
Operating instructions


Contact us at www.mantis.com
9
• Pull the plug of the charging unit if it is not in use.
• If the battery is not charging, check whether the electri-
cal socket provides current. If the charging of the batter-
ies nevertheless is not possible, give the battery charger
and the batteries to a service shop.
The batteries will self-discharge! Remove the
battery from the charge as soon as it is fully
charged.
General information on the battery: In the in-
terests of ensuring that the battery has a long
service life, pay attention to the following points:
• When the battery is at low voltage, the gardening tool
switches off automatically. In this case, the battery must
be charged.
• The lithium ion battery must be charged before long
breaks in use, e.g. before winter storage.
• When the battery is fully discharged, charging time is 5
hours.
• The lithium ion battery can be charged whatever its cur-
rent state of charge, and charging can be interrupted
at any time, without damaging the battery (there is no
memory effect).
Note: The battery is equipped with a deep-discharge pro-
tection feature: the tool is automatically switched off if the
battery is discharged. Recharge the battery immediately if
this should be the case.
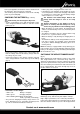
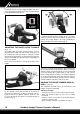
SWITCHING THE HEDGE TRIMMER ON/OFF
(g. 4)
When switching the hedge trimmer on take a safe stand.
This hedge trimmer has a two-hand safety switch. To
switch the hedge trimmer on the bar switch in the handle
(A) must be pushed and the rotary switch of the handle (B)
must be rotated by 45° backward. To switch the device off
let go of both switches. The motor already stops if one of
the two switches is released.
4
This hedge trimmer (8550) has an additional „Eco-switch“
feature (g. 5, D). This can vary the output in 2 steps.
High = higher performance, low = reduced performance.
In the low position it will increase the battery time to about
twice the duration, while the speed of the hedge trimmer
tion of your apparatus, the batteries have to be taken from
the apparatus, disposing of them separately.
You can drop off your old batteries to the local collecting
points of your municipality.
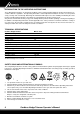
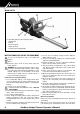
CHARGING THE BATTERIES (g. 2 and 3)
Caution! Only use the charger in dry areas.
• To take out the battery, press both push-buttons on the
sides designated with the number 1 and take out the
battery (g. 2).
2
• Connect the battery charger to the socket. Make sure
that the voltage stated on the battery charger matches
the voltage in your socket.
• Connect the battery to the charger using the jack plug
of the charger with the socket on the top of the battery
(g. 3).
3
• Information on the charger:
- LED is red: Battery is charging
- LED is green: Charging complete
- LED is ashing alternatively red and green:
Fault (e.g. battery overheating)
• The period of charging the battery ranges from 3 to 5
hours. During the process of charging, the battery heats
up. This is normal and it indicates no defect.