
Operating instructions


Cordless Hedge Trimmer Operatorʼs Manual
7
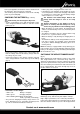
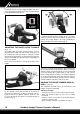
For more freedom of movement where contour trimming
is required the Swivel-Click™ handle can be set continu-
ously, too. Depress the red lock button (C) and keep it
pushed. The hedge trimmer can now comfortably be
turned in all directions while working (Fig. 8).
8
To increase safety when operating the Swivel-Click™ han-
dle, the trimmer drive shuts off in less that 0.1 seconds if
either the switch on the hand grip (A) or the red switch rail
on the turn handle (B) is released (Fig. 3). This ensures
that the hedge trimmer can only be operated if both hands
are on the hand grips and at the same time both switches
are actuated. This effectively eliminates the risk of injury,
combined with the extremely short run-on time.
HOLDING THE HEDGE TRIMMER WHEN IN
USE (g. 9 and 10)
This equipment will enable you to cut or trim bushes and
hedges easily and comfortably.
Trimming of hedges
- Young shoots are best cut in a side-to-side movement.
- Older and stronger hedges are best cut in a sawing
movement.
- Branches, which are too thick for the hedge trimmer,
should be cut with a saw.
- Sides of hedges should be cut upwards in a taper.
is lowered. You can use this setting for lighter work to in-
crease the battery life. On the back of the rear grab handle
is the appropriate switch (g. 5).
5
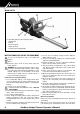
ADJUSTING THE SWIVEL-CLICK™ HANDLE
(g. 6 - 8)
To facilitate work, the hedge trimmer features 3 preset
pinlock positions (right, left, and normal). The purpose of
this mechanism is that especially for cutting in a vertical
direction the hedge trimmer can be held in their ergonomi-
cally most favourable position whereby an early fatigue of
the user is avoided.
Please proceed as follows to change the position of the
handle:
6
Release switch (A). Pull back the locking pin (C) (Fig.
6). The handle is now unlocked and can be turned to
the desired position (Fig. 6). Where consistent cuts are
required, three preset pinlock positions allow the user
to secure the handle and avoid an accidental change of
positions (Fig. 7).
10