
Installation & Assembly_2

Mantel Shelf Installation
Before installing your mantel shelf you should sand the entire shelf smooth before prefinishing.
The shelf should be prefinished before installation.
Tools & Materials Needed for Installation
Tape Measure 5/16” hex head driver
Pencil Phillips head screwdriver
Drill 120 grit sandpaper
Level
For non predrilled shelf tops:
1/16” drill bit
4 - #4 finish nails
Hammer
Nail Set
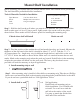
Step 1 - Hold the shelf on the wall where you want it to be installed. Set a level on top of the
shelf to make sure it is level. Using a pencil, lightly mark a line on the wall in the places
shown below. These marks will be reference points for installing the mounting strip.
1. Mark where shelf will install Marks on wall
Step 2 - Find the position of the studsin the wall and mark where they are located. Measure the
thickness of the top board of the shelf; it should be either 1/2” or 3/4”. Take the 1”x 1”x
48”(approximate size - length may vary for different length shelves) and hold it on the wall
1/2” or 3/4” below the marks as shown below. Make sure it is centered between the two end
marks. Mark on the mounting strip where the studs are located. Predrill holes in the mounting
stripfor the screwsthat will attach it to the wall studs. The heavy duty hex head screws
provided will work for masonry or drywall applications.
2. Install mounting strip to wall
Side View
Step 3 - After mounting strip is installed, slide shelf over mounting strip. Take the two Phillips
head screws and attach the shelf to the mounting strip through the predrilled holes in the shelf.
If you do not have a predrilled shelf see “Nail application” below.
Nail application:
Predrill and nail mounting strip to
finish installation. Use #4 finish nails
to install. Use a nail set to sink the
nail below the surface of the wood.
Use putty to match the finish of the
shelf and fill the nail holes.
✐
✐
✐
✐
wall
3. Install shelf to wall