
Installation & Assembly

12. Glue the next plank in the same row to the previously glued plank in the previous row. Apply adhesive to both the
length and width edges of the plank.
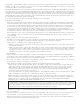
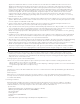
13. Continue to install wood flooring using this stair stepping method, as illustrated. Simply install each plank
according to the sequence of numbers shown.
14. At the end wall use a pry bar, if needed, to pull the ends of the planks tight. Continue laying the floor on top of
the underlayment, working right to left, laying plank after plank, row after row, tapping the planks together as you
go. Be sure to continue using 5/16 inch spacing wedges at all walls and obstructions throughout the installation.
15. Once the first sheet of underlayment is covered with wood flooring, install the second sheet. Butt the two edges
together and seal with tape.
16. After several runs of planks are down, lay perpendicular strips of Releasable “Blue” tape 12 inches apart to hold
the planks securely. Repeat this process as the installation progresses.
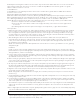
17. The last row will most likely require cutting to width but it should be no less than 1 1/2 inch wide. To do this, lay
the plank on top of, and edge to edge with, the plank in the next to the last row. Trace the wall contour on the
last plank using a scrap piece of plank and cut as required.
18. Install cut planks and pull into place with a pry bar. Install spacing wedges between planks and wall. Allow floor to
dry for a minimum of 12 hours before removing all spacing wedges and allowing foot traffic. Sweep the floor to
remove all dust and dirt, taking care not to scratch the finish.
19. Remove any glue residue using a white nylon pad dampened with mineral spirits. Follow up with Mannington
UltraClean spray cleanser.
Final Inspection
After the floor is cleaned, inspect the floor for nicks, scratches, and planks that may have moved during installation,
as well as any other imperfections that need attention. Touch up nicks and scratches with Mannington Wood Floors
touch-up products.
H. Moldings & Trim
Consideration for transitions should be made at any metal cased doorways, substrate changes, room to room
environment changes, complicated layouts and sub floor changes.
Molding Installation
Install Mannington wood moldings using traditional methods. Simply nail moldings into place with finishing nails.
Follow the instructions below for specific installation techniques on each molding. Consideration for transitions should
be made at substrate changes, room to room environment changes,complicated layouts and sub floor changes.
Quarter Round & Wall Base
Nail quarter round and wall base molding into the wall with finishing nails. Wall base and quarter round can either be
used separately or together, each achieving a different look and style. Do not fasten these moldings directly into the
flooring. They should be kept slightly off the floor as not to bind and jam the flooring.
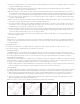
1. When installing quarter round and wall base it is important to miter all the corners as well as junctures. Drill small
holes for nailing in the molding to avoid wood splits and nail into the wall every 18 inches.
Finish Moldings
Use appropriate finish moldings or terminating profiles as transitions to door thresholds, steps, or other floor coverings.
T-molding, baby threshold, and reducer strip moldings can be glued or nailed to the subfloor using finishing nails.
2. When installing T-molding, baby threshold, or reducer strip, first drill small holes in the molding to avoid wood
splits. Using the drilled holes as your guide, hammer finishing nails directly into the subfloor every 18 inches.
3. Step nosing requires a unique installation method. Glue the wood flooring and step nosing directly to the stair
thread using Mannington UltraSpread Adhesive™.
Whatever option you choose foot traffic should limited for 24 hrs after installation.