
Installation & Assembly

Underlayment sheeting that combines a foam cushion layer and moisture barrier film all in one. It also has a built-in
edge sealing system when more than one sheet is needed. Use AquaBarrier™ II for below-grade or on-grade
subfloors where moisture is a concern.
ComfortBarrier™
ComfortBarrier™ is an underlayment foam cushion to be used for above-grade subfloors ONLY where subfloor
moisture is not a concern.
Mannington Whisper Underlayment Invented and Perfected by Mannington
Made from advanced vinyl foam construction, Mannington Whisper Underlayment stops footsteps in their tracks.
When installed properly, this new underlayment system “deadens” the sounds made on a Mannington Hardwood
Floor. Mannington Whisper can be installed over any level of subfloor and it is available in 300 sq ft rolls.
NOTE: While the floating method offers some advantages, there are some things of which you should be aware.
(1) The floor may have a hollow sound when walking on it.
(2) The wood rests on the subfloor with its own weight, which may cause the floor to have slight vertical
movement.
(3) A damaged plank cannot be replaced as simply as in a staple-down, or glue-down installation.
Job Preparation
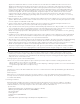
1. Undercut all wood door casings 1/16” higher than the thickness of the flooring and underlayment to be installed.
Place a scrap piece of plank and a sheet of underlayment against the door casing to act as a guide and cut the
door casing with a hand saw or power jamb saw set to the correct height. On a floating installation we strongly
recommend the use of transitions at all metal door casing. The floating floor must be allowed to float freely with a
minimum of 5/16” expansion space around all vertical surfaces.
2. After deciding the direction in which the planks will run, measure the width of the room (the dimension
perpendicular to the direction of the flooring). The last row of flooring should be no less than 1 1/2 inch wide. If it
is less, we recommend cutting the starter row narrower. This will require extra cutting but it will make the rest of
the installation easier and faster.
NOTE: It is extremely important to blend planks from several cartons to ensure a good balance of color, graining,
and plank length.
Installation
Install one sheet of the selected underlayment net along the starting wall. Unroll only one sheet at a time during
plank installation to prevent damaging the underlayment. If any part of the underlayment is punctured or damaged
during installation, seal the area with tape.
3. Position 5/16 inch spacing wedges around the entire work area. (Put two wedges together, face to face, and place
on edge against vertical surfaces.) This will help prevent squeaking and scratching on the adjacent walls due to the
up and down movement of the floor.
4. Before starting to glue planks, dry-lay the entire first two rows on top of the underlayment. Begin in the upper right
corner of the work area with the groove side of the planks facing the wall. Place spacing wedges along the walls on
both the ends and sides of all planks.
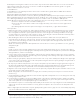
5. An easy way to mark the last plank in a row is to place the plank in position with the tongue against the tongue of
the previously laid plank and the end of the plank against the spacing wedge. Mark across the plank with a pencil
and cut along this line. Place cut plank with cut end toward wall and pull into place with a pry bar.
6. Begin the next row by using the leftover piece from the previously cut plank. Now lay the remainder of the second
row and tap into place with a tapping block.
NOTE: If any plank is shorter than 8 inches in length, do not install it; instead, cut a new piece to measure at least
8 inches long.
7. Cut the MegaGlue™ adhesive applicator nozzle at a 45° angle with a utility knife. Do not cut off any part of the cap
locking ring around the nozzle.
8. In a floating floor installation, the flooring is NOT nailed or glued to the underlayment, but is glued in the plank’s
groove only. Apply Mannington MegaGlue™ adhesive to the bottom of groove along the entire length and on the
end of each plank. Do not completely fill the groove with adhesive.
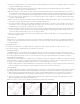
9. The installation sequence is critical and provides stability to the first two rows. Proper alignment is critical. Misaligned
starter rows can ruin the entire installation. To start, glue the first plank in the second row to the first plank in the
starter row.
10. Use a tapping block and a hammer to push glued planks together until no gaps are seen. Immediately wipe away
any excess adhesive with a clean damp cloth.
CAUTION: Never use a hammer or mallet directly on the flooring.
11. Glue the next plank to the first plank in the previous row. Apply adhesive only to the width end of the plank.
Tap the planks together carefully with a tapping block and hammer. Remember to continually remove adhesive
squeezed up between the joints with a clean, damp cloth.