
Installation & Assembly

applications. Maximum subfloor moisture should never exceed 14%. As a added alternative we have found
applying a small bead of mega glue to the bottom of the groove as a benefit to help eliminate squeaking or
gapping. This is strongly recommended for wider and longer plank format (random lengths that exceed 6 ft.)
Please refer to the Alternative Fastenting Methods document at www.mannington.com/residential/hardwood/
installation.aspx. When using this new method, you may choose to staple or nail down the hardwood, as either
method is acceptable. The use of the Mega Glue, along with a staple or cleat, reduces the movement of the
material as the sub floor deflects. This creates a much more uniform bond on the floor, and gives increased
stability to the hardwood. By applying the Mega Glue to the bottom of the groove, there is little to no clean up
that will have to be done.
2. Before installation, do a calculation to determine the width of the last row of planks. If it is less than 11/2 inch wide,
split the difference between the starter row and the last row. In any case, you will most likely be required to cut the
last row of planks to width with a table saw.
3. Select a starter wall. An outside wall is best because it’s most likely to be straight and square with the room.
Measure out from this wall, at each end, the width of the plank plus 1/4 inch.
4. Snap a chalk line from these points, parallel to that wall and perpendicular to the adjacent walls. Since most walls
are not straight, the edge of some planks may have to be trimmed along the wall or cut to fit. It is not necessary to
leave an expansion space for Mannington 9/16 inch, 1/2 inch, and 3/8 inch thick wood floors.
NOTE: It is extremely important to blend planks from several cartons to ensure a good balance of color, graining,
and plank length.
5. Install the first row of planks by laying the tongue edges on the chalk line. Proper alignment is critical. Misaligned
starter rows can ruin the entire installation. Drill pilot holes through the face of each plank (in darker grain) and
secure to subfloor with finishing nails or use a pneumatic brad tacker.
6. After the first row is complete, adjacent rows should also be predrilled in the nail pocket and secured with finishing
nails set at 45°. Rows of flooring will need to be installed in this manner until flooring planks are a sufficient
distance away from the wall to accommodate the stapler. Stapling schedule is every 6 inches to 8 inches on center.
NOTE: Proper alignment of planks is critical. Misaligned starter rows can ruin the entire installation.
7. The precise engineering of our UltraFit tongue - and - groove system delivers a very stable floor. But you MUST
make a good connection. Use a tapping block to tap the planks until the tongue and groove “snaps” into place.
CAUTION: Never use a rubber mallet to tap planks, since this can mark or damage the flooring.
8. Using the Mannington Spotnails Floor Monster stapler, with the proper adapter attached (see stapler set-up
instructions), continue to staple new planks every 6 inches to 8 inches in center, fastening the ends of the planks
approximately 2 inches from each end. NOTE: Avoid clustering end joints and stagger random lengths so that the
end joints are no closer than 6 inches.
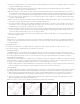
9. Using a pry bar, position the final filler planks.
10. Face nail or tack each final plank into place with the pneumatic stapler. Install the molding and retain a few
leftover planks in case a repair is ever required.
NOTE: Use of any other nailers or staplers may result in dimpling or damage to planks. Do not use manual nailers
on any Mannington Wood Floors maple flooring.
Cleanup
Sweep floor to remove all dust and dirt. Take care not to scratch the finish. Follow up with Mannington UltraClean™
spray cleanser.
Final Inspection
After the floor is cleaned, inspect the floor for nicks, scratches, or any other imperfections that need attention.
Touch up nicks and scratches with Mannington Wood Floors touch-up products. The newly installed floor can accept
foot traffic immediately.
G. Floating Installation
Most Mannington hardwoods may be installed using the floating method over numerous subfloors, including
concrete, plywood, underlayment-grade composition board, ceramic tile, reinforced vinyl tile, sheet vinyl and
radiant-heated floors. The only exception to this rule is 3/4 inch thick solid hardwood.
Special Tools
• Appropriate Mannington underlayment (see below for details)
• Mannington MegaGlue™ adhesive* (SKU #600021)
• Spacing wedges
• Safety glasses
• Tapping block (SKU #801926)
• Pry bar
• Releasable blue tape Mannington Underlayments AquaBarrier™ II