
Installation & Assembly

For further information regarding Mannington products, visit www.mannington.com or call our customer care team at 800-356-6787.
Copyright © 2018 Mannington or its affiliates. All rights reserved.
4
ADURA
®
Flex
Installation Guidelines
Maintain the squareness of the installation by keeping tiles along
guide lines. Lay all tiles in the same direction, all directional arrows
pointing in the same direction. Insure that the tiles are firmly
bonded to the subfloor by rolling the entire installation with a
minimum of 100-pound three-section floor roller.
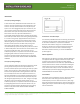
Plank Installation
After the MT-711 adhesive has had sufficient open time, begin laying
planks along the designated starting line. Note: If planks have
directional arrows on the back they should be installed with arrows
facing in one direction. Working back to the starting wall, plank ends
should be staggered in a random manner in order to avoid clustering
the end joints. Varying the length of the starting plank can assure
sufficient stagger of end joints. End joints should be staggered by at
least 6”. Always use factory-cut ends for end joints. Pay particular
attention to the randomness of the plank layout; avoid establishing
a repeating pattern. Continue installing the planks in a random
fashion and complete each area before beginning the next – see
Figure 2A. If required, use a kneeling board to avoid walking on
freshly installed planks. Insure that the planks are firmly bonded to
the subfloor by rolling the entire installation with a minimum of 100-
pound three-section floor roller.
Cutting or Fitting Border Tiles and Planks
ADURA®Flex can be cut with a large tile cutter or by using the score
and snap technique. Direct or pattern scribe the flooring to fit into
complicated, irregular walls or pipes, etc.
Grouting ADURA®Flex Tile
Certain ADURA®Flex tile patterns lend themselves to the design
option of applying a specially produced acrylic grout between the
tiles. Specific installation procedures must be followed when
installing and grouting ADURA®Flex.
• Required tools:
o Good quality rubber grouting float
o Plastic spacers
o Grouting sponge
o Water buckets
o >Spacers
• Procedure
The desired grout width must be determined before tile layout
begins. It’s critical to include grout width measurement to tile size
to insure a balanced layout. Grout width should be at least 1/16”
wide and no more than 1/4” wide. Commercially available hard-
plastic, ceramic tile spacers may be used to maintain equal grout
joint width. Tiles may be grouted immediately after installation.
Insure that the tiles are firmly bonded to the subfloor by re-rolling
the entire installation with a minimum of 100-pound three-
section floor roller just prior to grouting. Be certain to remove
spacers and clean any debris from grout joints. Only ADURA Grout
may be used with ADURA tiles. This pre-mixed grout has been
developed to bond to tiles and is flexible and durable. Never use
cement-based, epoxy or furan grout. Lightly wipe joints with a
dampened sponge. Apply the grout into the tile joints with the
narrow edge of the rubber float. Firmly pack each tile joint in each
direction as to leave no voids or skips. As each tile joint is grouted,
remove excess grout from tile edges with the stiff edge of the
float pulled in a 45º angle across each joint. Grout only in small
increments and clean each section as you go. Never apply grout in
an area greater than 12 square feet before cleaning. Do not wait
more than 8 min before starting clean up. To clean, soak sponge
in cold clean water. Wring out excess water completely. Use small
circular motions to break up grout on the tile and smooth out
joint. Soak and wring out sponge clean again. Wipe tiles clean by
drawing the sponge diagonally across the tile, flip sponge over
and repeat. Avoid excess water in the grout joint. Repeat
procedure as necessary. When cleaned properly the grout haze
will be minimal and can be removed easily with neutral household
cleaner. Once again, do not use excessive water during clean up.
Be certain to wipe diagonally across tile joints to avoid dragging
grout from the joint. Rinse this sponge frequently and change the