
Installation & Assembly

For further information regarding Mannington products, visit www.mannington.com or call our customer care team at 800-356-6787.
Copyright © 2018 Mannington or its affiliates. All rights reserved.
3
ADURA
®
Flex
Installation Guidelines
INSTALLATION
Tile Layout (including Rectangle)
As with all tile formats, ADURA®Flex should be “balanced” in the
work area. Tiles may be laid squarely or laid out diagonally in the
work area. Tiles may also be installed in a normal point to point
layout or in an ashlar (staggered, brick) layout. In either case, the
room must be accurately measured to square off the area and to
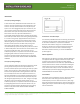
determine the center point. Accurately measure the room to
determine the center line, adjust this established line to
accommodate a balanced layout and then transpose this line to the
determined layout width away from the starting wall (approximately
2’ to 3’ wide - see Figure 1A). Apply the adhesive in this area and
begin installing tiles. Careful and precise measurements must be
taken during tile layout. Lay all tiles in the same direction, with all
directional arrows imprinted on the back of tiles pointing in the
same direction (except Tempo). For the pattern Tempo it is
recommended that you quarter turn (90º) every other tile to achieve
a checker board pattern. Please note that the “checker board” visual
will create a variable gloss effect. This is intentional. From an
installation perspective, it is important to notice that the tiles will be
packaged together and that to achieve the realistic visual, it is
important to install this collection by blending cartons and paying
attention to the pattern details. DO NOT CLUSTER THE SAME TILES
TOGETHER.
Tile Layout (including Rectangle)
It is also important to balance the layout of the plank format. Proper
planning and layout will prevent narrow plank widths at wall
junctures. Determine layout to prevent having less than 1/2 of plank
width or very short pieces. As with all plank products, lay the long
dimension of the plank parallel to the long dimension of the work
area. Accurately measure the room to determine the center line,
adjust this established line to accommodate a balanced layout and
then transpose this line to the determined layout width away from
the starting wall (approximately 2’ to 3’ wide - see Figure 1A). Apply
the adhesive in this area and begin installing planks. From an
installation perspective, it is important to notice that the planks will
be packaged together and that to achieve the realistic visual, it is
important to install this collection by blending cartons and paying
attention to the pattern details. DO NOT CLUSTER THE SAME
PLANKS TOGETHER.
Combinations –Tile & Plank Layout
The modularity of ADURA®Flex allows for interesting and decorative
combinations of tiles and planks. When determining proper layout
for this custom installation, it is important to consider the
dimensions of the modular “design unit” and then balance the
design unit in the work area. Careful and precise measurements
must be taken to ensure success with a combination design.
Note: Due to thickness variations, you cannot mix ADURA®Flex
products together.
Adhesive Application
Mannington MT-711 adhesive is required for adhering ADURA®Flex
to all approved substrates. Apply the adhesive with a 1/16” wide,
1/16” deep, and 1/16” apart-notched trowel. Begin applying
adhesive at the intersection of the chalk lines; spread the adhesive
in the pre-determined area. The MT-711 adhesive should be given
sufficient open time so that the trowel ridges appear “cloudy” or
“hazy” and the trowel “valleys” are clear. The adhesive must be
sufficiently tacky to prevent tile slippage during placement. DO NOT
ALLOW ADHESIVE TO GO TOTALLY CLEAR.
Tile Installation
After the MT-711 has had sufficient open time, begin laying the tile
at the intersection of the working lines. Be certain this tile is
installed squarely on the lines. After the first tile is in place, begin
laying tiles outward along both guide lines. Press tiles firmly against
adjoining tiles and press into the adhesive. Begin stair-stepping the
tiles into the field area.