
Troubleshooting guide


Installation and Service Manual
21
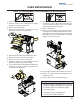
1. Disconnect electrical power to the unit.
2. Remove thumb screws holding plastic splash
guards and stainless splash panel.
3. Remove grid and drainpan.
4. Release the plastic latches on the back of either
side of the lid assembly. (see Detail A)
USER MAINTENANCE
HOW TO DISASSEMBLE FOR CLEANING OR MAINTENANCE
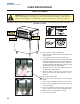
5. Slide the lid assembly forward and lift to remove.
6. Remove the plastic side panel assemblies.
7. Remove all ice from the ice storage bin.
8. Rotate the agitator arm so the paddle wheel pin
handle is pointing up, toward the ceiling.
9. Loosen the hand-removable paddle wheel pin from
the agitator by twisting counter clockwise until it
snaps from the agitator bar.
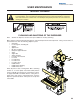
10. Then remove the paddle wheel pin from the hole in
the agitator. Push the agitator bar toward the back
of the unit until the agitator is free of the paddle
wheel hub and remove the agitator.
11. Remove the bin liner.
12. Remove horizontal tower cover brace then remove
the auger motor assembly by pulling the 7 pins hold-
ing it in place, disconnecting the 2 sets of insulated
quick slides to the motor, and lifting the assembly
straight up and out of the unit.
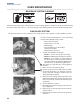
13. Lift the auger and auger tube up and out of the unit.
14. Remove the auger transition by pulling the 2 pins
holding it in place.
15. Remove the ice chute assembly and spout.
CLEANING CHECKLIST
• Check CO
2
supply. If CO
2
supply is low, an arrow on
the primary regulator gauge will point to a shaded area
that reads “Low CO
2
” or “Change CO
2
Cylinder.”
• Check syrup supply.
• Clean drain pan, grid, and splash panel.
• Clean the valve nozzles and diffusers.