
Specifications


194 Part Number 80-1230-9 6/08
DIAGNOSING START COMPONENTS
If the compressor attempts to start, or hums and trips the
overload protector, check the start components before
replacing the compressor.
Capacitor
Visual evidence of capacitor failure can include a bulged
terminal end or a ruptured membrane. Do not assume a
capacitor is good if no visual evidence is present. A good test
is to install a known good substitute capacitor. Use a
capacitor tester when checking a suspect capacitor. Clip the
bleed resistor off the capacitor terminals before testing.
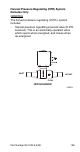
Relay
The relay has a set of contacts that connect and disconnect
the start capacitor from the compressor start winding. The
contacts on the relay are normally closed (start capacitor in
series with the start winding). The relay senses the voltage
generated by the start winding and opens the contacts as the
compressor motor starts. The contacts remain open until the
compressor is de-energized.
Relay Operation Check
1. Disconnect wires from relay terminals.
2. Verify the contacts are closed.
Measure the resistance between terminals 1 and 2. No
continuity indicates open contacts. Replace the relay.
3. Check the relay coil.
Measure the resistance between terminals 2 and 5. No
resistance indicates an open coil. Replace the relay.
4. Move toggle switch to the ICE position.
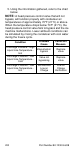
5. The compressor start winding should energize for less
than 1 second. Continued high amperage draw could
indicate:
• Low incoming power supply.
(Check voltage at compressor start-up when load is
greatest.)
• Defective relay.
• Defective capacitor.
• Defective compressor.
6. Verify voltage and replace all start components.
7. If all of the previous tests are satisfactory and the
compressor will not operate or continue to operate,
replace the compressor.
!
Warning
Disconnect electrical power to the ice machine
before proceeding.