
Specifications


Multiplex Company, Inc.
Component Parts Workbook
51
00218011 Revision B (KAK) 31 July, 2000
Part No. Description
00210693 4-Selection Portion Control for Wilshire Valves
00210694 4-Selection Portion Control with Soda for Wilshire Valves
00210695 4-Selection Portion Control with Water for Wilshire Valves
00210697 4-Selection Portion Control for Lancer Valves
Sitco 4-Selection Portion Control Timers
Adjusting portion control for
size of drinks dispensed
1. Simultaneously press and hold S (SMALL)
and X (EXTRA LARGE) push button switches
on Coded Autoset Portion Control Module un-
til LED light in center of module starts blink-
ing, then release switches. Blinking LED indi-
cates set mode is active.
2. Put desired amount of ice in cup, place cup
under valve and push selected size button
(small, medium, large, or extra large). Hold
button in until cup fills to desired portion then
release button. Wait for foam to settle then
actuate button again to top off. Repeat the
above procedure for remaining sizes.
3. After programming all drink sizes, press and
release CANCEL/POUR switch to return the
Coded Autoset Portion Control to the opera-
tional mode. Blinking LED light will go out.
Note: If top-off is not desired or required,
the following steps must be followed:
a. Follow step 1 above.
b. Put desired amount of ice in cup, place
cup under valve and push selected size
button (small, medium, large, or extra
large). Hold button in until cup fills to de-
sired portion then release button.
Note: After actuating the last selected size but-
ton, momentarily actuate one of the other size
buttons. This will signal the microprocessor that
all selected sizes are completed. Failure to do
this will signal an incomplete response back to
the microprocessor and the last selected size will
revert back to its previous program.
If, at a future date, it is decided to change
portion size of the drinks or omit or add the top
off feature, the individual sizes can be adjusted
by the above procedure. It is not necessary to
reprogram every size.
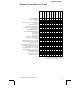
Stop/FlowSoda/Water
Small Medium Large X-Large
Cancel/pour
1. Push and release to cancel or stop valve dis-
pensing.
2. Push and hold for continuous pour.
The portion control has a full memory retention
when programming and in case of power failure.
Installation
1. Remove the front cover from the valve.
2. Remove the rear cover by loosening the screw
at the front top portion of the rear cover and
then lift up on the rear cover.
3. Disconnect the valve 24 volt AC electrical con-
nection (white plug) from the dispensing valve
connector.
4. Remove the entire valve wiring harness from
the dispensing valve (valve lever and micro
switch can be removed, if desired).
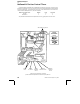
5. Attach the portion control wiring as shown in
Figures 1 or 2.
6. Connect the 24 VAC connector from the por-
tion control to the connector on the dispenser.
7. Place the rear cover on the valve and tighten
the screw at the front of the rear cover.
8. Place the coded auto set portion control front
cover on the front of the rear cover. Snap the
front cover into the rear cover at the bottom
of the front cover.