
User Manual
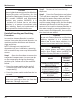
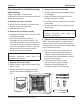
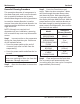
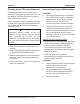
Table Of Contents

Part Number 000014141 Rev 07 2/20 47
Section 4 Maintenance
Parts Removal for Detailed Descaling
and Sanitizing
Single evaporator is shown; Each
evaporator will have a distribution tube and
water curtain/damper.
A. Remove the water curtain(s)
• Gently flex the curtain in the center and
remove it from the right side.
• Slide the left pin out.
B. Remove the ice thickness probe
• Compress the hinge pin on the top of the
ice thickness probe.
• Pivot the ice thickness probe to
disengage one pin then the other. The
ice thickness probe can be descaled and
sanitized at this point without complete
removal. If complete removal is desired,
disconnect the ice thickness control
wiring from the control board.
Notice
Electrical connector must never be
exposed to any liquids.
C. Remove the water trough
• Depress tabs on right and left side of the
water trough.
• Allow front of water trough to drop as
you pull forward to disengage the rear
pins.
D. Remove the water level probe
• Pull the water level probe straight down
to disengage.
• Lower the water level probe until the
wiring connector is visible.
• Disconnect the wire lead from the water
level probe.
• Remove the water level probe from the
ice machine.
Notice
Electrical connector must never be
exposed to any liquids.
E. Remove the water distribution tube(s)
NOTE: Thumbscrews for the distribution
tube are retained to prevent loss. Loosen
thumbscrews, but do not pull thumbscrews
out of distribution tube.
• Loosen the two outer screws (do not
remove screws completely because
they are retained to prevent loss) and
pull forward on the distribution tube to
release from slip joint.
• Disassemble distribution tube
by loosening the two (2) middle
thumbscrews and dividing the
distribution tube into two pieces.
A
E
D
C
B