GET STARTED For assistance, call us on 020 8450 0005 or visit manhattan-tv.com/support For assistance, call us on 020 8450 0005 or visit manhattan-tv.com/help Check Freeview HD coverage in your area by visiting freeview.co.uk Check Freeview HD coverage in your area by visiting freeview.co.
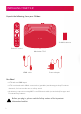
INSTALLING YOUR T3•R Unpack the following from your Giftbox: 2x AAA batteries Remote control Manhattan T3•R HDMI cable Power adapter You Need • A TV with an HDMI input. • A TV aerial and cable. While some indoor (portable) aerials may pick up Freeview channels, for best results use a rooftop aerial. • An internet connection using Wi-Fi or an Ethernet cable (not included) for apps and Freeview Play features. Before you plug in, please read the Safety section of the Important Information booklet.
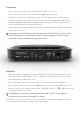
Connect Up • Connect the aerial cable from your aerial wall socket to your T3•R. • Next, connect the T3•R to your TV using the HDMI cable provided. • An internet connection is required for apps, Freeview Play features and to receive software updates over the internet. Wi-Fi can be selected during initial setup but for high-bandwidth 4K content we recommend you connect your T3•R to your internet router using an Ethernet cable (not included).
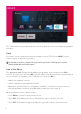
BASICS The T3•R makes it easy to watch and record TV as well as access on demand programmes and apps. Home The Home screen shows all the menus and apps on your T3•R. Press HOME on your remote control at any time to go there. An internet connection is required for apps, catch-up from the TV Guide and to use the Featured, Watchlist and Search menus. How to Use Menus The directional pad changes the highlighted programme, app or button. Press OK to select it.
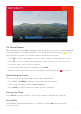
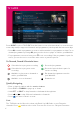
WATCHING TV The Channel Browser While watching TV, press OK to display the Channel Browser, then use the directional pad to browse what’s on. Favourite channels can be quickly browsed by pressing to cycle through them. See page 17 for details of how to add and remove them. • Press OK to watch a programme on now or add a reminder for a programme on later. ® • Press to set a recording. If the programme is part of a series, you can choose to record the entire series or just the episode.
TV GUIDE Press GUIDE or select ‘TV GUIDE’ from the Home screen to browse what’s on over the next seven days and (for supported channels and programmes) catch up with the last seven days: • Press OK to watch a programme on now or add a reminder for a programme on later. For on demand programmes pressing OK gives you the choice to play it or add it to your Watchlist. • For programmes on now or later, press to set a recording.
PROGRAMME INFO Press INFO when watching TV to display detailed information about the programme you’re watching. You can also press INFO to view detailed information for a programme whenever you see next to its name or description.
LIVE PAUSE The T3•R is always recording the channel you’re watching and will store (‘buffer’) up to the last 2 hours. When you change channel, what had previously been recorded is cleared and recording starts again. There are many ways to take advantage of Live Pause: • Press PAUSE when you need to get the door, make a cup of tea, etc. • Press LEFT to instantly skip back 10 seconds; helpful if you’ve missed some dialogue or want to replay a great moment. • Press to seek backwards to a specific point.
RECORDINGS Press RECORDINGS or select ‘RECORDINGS’ from the Home screen to display a list of all your recordings. Use UP/DOWN to browse the list and LEFT/RIGHT to select a section: • • • • • SCHEDULE – Your planned recordings and reminders SERIES – Recordings that are part of a series MOVIES – Movies that have been recorded KEPT – Recordings you have chosen to keep TRASH – Recordings you have deleted but can still be recovered To play a recording or open a series folder, press OK.
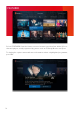
FEATURED Select ‘FEATURED’ from the Home screen to browse top picks from all the UK’s on demand players, neatly organised by genres such as Comedy, Movies and Sport. To display the options menu with more information about a highlighted programme, press OK.
SEARCH Press SEARCH or select ‘SEARCH’ from the Home screen to find programmes from all the UK’s on demand players. Use the on-screen keyboard to enter a programme’s name and as you type the T3•R will suggest what you’re looking for. Select a suggestion or your search term to display the results. To display the options menu with more information about a highlighted programme, press OK.
WATCHLIST Programmes available on demand can be saved to your Watchlist to watch later (see page 4, ‘How to Use Menus’). Programmes can be watched at any time until they expire – this varies from programme to programme and is shown when a programme is highlighted. To browse your Watchlist, select ‘WATCHLIST’ from the Home screen. Programmes on your Watchlist can be sorted by how recently you added them, alphabetically or by expiry. You can also see which programmes have expired within the last 14 days.
REMINDERS When an upcoming programme is highlighted in the TV Guide or the Channel Browser, press OK to add a reminder. To cancel it, press OK again. Reminders are displayed just before a programme is scheduled to start.
SETTINGS You can view and change your T3•R’s settings by pressing HOME and selecting the button located at the top right of the screen. Picture & Sound Resolution The T3•R supports resolutions up to 4K ‘Ultra HD’ (3840 x 2160 pixels or 2160p), which is four times the resolution of ‘Full HD’ (1920 x 1080 pixels or 1080p). When ‘Resolution’ is set to its default of ‘Auto’, the T3•R detects your TV’s capabilities and sets the optimum resolution.
HDR High Dynamic Range (HDR) enables content to be produced, transmitted and displayed with dramatically improved contrast and a much wider range of colours than previously. The T3•R supports two different HDR standards called HDR10 and HLG. When ‘HDR’ is set to its default of ‘Auto’, the T3•R reads the EDID identification data from your TV over HDMI to determine whether it supports them.
SETTINGS (CONT’D) when possible and 2.0 PCM when not. ‘Auto’ uses the EDID identification data from the TV or device the T3•R is connected to by HDMI to automatically choose ‘Surround’ or ‘Stereo PCM’. This normally works well but there can be issues when there are multiple devices in the chain or they don’t identify their capabilities correctly. When using Surround with a device that supports Dolby Digital the volume of HD channels cannot be adjusted on the T3•R.
instead choose to add padding to the start and end of all recordings. By default playback of recordings made with padding will start from the broadcaster’s signalled start but you can change this to the recorded start. Parental Controls Requires your PIN to play recordings before 9pm that are unsuitable for viewing pre-watershed. Format Hard Drive Wipes the Hard Drive and erases all recorded programmes. Requires your PIN. Channels Edit Favourites Add or remove channels on your favourites list.
SETTINGS (CONT’D) Internet The T3•R supports both wired (Ethernet) and Wi-Fi connections and automatically prioritises a wired connection. In this section you can connect to a Wi-Fi network, forget a Wi-Fi network, disable the Wi-Fi interface, configure your network settings and clear your browsing data. System Standby Options → Auto Standby The T3•R will automatically go into standby if no buttons are pressed for 3 hours. The length of Auto Standby can be changed or it can be disabled altogether.
Reminder Auto Watch See page 13. Software Updates The T3•R automatically checks for an update each night using its internet connection and installs one if it’s available. Turn ‘Automatic Updates’ off to disable this. To check for an update straight away, select ‘Check for Update Now’. If you can’t connect your T3•R to the internet, updates can be installed using a USB stick by following the instructions on our website.
YOUR REMOTE Standby on/off Show the Recordings menu Swap to the last channel viewed Pause live TV/playback Show the Settings menu Rewind Skip back 24 hours in Guide Fast Forward Skip forward 24 hours in Guide Stop playback or live pause Set recordings & display record options Show the TV Guide Select options & perform on-screen actions Show Channel Browser when watching TV Back to previous menu or to watching TV Volume up/down Show the Home screen Mute Show detailed programme info Navigate menus S
CONTROL YOUR TV Your T3•R remote can be programmed to control the following functions on your TV: • • • • Standby AV (input selection). On most TV remotes this is labelled ‘AV’, ‘SOURCE’, ‘INPUT’ or Volume Up/Down Mute . IMPORTANT • Please turn the volume up on your T3•R to maximum before you continue. If you do not, the volume from your T3•R will always be lower than it should be. • Some TV’s use non-standard remote signals and may not be supported.
TROUBLESHOOTING PROBLEM There’s no picture or sound and the T3•R’s menus can’t be seen POSSIBLE CAUSE WHAT TO DO The HDMI cable may be disconnected. Check the HDMI connections between the T3•R and your TV. The input the Manhattan T3•R is connected to may not be selected on your TV. Select the correct HDMI input (see your TV’s manual for guidance). Your TV may not correctly communicate the resolutions it is capable of and an incompatible resolution may be selected.
PROBLEM POSSIBLE CAUSE WHAT TO DO Video in apps buffers, stutters or stops altogether Your broadband is not fast enough. A minimum speed of 3Mbps is recommended for internet video. Even if you have a faster connection, e.g. 16Mbps, other devices may be using it at the same time and reducing the speed available to the T3•R. Check your broadband speed with your internet provider and try running an online speedtest on a computer or mobile device.
For assistance, call us on 020 8450 0005 or visit manhattan-tv.com/support Check Freeview HD coverage in your area by visiting freeview.co.uk The details in this guide are correct at the time of going to print and are for guidance only. Product features outlined are subject to change at any time without notice. © 2021 Manhattan TV Limited. Manhattan is a registered trademark of Manhattan TV Limited; registered company no. 2247629. The FREEVIEW words and logos are trade marks of DTV Services Ltd.