LONG RANGE CCD barcode scanner user manual 460873 MAN-460873-UM-0110-01
Content Introduction............................................................................ 1 1.1 General ................................................................... 1 1.2 EMI certificated ....................................................... 1 1.3 Legislation and WEEE symbol ................................ 1 1.4 Pin Assignment ....................................................... 2 How to Configure................................................................... 3 2.1 Flow Chart ......
Content 4.9 Matrix 25 ............................................................... 28 4.10 CODABAR/NW7 ................................................. 29 4.11 Code 93 ............................................................... 32 4.12 Code 11 ............................................................... 33 4.13 MSI/PLESSEY Code ........................................... 35 4.14 Code 2 of 6.......................................................... 37 4.15 Telepen.................................
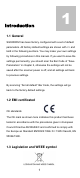
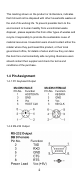
1 Introduction 1.1 General SG300RFM has been factory configured with a set of default parameters. All factory default settings are shown with <> and bold in the following sections. You may make your own settings by following procedures in this manual. If you want to save the settings permanently, you should scan the Bar Code of “Save Parameters” in chapter 2, otherwise the settings will not be saved after the scanner power is off, and all settings will back to previous settings.
This marking shown on the product or its literature, indicates that it should not be disposed with other households wastes at the end of its working life. To prevent possible harm to the environment or human healthy from uncontrolled waste disposal , please separate this from other types of wastes and recycle it responsibly to promote the sustainable reuse of material resources.
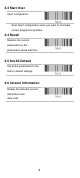
How to Configure 2 2.1 Flow Chart Start Configuration Recall Parameters Set All Defaults Bar Codes Parameters About Configuration End Configuration Save Parameters 2.2 General Process Step1 Power on the scanner and cradle Step2 Scan Start of configuration Step3 Scan the barcodes for the desired features before scan End. Step4 Scan End of configuration Step5 Save The settings will be saved permanently.
2.3 Start Over Abort configuration Scan Abort configuration when you want to terminate current programming status. 2.4 Recall Replace the current parameters by the parameters saved last time. 2.5 Set All Default Set all the parameters to the factory default settings. 2.6 Version Information Display the decoder version information and date code.
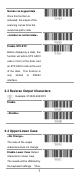
3 Operation 3.1 Beeper Option Medium Low Off 3.2 Output Characters This function is related to the software of the host. The output results will be affected by the software. None Data are displayed continuously The cursor moves to the left once data are displayed, and it will move to the next line when the next data is ready to be displayed.
Enable CR Suffix – The scanner transmits a carriage return after each scan. The cursor moves to the left once data are displayed. Enable LF Suffix – The scanner transmits a line feed after each scan. The cursor moves to the next line once data are displayed. Enable Space Once data are displayed, the cursor will skip a space to get ready for the next data. Enable Tab(HT) Once data are displayed, the cursor will skip a tab to get ready for the next data.
Number as keypad data Once this function is activated, the output of the scanning comes from the numerical pad’s code. Enable STX-ETX Before displaying a data, this function will add a STX ASCII code in front of the data, and an ETX ASCII code at the end of the data. only This function is limited to RS232 interface. 3.3 Reverse Output Characters Example: 012345Æ543210 Enable 3.4 Upper/Lower Case The case of the output characters does not change.
please lock the keyboard before testing the scanner. Enable Upper Case Output characters in upper case. The results will be affected by the keyboard settings. Thus, please lock the keyboard before testing the scanner. Enable CapsLock Detection Disable CapsLock Detection 3.5 Interscan Code Delay Delay the characters output time.
200 msec 300 msec 9
4 Code Type 4.1 Code Selection If “Enable” is selected for all the barcode types, then the scanner could read all types of barcode. If “Disable” is selected for a certain barcode type, then the scanner could not read the particular barcode. >” means default settings.
Disable EAN-8 / JAN-8 Disable CODE 39 Disable CODE 128 Disable CODABAR/NW7 Disable Interleave 25 Enable Industrial 25 Enable Matrix 25 11
Enable CODE 93 Enable CODE 11 Enable China Postage Enable MSI/PLESSE Enable CODE 2 OF 6 Enable Telepen LCD25 12
RSS-14 RSS Limited RSS Expanded 13
4.2 Bar Code ID With this function on, a leading character will be added to the output string while scanning code; user may refer to the following table to know what kind of barcode is being scanned.
4.3 User Define Code ID User define code ID will override default value.
CODE 93 CODE 11 China Postage MSI/PLESSEY Code 2 of 6 Telepen LCD25 Reserved 5 Reserved 6 RSS-14 RSS Limited RSS Expanded 16
4.4 UPC/EAN/JAN > Reading Type Enable UPC-A= EAN 13 add 0 before UPC-A to make it 13 digits. Enable ISBN-10 =Disable ISBN-13 =Enable ISBN-13 If you need to use ISBN-13, Please turn on EAN 13 Check Digit Transmission Function as well.
Enable GTIN format > Supplemental Setup Enable 2 Digit Supplemental Enable 5 Digit Supplemental Enable 2 & 5 Digit Supplemental > Check Digit Transmission If “Check Digit” is selected, the scanner will transmit the check digit. If “Disable” is selected, the scanner will not transmit the check digit.
< EAN-8 Check Digit Transmission> Disable EAN-8 Check Digit Transmission < EAN-13 Check Digit Transmission> Disable EAN-13 Check Digit Transmission < ISSN Check Digit Transmission> Disable ISSN Check Digit Transmission 4.
Calculate Check Digit and Transmit Calculate Check Digit and Not Transmit > Output Start / Stop Character Enable Start/Stop Character > Decode Asterisk Enable Decode Asterisk The scanner will decode the “*” symbol in code 39. The scanner will not decode the “*” symbol in code 39. > Setup Code Length 1. Scan the “Set Begin” Bar Code (2 Sets Available) 2.
same as the barcode’s length. There is no limit in length for the reading output. Fix Length (2 sets Available) 1 1 Set Begin 2 Decimal Value 3 1 Set Complete 1 2 2 Decimal Value 3 2 st Appendix A st nd nd Set Begin Appendix A Set Complete Minimum Length 1 Minimum Length Set a minimum length for codes. If the length of a code is shorter than the minimum length, then the scanner will not output the data.
4.6 Code 128 > Check Digit Transmission Do Not Calculate Check Digit Calculate Check Digit and Transmit > Append FNC2 “FNC2” is a multi codes-connection function for Code 128. Sometimes a Code 128 is divided into two barcodes for large amount of data. Enable FNC2 “ON” means after reading a code 128 barcode with FNC2, you must read the next Code 128 barcode with FNC2 in order to have a complete code output.
< Variable> The output would be the same as the barcode’s length. There is no limit in length for the reading output. Fix Length (2 sets Available) 1 1st Set Begin 2 Decimal Value 3 1 Set Complete 1 2 2 Decimal Value 3 2 Appendix A st nd nd Set Begin Appendix A Set Complete Minimum Length 1 Minimum Length Set a minimum length for codes. If the length of a code is shorter than the minimum length, then the scanner will not output the data.
3 Minimum Length Complete 4.7 Interleave 25 > Check Digit Transmission Calculate Check Digit and Transmit Calculate Check Digit and Not Transmit > Setup Number of Character “Even” means the Interleave 25 code will be output in even numbers. Set up Digit Number as Odd “Odd” means odd numbers.
> Brazilian Banking Code Enable Brazilian Banking Code > Setup Code Length 1. Scan the “Set Begin” Bar Code (2 Sets Available) 2. Go to Decimal Value Table in Appendix A, scan Bar Code(s) that represents the code length 3. Scan the “Complete” Bar Code Repeat Steps 1-3 to set additional lengths < Variable> The output would be the same as the barcode’s length. There is no limit in length for the reading output.
Minimum Length 1 Minimum Length Set a minimum length for codes. If the length of a code is shorter than the minimum length, then the scanner will not output the data. 2 Appendix A 3 Minimum Length Complete 4.8 Industrial 25 > Check Digit Transmission Calculate Check Digit and Transmit Calculate Check Digit and Not Transmit > Setup Code Length 1. Scan the “Set Begin” Bar Code (2 Sets Available) 2.
There is no limit in length for the reading output. Fix Length (2 Sets Available) 1 1st Set Begin 2 Decimal Value 3 1 Set Complete 1 2 2 Decimal Value 3 2 Appendix A st nd nd Set Begin Appendix A Set Complete Minimum Length 1 Minimum Length Set a minimum length for codes. If the length of a code is shorter than the minimum length, then the scanner will not output the data.
> IATA 25 Enable IATA 25 4.9 Matrix 25 > Check Digit Transmission Calculate Check Digit and Transmit Calculate Check Digit and Not Transmit > Setup Code Length 1. Scan the “Set Begin” Bar Code (2 Sets Available) 2. Go to Decimal Value Table in Appendix A, scan Bar Code(s) that represents the code length 3. Scan the “Complete” Bar Code Repeat Steps 1-3 to set additional lengths < Variable> The output would be the same as the barcode’s length.
1 1st Set Begin 2 Decimal Value 3 1 Set Complete 1 2 2 Decimal Value 3 2 Appendix A st nd nd Set Begin Appendix A Set Complete Minimum Length 1 Minimum Length Set a minimum length for codes. If the length of a code is shorter than the length, minimum then the scanner will not output the data. 2 Decimal Value 3 Minimum Length Appendix A Complete 4.
> Transmission Type of Start/Stop A Start A Stop B Start B Stop C Start C Stop D Start D Stop 30
> Setup Code Length 1. Scan the “Set Begin” Bar Code (2 Sets Available) 2. Go to Decimal Value Table in Appendix A, scan Bar Code(s) that represents the code length 3. Scan the “Complete” Bar Code Repeat Steps 1-3 to set additional lengths < Variable> The output would be the same as the barcode’s length. There is no limit in length for the reading output.
the scanner will not output the data. 2 Decimal Value 3 Minimum Length Appendix A Complete 4.11 Code 93 > Check Digit Transmission < Calculate Check 2 Digit & not Transmit> Do not Calculate Check Digit > Setup Code Length 1. Scan the “Set Begin” Bar Code (2 Sets Available) 2. Go to Decimal Value Table in Appendix A, scan Bar Code(s) that represents the code length 3.
3 1 Set Complete 1 2 2 Decimal Value 3 2 st nd nd Set Begin Appendix A Set Complete Minimum Length 1 Minimum Length Set a minimum length for codes. If the length of a code is shorter than the minimum length, then the scanner will not output the data. 2 Decimal Value 3 Minimum Length Appendix A Complete 4.
Calculate Check 2 Digit and Transmit Calculate Check 2 Digit and Not Transmit > Setup Code Length 1. Scan the “Set Begin” Bar Code (2 Sets Available) 2. Go to Decimal Value Table in Appendix A, scan Bar Code(s) that represents the code length 3. Scan the “Complete” Bar Code Repeat Steps 1-3 to set additional lengths < Variable> The output would be the same as the barcode’s length. There is no limit in length for the reading output.
Minimum Length 1 Minimum Length Set a minimum length for codes. If the length of a code is shorter than the minimum length, then the scanner will not output the data. 2 Decimal Value 3 Minimum Length Appendix A Complete 4.13 MSI/PLESSEY Code > Check Digit Transmission Calculate Check Digit and Transmit Calculate Check Digit and Not Transmit > Setup Code Length 1. Scan the “Set Begin” Bar Code (2 Sets Available) 2.
< Variable> The output would be the same as the barcode’s length. There is no limit in length for the reading output. Fix Length (2 Sets Available) 1 1st Set Begin 2 Decimal Value 3 1 Set Complete 1 2 2 Decimal Value 3 2 Appendix A st nd nd Set Begin Appendix A Set Complete Minimum Length 1 Minimum Length Set a minimum length for codes. If the length of a code is shorter than the minimum length, then the scanner will not output the data.
4.14 Code 2 of 6 > Check Digit Transmission Do not Calculate Check Digit Calculate Check Digit and Not Transmit > Setup Code Length 1. Scan the “Set Begin” Bar Code (2 Sets Available) 2. Go to Decimal Value Table in Appendix A, scan Bar Code(s) that represents the code length 3. Scan the “Complete” Bar Code Repeat Steps 1-3 to set additional lengths < Variable> The output would be the same as the barcode’s length. There is no limit in length for the reading output.
3 2 nd Set Complete Minimum Length 1 Minimum Length Set a minimum length for codes. If the length of a code is shorter than the minimum length, then the scanner will not output the data. 2 Decimal Value 3 Minimum Length Appendix A Complete 4.
> Setup Code Length 1. Scan the “Set Begin” Bar Code (2 Sets Available) 2. Go to Decimal Value Table in Appendix A, scan Bar Code(s) that represents the code length 3. Scan the “Complete” Bar Code Repeat Steps 1-3 to set additional lengths < Variable> The output would be the same as the barcode’s length. There is no limit in length for the reading output.
the scanner will not output the data. 2 Decimal Value 3 Minimum Length Appendix A Complete 3 Minimum Length Complete 4.16 LCD 25 > Check Digit Transmission Do not Calculate Check Digit Calculate Check Digit and Transmit > Setup Code Length 1. Scan the “Set Begin” Bar Code (2 Sets Available) 2. Go to Decimal Value Table in Appendix A, scan Bar Code(s) that represents the code length 3.
Fix Length (2 Sets Available) 1 1st Set Begin 2 Decimal Value 3 1 Set Complete 1 2 2 Decimal Value 3 2 Appendix A st nd nd Set Begin Appendix A Set Complete Minimum Length 1 Minimum Length Set a minimum length for codes. If the length of a code is shorter than the minimum length, then the scanner will not output the data. 2 Decimal Value 3 Minimum Length Appendix A Complete 4.
RSS-14 Don’t Transmit Check Digit Transmit RSS-14 Application ID Don’t Transmit RSS-14 Application ID Transmit RSS-14 Symbology ID Don’t Transmit RSS-14 Symbology ID 4.
Don’t Transmit RSS Limited Symbology ID 4.
PREFIX/SUFFIX 5.1 Standard Suffixes None Data are displayed continuously The cursor moves to the left once data are displayed, and it will move to the next line when the next data is ready to be displayed. (This function is related to the software of the host, and the results will be affected by the software) Enable CR Suffix – The scanner transmits a carriage return after each scan. The cursor moves to the left once data are displayed.
Enable Space Once data are displayed, the cursor will skip a space to get ready for the next data. Enable Tab(HT) Once data are displayed, the cursor will skip a tab to get ready for the next data. Enable STX-ETX Before displaying a data, this function will add a STX ASCII code in front of the data, and an ETX ASCII code at the end of the data. This function is only limited to RS232 interface. 5.2 Insertion Data You can insert character for up to 6 different barcode types. Steps 1. 2.
7. Scan “End” 8. Scan “Save” Repeat Steps 1-6 to set additional set > Example Insert $ as Prefixes for Code UPC-A Start Set #1 Scan the bar code for the desired Set Code UPC-A Scan the bar code of the desire bar code type 1st digit Scan Bar Code(s) that represents the position of digit number to be inserted.
Scan “Save” bar code > Insertion Set Number Set #1 Set #2 Set #3 Set #4 Set #5 Set #6 > Code Type to be inserted UPC-A UPC-E EAN-13/JAN-13 EAN-8/JAN-8 CODE 39 47
CODE 128 CODABAR/NW7 Interleave 25 Industrial 25 Matrix 25 CODE 93 CODE 11 China Postage MSI/PLESSEY Code 2 of 6 Telepen Resvered 5 LCD25 RSS-14 48
RSS Limited RSS Expanded All Codes None > Character Position to be inserted 49
Complete > Character to be inserted Go to Appendix B (ASCII), Appendix C (Function Key) Complete End Save 50
5.3 Deletion Data You can delete character for up to 6 different barcode types. Steps 1. Scan the bar code for the desired set. 2. Scan the desire bar code type 3. Scan Bar Code(s) that represents the digit number of start position to be deleted 4. Scan the “Compete” Bar Code of Character Position to be deleted 5. Scan the numbers of characters need to be deleted. 6. Scan the “Compete” Bar Code of Number of Characters to be deleted. 7. Scan “End”. 8. Scan “Save”.
Complete 3 Scan the numbers of characters need to be deleted Complete End Save > Delectation Set Number Set #1 Set #2 Set #3 Set #4 Set #5 Set #6 > Code Type to be deleted 52
UPC-A UPC-E EAN-13/JAN-13 EAN-8/JAN-8 CODE 39 CODE 128 CODABAR/NW7 Interleave 25 Industrial 25 Matrix 25 CODE 93 CODE 11 China Postage MSI/PLESSEY 53
Code 2 of 6 Telepen Resvered5 LCD25 RSS-14 RSS Limited RSS Expanded All Codes None > Delete Start Position 54
Complete > Number of Characters to be deleted 55
Complete End Save 56
A Appendix A-Decimal Value 57
B-ASCII Table NULL ETX ACK HT FF SI DC2 NAK CAN ESC GS RS STX 58
ENQ BS VT SO DC1 DC4 ETB SUB SYN SOH EOT BEL LF CR 59
DLE DC3 % $ & ( ' ) + * , comma .
; : < Less than > Greater than = ? @ EM FS US SPACE ″ ! # 61
0 Number Zero 1 Number One 2 3 4 5 6 7 8 9 A B C D 62
E F G H I Letter I J K L M N O Letter O P Q R 63
S T U V W X Y Z a b c d e f 64
g h i j k l m n o p q r s t 65
u v w x y z ~ } DEL { [ \ _ Underscore ] 66
^ ` C-Function Key Table F1 F2 F3 F4 F5 F6 F7 F8 F9 F10 F11 67
F12 lnsert Delete Home End Page UP Page Down Left Up Right Down 68
Save Recall Set all default Start End Abort Version Information Ver 1.