
Install (Multi) Instruction Manual

MAN-130004-QIG-ML-0613-08-0
Deutsch: Multi Funktions SATA Quick Dock
1 Verbinden Sie die 12V-Strombuchse über das beiliegende Netzteil mit einer Steckdose.
2
Schließen Sie das Dock über das beiliegende eSATA-Kabel oder Mini-USB-Kabel an den PC an.
Hinweis: USB-Standard-A-Anschlüsse werden für Card-Reader- und/oder Hub-Funktionen
benötigt.
3 Setzen Sie entweder eine 2,5” oder 3,5”-Festplatte in den Doppelslot ein.
4
Setzen Sie die Speicherkarte in den passenden Slot. Das Gerät erkennt die Karte automatisch.
5 Bringen Sie den Netzschalter in die “An”-Position.
6 Um mit dem Daten-Backup zu beginnen, drücken Sie die One-Touch-Backup-Taste.
Hinweis: Dies erfordert die Installation der One-Touch-Backup-Software von der
beiliegenden CD.
• Auf der Rückseite dieser Kurzanleitung finden Sie eine Liste der kompatiblen Speicherkarten.
(Ein “*” bedeutet, dass ein Adapter benötigt wird. Dieser liegt aber nicht bei).
• Die Spezifikationen finden Sie auf manhattan-products.com.
Français: Station d’accueil Quick Dock SATA multifonction
1 Connectez la fiche 12V via l’adaptateur secteur à une prise de courant.
2 Connectez la station à un PC via le câble eSATA ou mini USB inclus. Remarque: Les
connexions USB type A sont nécessaires pour les fonctions lecteur de carte et Hub.
3 Insérez un disque dur 2,5” ou 3,5” dans la double fente d’insertion.
4
Insérez la carte mémoire dans la fente respective. Le dispositif détecte la carte
automatiquement.
5 Activez l’interrupteur marche-arrêt.
6 Pour commencer la sauvegarde des fichiers, appuyez sur le bouton respectif. Remarque:
Pour cette fonction il faut installer le logiciel One Touch Backup sur le CD inclus.
•
Sur le verso de cette feuille, vous trouvez une liste de compatibilité pour les cartes mémoires.
(“*” indique qu’un adaptateur est requis. Celui n’est pas inclus).
•
Vous trouvez les spécifications sur manhattan-products.com.
Español: Puerto Rápido Multifuncional SATA
1 Usando el adaptador de corriente, conecte el conector de 12V de CC en la parte posterior a
una toma de alimentación de CA.
2 Use el cable eSATA o mini USB, conecte la base a la PC. Nota: Una conexión Tipo USB A es
necesaria para el lector de tarjetas y/o funciones de hub.
3 Inserte un HD de 2.5” o 3.5” en la ranura doble.
4 Inserte la tarjeta de memoria en la ranura correspondiente slot. El dispsotivo detectará
automaticamente e identificará la tarjeta.
5 Mover el interruptor a la posicion de encendido.
6 Para comenzar la copia de seguridad de archivos, presione el botón de One Touch Backup.
Nota: Esto requiere la instalación del software One Touch Backup incluido en el CD.
• Vea el reverso de esta hoja para obtener una lista de compatibilidad de la tarjeta de memoria.
(* requiere un adaptador, pero no está incluido.)
• Para más especificaciones, visite manhattan-products.com.
Polski: Stacja dokująca wielofunkcyjna na dyski SATA
1 Podłącz adapter zasilania (w komplecie) do gniazda DC 12V w stacji dokującej oraz do
gniazda AC sieci elektrycznej.
2 Podłącz stację dokującą do komputera kablem eSATA lub mini USB (kable w komplecie).
Uwaga: Niezbędne jest podłączenie kablem USB, aby działał czytnik kart oraz hub USB.
3 Umieść dysk twardy 2,5” lub 3,5” w kieszeni stacji dokującej.
4 Umieść kartę pamięci w odpowiednim slocie czytnika stacji dokującej. Karta zostanie
automatycznie wykryta i zidentyfikowana.
5 Włącz zasilanie stacji ustawiając przełącznik zasilania w pozycji ON.
6
Aby rozpocząć proces automatycznego „backupu” (wykonywania kopii zapasowej) danych,
wciśnij przycisk „One Touch Backup”. Uwaga: Funkcja wykonywania automatycznej kopii
danych wymaga uprzedniego zainstalowania oprogramowania z załączonej płyty CD.
• Na następnej stronie instrukcji zamieszczona jest lista obsługiwanych kart pamięci
(Compatibility list). „*” – gwiazdką oznaczone są rodzaje kart, które wymagają użycia adaptera
do podłączenia (adapterów nie ma w komplecie).
• Pełną specyfikację produktu znajdziecie Państwo na stronie manhattan-products.com.
Italiano: Docking station USB2/eSata HDD con lettore di memorie
1 Usando l’alimentatore incluso, collegare il Jack DC 12V sul retro del prodotto ad una presa di
corrente AC.
2
Usando il cavo eSATA o mini USB incluso, collegare la docking al PC. Nota: Connessioni tipo A
USB sono necessarie per le funzioni di lettore di schede e/o hub.
3 Inserire o un disco fisso da 2.5” o uno da 3.5” nell’alloggiamento con doppio inserimento.
4 Inserire la scheda di memoria nel corrispondente slot. La periferica automaticamente
rileverà ed identificherà la scheda.
5 Pisizionare l’interruttore su On.
6 Per iniziare il file backup, premere il tasto One Touch Backup. Nota: Questo richiede
l’installazione del software One Touch Backup presente nel CD.
• Vedere sul retro della presente guida, una lista della Compatibilità con le varie schede di memoria.
(* indica che è richiesto un alimentatore, ma non è incluso.)
• Per ulteriori specifiche, visita il sito manhattan-products.com.
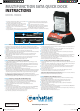
MULTIFUNCTION SATA QUICK DOCK
INSTRUCTIONS
MODEL 130004
1
2 2
5
44
42
• See the back of this sheet for a memory card Compatibility list. (* indicates an adapter is required but not included.)
•
For specifications, go to manhattan-products.com.
1 Using the included power adapter, connect the DC 12V
jack on the back to an AC power outlet.
2 Using the included eSATA or mini USB cable, connect
the dock to the PC. Note: Type A USB connections are
needed for card reader and/or hub functions.
3 Insert either a 2.5” or 3.5” hard-disk drive into the dual-
insertion slot.
4 Insert the memory card into the corresponding slot.
The device will automatically detect and identify the
card.
5 Toggle the Power switch to the On position.
6 To begin the file backup, press the One Touch Backup
button. Note: This requires the installation of the One
Touch Backup software on the included CD.
Srpski: Multifunkcionalna SATA bazna stanica
1 Koristite adapter za napajanje koji uređaj poseduje, povežite konektor DC12V sa zadnje
strane na napajanje AC strujom.
2 Koristite eSATA ili mini USB kabal koji ide uz uređaj, povežite radnu stanicu na PC.
Napomena: Tip A USB konektora je potreban za funkciju čitača kartice i/ili hub.
3 Ubacite 2,5“ ili 3,5“ hard disk u dupli slot za ubacivanje.
4 Ubacite memorijsku karticu u odgovarajući slot. Uređaj će automatski detektovati i
identifikovati karticu.
5 Prebacite Power taster u polažaj On.
6 Da biste otpočeli pravljenje beck up kopije pritisnite One Touch Beckup taster. Napomena:
ova funkcija zahteva instalaciju One Touch Beckup.
• Pogledajte na kraju ovog dokumenta za kompatibilnost memorijske kartice (* indikovano je
gde je potreban adapter koji nije uključen).
• Za specikaciju idite na manhattan-products.com.
46
3
manhattan-products.com
Important: Read before use.
Importante: Leer antes de usar.
130004_08_QIG_ML_NL.indd 1 6/10/13 8:20 AM