
User Manual


6
© 2011 Manhattan LCD LLC. - All Rights Reserved
& Down
& Down& Down
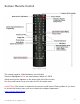
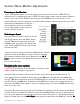
& Down arrow buttons located just under the Menu button to scroll within a menu tab. To adjust a
specific field use the Left & Right
Left & Right Left & Right
Left & Right arrow buttons located below the MENU key to make changes to
a certain field. Press the MENU button again to save your changes and go up a level Use the UP
UPUP
UP
arrow to get back to the menu tabs and MENU button once more to exit the menu.
These monitors are equipped with 4 external inputs; VGA, Component, Composite, and HDMI port.
The HD089B model has a second HDMI port which is only accessible from inside the monitor there
is no external connector. Each input has its own set of menu items and are stored separately from
each other adjusting an input will have no effect on another.
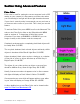
Picture Tab:
Picture Tab:Picture Tab:
Picture Tab:
The adjustments you can make in the Picture Tab of the menu system are:
Preset:
Preset:Preset:
Preset:
Allows the user to make Preset color tables for different cameras
Brightness:
Brightness:Brightness:
Brightness: Adjusts the amount of white in the picture.
Contrast:
Contrast:Contrast:
Contrast: Adjusts the contrast between the colors.
Phase:
Phase:Phase:
Phase: Modifies the Clock/ Phase of the input (VGA & Component only)
Frequency:
Frequency:Frequency:
Frequency: Changes the frequency at which the panel is running (VGA only).
Sharpness:
Sharpness:Sharpness:
Sharpness: Adjusts the sharpness filter allowing you to go for a sharp look or smooth look.
Color:
Color:Color:
Color: Allows you to adjust the Color Saturation level.
Tint:
Tint:Tint:
Tint: Allows you to adjust the Hue of the image.
Gamma:
Gamma:Gamma:
Gamma:
Color Temp:
Color Temp:Color Temp:
Color Temp: Allows you to adjust the Red, Green and Blue channel gains individually.
Img.Adj Tab:
Img.Adj Tab:Img.Adj Tab:
Img.Adj Tab:
The image Adjust tab will allow the user to adjust the images position and aspect ratio on the
monitor.
Image S
Image SImage S
Image Size:
ize:ize:
ize: Adjusts aspect ratio. Fill All, 1:1, Fill Aspect, 4:3, 16:10, 15:9, 16:9, 1.85:1, 2.35:1, Red
Camera, & Canon 7D, HDSLR Record & HDSLR Playback.
H position:
H position: H position:
H position: Horizontal position of the picture.
V position:
V position:V position:
V position:
Vertical position of the picture.
Overscan:
Overscan:Overscan:
Overscan: allows the operator to zoom in or out on a
specific image.
Auto:
Auto:Auto:
Auto:
Auto centers the position the picture on the
screen.
Freeze Frame:
Freeze Frame:Freeze Frame:
Freeze Frame:
Freezes a specific image on the screen.
Setup Tab:
Setup Tab:Setup Tab:
Setup Tab:
The setup tab allows the user to customize Picture in Picture as well as OSD settings.
Picture in Picture:
Picture in Picture:Picture in Picture:
Picture in Picture:
Picture in Picture settings.
Language:
Language:Language:
Language:
Changes the language of the OSD.
Transparency
TransparencyTransparency
Transparency:
::
: Sets how visible the background of the OSD menu system.
OSD Timeout
OSD TimeoutOSD Timeout
OSD Timeout: sets the length of time for the OSD to be displayed after the last keystroke.