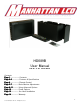
HD089B User Manual Updated 7/15/2011 for new firmware Contents Page 1---------- Contents Page 2-3-------- Features & Specifications Page 4---------- Remote Control Page 5-7------- Basic Monitor Adjustments Page 8-11-----Using Advanced Options 11 Page 12-------Power Options 12 Page 13-------- Sun Hood Installation Page 14-------- Warranty 1 © 2011 Manhattan LCD LLC.
Section: Features & Specifications: LCD Screen Specifications: Screen Size: 8.
Case Specifications: 2 standard 1/4x20 mounts Top & Bottom Case: 0.125" thick Black ABS Polymer- Matte Finish Case Dimensions: 9.6" Wide, 6.4" High, 1.6" Deep Weight: Approx 1.8 LBS Optional Accessories: ABS Sunhood Sony Battery Plate Canon Battery Plate Panasonic Battery Plate Anton Bauer Battery Plate XLR Power Input (w/ built in voltage regulator) 3 © 2011 Manhattan LCD LLC.
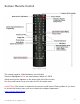
Section: Remote Control The remote requires 2 AAA batteries (not included) Sections Highlighted in Red are new features added 4/1/2010. Quick access menu appears on the lower right side of the screen. Use the recall button to go up a menu level in the quick menu. ***NOTE*** The remote is required to access the quick menu & Factory Menu if you need to access the factory menu you must contact the support department. support@manhattanlcd.com 4 © 2011 Manhattan LCD LLC.
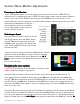
Section: Basic Monitor Adjustments Powering Powering on the Monitor: Monitor: Insert 12V regulated power source via connector into the 12V DC socket. A RED LED will indicate power is reaching the monitor. If RED LED fails to light, trouble shoot the power adapter or battery. The screen will be BLACK until you press the POWER button on the monitor or the remote.
& Down arrow buttons located just under the Menu button to scroll within a menu tab. To adjust a specific field use the Left & Right arrow buttons located below the MENU key to make changes to a certain field. Press the MENU button again to save your changes and go up a level Use the UP arrow to get back to the menu tabs and MENU button once more to exit the menu. These monitors are equipped with 4 external inputs; VGA, Component, Composite, and HDMI port.
Sleep Timer: Timer: Sets how long the monitor will stay on with no video input. Source Enable: Enables or disables video Inputs. Factory Reset: Resets all user adjustments to factory defaults. Advanced Tab: Blue Gun: Turns off red & green channels for use when calibrating monitor.
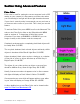
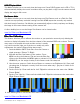
Section: Using Advanced Features False Color: aaaaaaaaaaaaa False color is used for setting the correct exposure level or ISO setting on your camera. It is important to use false color when you are shooting in low light and direct light situations because if your shot is severely under/overexposed you may not have to re-shoot an entire scene of your video. This is how you use this feature.
Focus Assist: The focus assist function will allow users to focus the camera with great precision. This feature is very similar to a peaking function on other brand monitors. When enabled the object in focus will be highlighted in white and everything else will be darkened or grayed out. To activate Focus Assist press MENU scroll to the Advanced Tab and turn the Focus Assist slider to the ON position hit MENU again to activate it. To deactivate it follow the reverse procedure.
HDSLR Playback Mode: Mode: This Mode will allow you to correctly view the image on a Canon DSLR camera such a 5D or T2i it will automatically display the correct resolution when you play back a clip[ from the camera and will display the image in full screen. Red Camera Mode: This Mode will allow you to correctly view the image on a Red Camera such as a Red One. Red cameras use a proprietary resolution coming from their HDMI output that normally only worked with their brand of monitors.
Aspect Guides & Screen Markers: The Aspect Guides and Screen Markers Features will assist you in correctly framing your shot. Activating an Aspect Guide or Screen marker will display a rectangle box representing a specific aspect ratio. For example if you are filming in 4:3 and you will be editing the video in post production to 16:9 the aspect guides will show you if you will be cutting off the top of someone’s head in the video. Within the aspect guides you have several options for line style and % safe.
Section: Power Options: HD089B model monitors may use any 12V regulated power source. All monitors ship with a supplied 12V regulated AC adapter. The input connector is a standard 2.1x5.5mm barrel connector the center pin being + positive outer shell is - negative. You may use any power source as long as it is regulated. If the polarity is reversed it will void your warranty, if you overpower the monitor with a higher voltage than 12.5 volts it will blow a fuse and void the warranty.
Section: Sun-Hood Installation There are 8 treaded holes on the monitor 2 on each side the sun hood is a 2 piece design 1 piece fits on the top the second on the bottom they are made to fit on either side. The sun hood mounts to the monitor with supplied thumbscrews in 2 easy steps. 1. Thread in the thumbscrews about half way 2. Then slide the groves in the sun hood around the shaft of the thumbscrews and Snug the thumbscrews. 13 © 2011 Manhattan LCD LLC.
Section: Warranty Statement Warranty: Manhattan LCD monitors are under warrantee and are guaranteed to be free from manufacturing defects for a period of 12 Months from the date of purchase to the original owner unless otherwise specified. Disclaimers: Manhattan LCD Shall be indemnified and held harmless for any and all injury or death resulting from the improper use of their products.