PLAZA MODELS ST 250 / ST 350 Digital Satellite Receiver Instruction Manual (English) http://www.plaza-st.
CONTENTS INTRODUCTION .....................................................................................................................................2 FEATURES .............................................................................................................................................3 FRONT PANEL CONNECTORS ...................................................................................................................4 CONTROLS AND DEFINITIONS.......................................
Welcome to the world of Manhattan digital satellite receiver that will make your life closer to your dream. Before using your new receiver, we suggest that you carefully read this manual and the following safety notice. The PLAZA model is an advanced digital satellite receiver with the unique option of Blind Search Facility and is designed to cope with the many different operating requirements of broadcast standards worldwide.
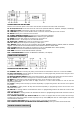
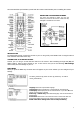
CONNECTORS AND DEFINITIONS Please do not connect the power to the receiver until all other connections have been made and checked. R1: AC IN (Power Cord) Connect this lead to the mains outlet (100-240 Volts AC, 50/60 Hz, 0.2Amps / 0.15Amps) R2: LNB IN (IF Input) Connect the IF cable from your LNB to this connector. R3: LOOP OUT If you have a second satellite receiver, connect the receivers LNB input to this connector. R4: ANT IN Connect your TV antenna to this connector.
We recommend that you familiarize yourself with the remote control handset prior to installing the receiver. OPERATION IN PROGRAMMING MODE The menus are designed to assist you from the moment you switch on the receiver. Follow the help messages at the bottom of the menu. INSTALLATION For digital quality picture, connect the receiver to your TV using a fully wired SCART lead. If using the UHF TV OUT connector then follow below step.
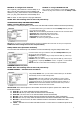
TV Settings TV Standard: Select the output for your TV. Example: for USA select NTSC M. If your TV supports ‘Auto Sensing’ then select Auto. Screen Format: Select the picture format for your TV. STORE: After above settings move to store and press OK key. Time Settings In standby mode, the front display and channel banner will indicate the time after setting as below. Year / Month / Date / Hour / Minutes: Press VOL up / down to select. STORE: After above settings move to store and press OK key.
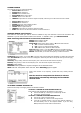
EXAMPLE: To configure four antennas Astra 2 (28.2E), select Antenna 1 and set DiSEqC to 1 Astra 1 (19.2E) select Antenna 2 and set DiSEqC to 2 Hotbird 1-6 (13E), select Antenna 3 and set DiSEqC to 3 Thor 2, 3 (1W), select Antenna 4 and set DiSEqC to 4 EXAMPLE: To configure MONOBLOCK LNB Astra 1(19.2E), select Antenna 1 and set DiSEqC to Mini-A Hotbird 1-6(13E), select Antenna 2 and set DiSEqC to MiniB 12V: To select 12 volts output for relay type LNB switch.
TP All + D -- Selected TP for all Video, Radio and Data channels. TP FTA -- Selected TP for Free to Air Video and Radio channels. Manual All – Single TP for all Video and Radio channels. To select go to TP Data and press OK for sub menu. Manual All + D – Single or user defined TP for all Video, Radio and Data channels. Manual FTA – Single or user defined TP for Free To Air Video and Radio channels. To select press VOL up / down. To edit or add, follow below settings.
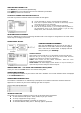
CHANNEL SEARCH Go to Channel Search and configure following Search Index: Select index 1 Antenna: Select reference 1 Satellite: Select satellite name. Search Mode: Select search option. TP Data: Select a lower band TP. LNB Skew: Adjust skew for maximum Signal and Quality. After this go to Index search and set as below. Search Index: Select index 2 Antenna: Select reference 2 Satellite: Select the same satellite as above. Search Mode: Select search option.
SORTING THE CHANNEL LIST Press Green key to sort channels alphabetically. Press Yellow key to sort channels Free To Air first followed by Scrambled. Press Red key to return to normal list. TO SELECT A CHANNEL FROM ANOTHER SATELLITE Press SAT key and the combined channel and satellite list will appear. Use CH and PAGE up / down to scroll through the satellite list Press OK on required satellite, the channel list will change and the cursor will also move to its channel list.
TO SELECT SUBTITLES ON A CHANNEL Press SUB.T (Blue) key. Select required language and press OK. The subtitles will appear after a few seconds. If not transmitted, it will state No Subtitles available. TO SELECT AUDIO LANGUAGE You can select an audio by pressing LANG key. The screen will display options on the top left. Select required language and press OK. To change the output, press the AUDIO key repeatedly. TO ACTIVATE SLEEP TIMER Press SLEEP key repeatedly to switch on and select duration of the timer.
TO LOCK MENU AND CHANNELS Go to INSTALL menu and select Parental Lock. Lock: Press VOL up / down to turn it on. Old Password: Use 0-9 keys and enter 0000. This is the default password. New Password: Use 0-9 keys and enter four digits of your choice. Confirm: Use 0-9 keys and re- enter four digits of your choice. STORE: Press OK to store the settings. NOTE: After locking you can only access a locked channel or the menus by entering your password.
TO SORT SATELLITE LIST After adding a satellite select Sort and press OK. The list will be sorted by satellite positions in degrees. TO EDIT A TP --- Select TP option and press OK The cursor will move to TP list. Select the TP you want to edit and press OK. Cursor will move to Edit TP. Now enter the Frequency, Polarity, S / R and FEC of the TP. After this press EXIT. TO ADD A TP Select Add and press OK, a keypad will appear. Select character and press OK. After naming press EXIT.
Format Hard Disk: After fitting Hard Disk or to erase previously recorded events, press OK on this menu. A message Formatting will erase all data will come up. To format press OK. Play / Edit: When you want to playback or edit the events recorded, press OK on this menu and follow steps in PLAYBACK AND EDITTING section below. TO RECORD PROGRAMS To start recording, press REC key. The following record banner will appear.
TROUBLE SHOOTING GUIDE If you suspect there is a problem with your receiver, please check the following trouble shooting guide before calling a Manhattan authorised service agent. WARNING! Do NOT attempt to repair the receiver yourself. Tampering with the receiver may result in fatal electric shock and will invalidate your warranty. Symptoms --- Possible cause / solutions Front display not lit --- Check that the mains lead is plugged into the power socket.
POWER SUPPLY Type Input Voltage Power Consumption Protection Ambient Temperature Range Usage PHYSICAL DIMENSIONS Size (W X H X D) AP-129B SMPS 100 -- 240 Volts AC, 50/60Hz, 0.2Amps / 0.15Amps Maximum 30W Separate Internal Fuse 0 – 45 Degrees C This power supply is not for external use. This power supply must be installed in a suitable electrical, fire and mechanical enclosure. All secondary output circuits are SELV, and are not at hazardous energy levels under normal and single fault conditions.