Original Instruction Manual Instructions d’emploi d’origine Originalbetriebsanleitung Manuale di istruzioni originale Originele gebruiksaanwijzing Instrucciones de manejo originales Instruções de serviço original Original brugsanvisning Πρωτότυπο εγχειρίδιο οδηγιών Orijinal Kullanım Kılavuzu Important: Read this instruction manual carefully before putting the Petrol String Trimmer into operation and strictly observe the safety regulations! Preserve instruction manual carefully! Important : Veuillez lire att
English (Original instructions) Thank you very much for purchasing the MAKITA Outdoor Power Equipment. We are pleased to recommend to you the MAKITA product which is the result of a long development program and many years of knowledge and experience. Please read this booklet which refers in detail to the various points that will demonstrate its outstanding performance. This will assist you to obtain the best possible result from your MAKITA product. Table of Contents Page Symbols.......................
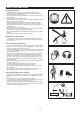
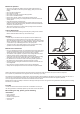
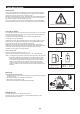
SAFETY INSTRUCTIONS General Instructions –– Read this instruction manual to become familiar with handling of the equipment. Users insufficiently informed will risk danger to themselves as well as others due to improper handling. –– It is recommended only to lend the equipment to people who have proven to be experienced. Always hand over the instruction manual. –– First users should ask the dealer for basic instructions to familiarize oneself with the handling of string trimmers.
–– Start the Petrol String Trimmer only in accordance with the instructions. –– Do not use any other methods for starting the engine! –– Use the Petrol String Trimmer and the tools only for such applications as specified. –– Only start the engine, after the entire assembly is done. Operation of the device is only permitted after all the appropriate accessories are attached! –– Before starting make sure that the cutting attachment has no contact with hard objects such as branches, stones etc.
Method of operation –– Only use in good light and visibility. During the winter season beware of slippery or wet areas, ice and snow (risk of slipping). Always ensure a safe footing. –– Never cut above waist height. –– Never stand on a ladder. –– Never climb up into trees to perform cutting operation. –– Never work on unstable surfaces. –– Remove sand, stones, nails etc. found within the working range. –– Before commencing cutting, the cutting attachment must have reached full working speed.
For European countries only EC Declaration of Conformity Makita declares that the following Machine(s): Designation of Machine: Petrol String Trimmer Model No.
TECHNICAL DATA Model ER2600L Handle type Loop handle Dimensions: length x width x height (without cutting tool) mm Net weight kg Engine type 1,645 x 220 x 510 4.3 Air cooled, 2-stroke, single cylinder Engine displacement 3 cm 25.7 Maximum engine performance kW 0.
DESIGNATION OF PARTS (1) (4) (2) (5) (3) (6) (7) (8) (9) (10) (11) Name of parts (12) (13) (14) (15) (16) (17) (18) 8 1 Control cable 2 Rear grip 3 Control lever 4 Start-Stop switch 5 Handle 6 Shaft 7 Protector (Cutting tool guard) 8 Nylon cutting head 9 Air cleaner cover 10 Clutch case 11 Fuel tank cap 12 Primer pump 13 Fuel tank 14 Spark plug 15 Choke lever 16 Exhaust muffler 17 Starter handle 18 Recoil starter
MOUNTING OF HANDLE CAUTION: Before doing any work on the equipment, always stop the engine and pull the spark plug connector off the spark plug. Always wear protective gloves! CAUTION: Start the engine only after having assembled it completely. (1) For machines with loop handle –– Fix the loop handle (1) on the shaft (2). –– Make sure that the spacer on the shaft pipe is located between the grip assembly and the other grip. Do not remove or shrink the spacer.
FUEL/REFUELLING Handling fuel Utmost care is required when handling fuel. Fuel may contain substances similar to solvents. Refuel either in a well ventilated room or outdoors. Do not inhale fuel vapors, and avoid any contact of fuel or oil with your skin. Mineral oil products degrease your skin. Prolonged skin contact with these products will cause your skin to become extremely dry, which may result in various kinds of skin disease. In addition, allergic reactions may occur.
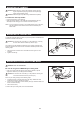
STARTING/STOPPING Observe the applicable accident prevention regulations. Starting Move at least 3 m away from the area where you refuelled the equipment. Place the string trimmer on a clean piece of ground taking care that the cutting tool does not come into contact with the ground or any other objects. WARNING: Pay attention that the cutting tool rotates immediately after the engine starts. Cold start –– Set the Start-Stop Switch (1) to start position as illustrated.
–– Firmly hold the clutch case with your left hand, as illustrated. –– Slowly pull the starter handle until you feel resistance, and then continue to pull sharply. –– Do not pull out the starter rope to its full extent, and do not allow the starter handle to retract by itself. Maintain control of the starter rope and ensure it retracts slowly. –– Repeat the starting operation until you hear the engine’s initial ignitions.
NYLON CUTTING HEAD The nylon cutting head is a dual line trimmer head that has bump & feed mechanism. The nylon cutting head feeds out the nylon cord after tapping the trimmer head on the ground. Most effective cutting area Operation –– The most effective cutting area is shown by the shaded area. –– To feed the nylon cord, increase the nylon cutting head speed to approx. 6,000 min-1 and tap the nylon cutting head lightly on the ground.
–– Feed the cords through the slits to come out of the housing. Mount the washer, spring, and spool in the housing. –– Align the hooks on the cover and the housing. Then push cover firmly onto the housing to secure it. SERVICING INSTRUCTIONS Servicing instructions CAUTION: Before performing any type of maintenance work on the string trimmer, always switch off the motor and detach the plug cap from the spark plug (see “checking the spark plug”). Always wear protective gloves.
Checking the spark plug –– Only use the supplied universal wrench to remove or to install the spark plug. –– The gap between the two electrodes of the spark plug should be 0.6-0.7 mm (0.024”-0.028”). If the gap is too wide or too narrow, adjust it. If the spark plug is clogged with carbon or dirty, clean it thoroughly or replace it. CAUTION: Never touch the spark plug connector while the engine is running (danger of high voltage electric shock). 0.6 mm-0.7 mm (0.024”-0.
STORAGE –– When storing the equipment for a long period of time, drain all the fuel from the fuel tank and carburetor. To do this, simple drain all of the fuel from the fuel tank. Dispose of the drained fuel in accordance with local applicable laws. –– Remove the spark plug and add a few drops of oil into the spark plug hole. Then, pull the starter gently so that oil coats the inside of the engine, then tighten the spark plug.
Nederlands (Originele instructies) Hartelijk dank voor uw aankoop van dit gemotoriseerd tuingereedschap van MAKITA. Met trots bevelen wij u dit gereedschap van MAKITA van harte aan als resultaat van een langdurig ontwikkelingsprogramma en jarenlange kennis en ervaring. Lees deze handleiding met daarin nauwkeurige beschrijvingen van de diverse punten die zijn hoogstaande prestaties demonstreren. Hierdoor bent u in staat de best mogelijke resultaten te behalen die het gereedschap van MAKITA u kan bieden.
VEILIGHEIDSINSTRUCTIES Algemene instructies –– Lees deze gebruiksaanwijzing om u bekend te maken met de juiste manier van omgaan met het gereedschap. Gebruikers die onvoldoende geïnformeerd zijn, lopen de kans zichzelf en anderen in gevaar te brengen als gevolg van onjuist omgaan met het multifunctionele aandrijfsysteem. –– Het verdient aanbeveling het gereedschap uitsluitend uit te lenen aan mensen die bewezen hebben ervaren te zijn. Geef altijd de gebruiksaanwijzing mee.
–– Start de benzinegraskantmaaier alleen op de manier beschreven in de instructies. –– Gebruik geen enkele andere methode om de motor te starten! –– Gebruik de benzinegraskantmaaier en de gereedschappen uitsluitend voor de beschreven toepassingen. –– Start de motor van de benzinegraskantmaaier alleen nadat deze volledig is gemonteerd.
Gebruiksmethode –– Gebruik het gereedschap alleen bij goed licht en zicht. Wees in de winter bedacht op gladde of natte plaatsen, ijs en sneeuw (gevaar voor uitglijden). Zorg er altijd voor dat u stevig staat. –– Maai nooit boven heuphoogte. –– Werk nooit vanaf een ladder. –– Klim nooit in een boom om daar met het gereedschap te werken. –– Werk nooit op onstabiele oppervlakken. –– Verwijder zand, stenen, nagels, enz. die u binnen uw werkbereik vindt.
Alleen voor Europese landen EU-verklaring van conformiteit Makita verklaart dat de volgende machine(s): Aanduiding van de machine: Benzinegraskantmaaier Modelnr./Type: ER2600L Technische gegevens: zie de tabel “TECHNISCHE GEGEVENS”.
TECHNISCHE GEGEVENS Model ER2600L Type handgreep Beugelhandgreep Afmetingen: lengte x breedte x hoogte (zonder snijgarnituur) mm Nettogewicht kg Motortype 1.645 x 220 x 510 4,3 Luchtgekoeld, tweetakt, ééncilinder Cilinderinhoud 3 cm 25,7 Maximaal motorvermogen kW 0,83 Maximaal astoerental min -1 10.000 Maaidiameter met nylondraad-snijkop mm φ 400 Stationair toerental /min 3.000 Toerental op aangrijppunt van koppeling /min 4.
NAMEN VAN ONDERDELEN (1) (4) (2) (5) (3) (6) (7) (8) (9) (10) (11) Naam van onderdeel (12) (13) (14) (15) (16) (17) (18) 68 1 Gaskabel 2 Achterhandgreep 3 Gashendel 4 Start-stopschakelaar 5 Handgreep 6 Schacht 7 Beschermkap van snijgarnituur 8 Nylondraad-snijkop 9 Luchtfilterkap 10 Koppelingshuis 11 Brandstofvuldop 12 Brandstofhandpomp 13 Brandstoftank 14 Bougie 15 Chokehendel 16 Uitlaatdemper 17 Trekstarthandgreep 18 Trekstartinrichting
DE HANDGREEP MONTEREN LET OP: Voordat u werkzaamheden uitvoert aan het gereedschap, moet u altijd de motor uitzetten en de bougiekap van de bougie aftrekken. Draag altijd veiligheidshandschoenen! LET OP: Start de motor alleen nadat hij volledig is gemonteerd. (1) Voor gereedschappen met een beugelhandgreep –– Bevestig de beugelhandgreep (1) aan de schacht (2). –– Zorg ervoor dat de afstandshouder zich op de schacht bevindt tussen de voorhandgreep en de achterhandgreep.
BRANDSTOF EN BIJVULLEN Omgaan met brandstof Uiterste zorg is vereist bij het omgaan met brandstof. Brandstof kan stoffen bevatten die ook in oplosmiddelen voorkomen. Tank alleen bij in een goed geventileerde ruimte of buitenshuis. Zorg dat u de brandstofdampen niet inademt en vermijd contact van de brandstof of de olie met de huid. Aardolieproducten ontvetten uw huid. Als uw huid langdurig in contact is geweest met deze producten, kan uw huid extreem droog worden.
STARTEN EN STOPPEN Volg de toepasselijke voorschriften voor ongevallenpreventie. Starten Ga op minstens 3 m afstand staan van het gebied waar u het gereedschap hebt bijgetankt. Plaats de graskantmaaier op een schoon stuk grond en zorg ervoor dat het snijgarnituur niet in contact komt met de grond of andere objecten. WAARSCHUWING: Denk eraan dat het snijgarnituur onmiddellijk gaat draaien zodra de motor aanslaat. Koude start –– Zet de start-stopschakelaar (1) in de stand voor starten, zoals afgebeeld.
–– Houd de koppelingbehuizing met uw linkerhand vast, zoals weergegeven. –– Trek langzaam de trekstarthandgreep tot u weerstand voelt en trek vervolgens met een stevige ruk. –– Trek de startkoord niet volledig uit en laat de starthandgreep niet vanzelf intrekken. Behoud de controle over de startkoord en zorg dat deze langzaam wordt ingetrokken. –– Herhaal het starten tot u de eerste ontstekingen van de motor hoort. –– Duw de chokehendel (5) omlaag ( ) en trek opnieuw aan de startkoord tot de motor start.
NYLONDRAAD-SNIJKOP De nylondraad-snijkop is een dubbele-draadkop uitgerust met een stootaanvoermechanisme. De nylondraad-snijkop voert de nylondraad uit door met de kop van de spoel op de grond te tikken. Meest effectieve maaigebied Bediening –– Het meest effectieve maaigebied wordt weergegeven door het gearceerde deel. –– Om de nylondraad aan te voeren, verhoogt u het toerental van de nylondraad-snijkop naar ongeveer 6.000 min-1 en tikt u met de nylondraadsnijkop voorzichtig op de grond.
–– Voer de nylondraden door de sleuven zodat ze uit de behuizing steken. Plaats de ring, veer en draadspoel in de behuizing. –– Lijn de haken op het deksel uit met de vergrendelnokken van de behuizing. Duw daarna het deksel stevig op de behuizing om hem te vergrendelen. ONDERHOUDSINSTRUCTIES Onderhoudsinstructies LET OP: Voordat u enige onderhoudswerkzaamheden uitvoert aan de graskantmaaier, moet u altijd de motor uitzetten en de bougiekap van de bougie aftrekken (zie “De bougie controleren”).
De bougie controleren –– Gebruik alleen de bijgeleverde moersleutel om de bougie te verwijderen of te monteren. –– De afstand tussen de twee elektroden van de bougie moet 0,6 tot 0,7 mm zijn. Als de afstand te groot of te klein is, moet u deze aanpassen. Als de bougie verstopt zit met koolafzetting of vuil, moet u deze grondig schoonmaken of vervangen. LET OP: Raak de bougiekap nooit aan terwijl de motor draait (gevaar van elektrische schok door hoogspanning).
OPSLAG –– Wanneer u het gereedschap lange tijd opslaat, moet u alle brandstof aflaten uit de brandstoftank en de carburator. Verwijder hiervoor alle brandstof uit de brandstoftank. Gooi de afgelaten brandstof weg in overeenstemming met de lokale toepasselijke wetten. –– Verwijder de bougie en breng enkele druppels olie via het bougiegat in de cilinder. Trek vervolgens voorzichtig aan de trekstarthandgreep zodat de olie de binnenkant van de motor bedekt en monteer daarna de bougie weer.
Makita Jan-Baptist Vinkstraat 2, 3070, Belgium Makita Corporation Anjo, Aichi, Japan ER2600L-10L-1014 ALA www.makita.