
User Manual


7
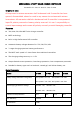
3. D02 Continue to press the button UP, LCD shows 14.5 (Voltage can be set from 12V-
17V). This is highest constant voltage for battery. Press ENTER until numbers flash, then
press UP/DOWN to set up voltage that you want, press ENTER to confirm it.
4. D03 Continue to press the button UP, LCD shows 10.0. This is protection value of battery
discharge. Press ENTER until numbers flash, then press UP/DOWN to set up voltage that
you want, press ENTER to confirm it. It means it’s protected when 12V battery is less 10.0V
and there is no output power from OU+ and OU-.
5. D04 Continue to press the button UP, LCD shows 00. 00 is default for lead acid batteries.
If it’s for lithium battery, please press ENTER until numbers flash, then press UP/DOWN to
choose 01, press ENTER to confirm it. Step 2 (D01) is not useful when you choose 01 for
lithium battery. And the voltage in step 3 (D02) will be highest charging voltage for lithium
battery. Press ESC to exit the setting menu. Reboot the controller and check settings again.
Dimension
Notes: Please use our screws only since it may damage the internal PCB if using other screws.
Please use proper torque to push the screws into casing since it may damage the internal PCB by
strong torque.
Content Included
1 Controller
1 English manual
4 Corner connections
4 Screws for controller casing