
User Manual


6
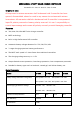
LCD display
Working mode
1
PV voltage / Output power
3.0
Night mode, no charging
2
Battery voltage / Charging current
4.0
MPPT mode
3
Working mode/Error code/Temperature
7.0
Absorption mode
4
ACC Power Generation
8.0
Floating mode
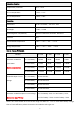
Troubleshooting
Code
Description
How to solve
18
Input PV voltage is low
Increase the PV voltage
60
Over-temperature
protection
Fan will work and temperature reduction
automatically
63
Battery voltage is high
Battery high voltage protection and wait for recovery
65
Battery voltage is low
Battery over-discharge and wait for recovery
71
Input PV voltage is
high
Decrease the PV voltage, refer to correct Voc range
73
Over-charging current
Decrease the PV power, refer to correct Voc range
74
Output load is short
Disconnect the load and press ENT over 5 seconds
Manual Setting
Reminder: The controller will work well on default setting except lithium battery.
Caution! Disconnect the PV modules before setting the controller. When you set up all steps,
please reboot the controller to see if all setting is successful.
1. D00 Press the button PRG, then LCD displays D00. This is setting for load working time
(Default is 24-hour). Press ENTER until numbers flash, then press UP/DOWN to set up time
that you want, press ENTER to confirm it. This output voltage is same as battery. The load
is only for small DC load less 5AMP current. If no load, just leave it.
2. D01 Press the button UP, LCD shows 13.8 (Voltage can be set from 12V-17V). This is
default value of floating voltage. Press ENTER until numbers flash, then press UP/DOWN to
set up voltage that you want, press ENTER to confirm it.