® USER MANUAL MB2020_REP2_UserManual_V4.
MB2020_REP2_UserManual_V4.
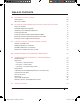
TABLE OF CONTENTS A WELCOME.
A Welcome. Let’s get started. MB2020_REP2_UserManual_V4.
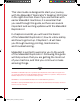
This User Guide is designed to start your journey with the MakerBot® Replicator ®2 Desktop 3D Printer in the right direction. Even if you are familiar with earlier MakerBot machines, it is essential that you read through this guide, as there are several important and exciting updates with the MakerBot Replicator 2. In chapters A and B, you will learn the basics of the MakerBot Replicator 2, how to unbox safely, and how to get set up.
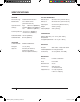
SPECIFICATIONS PRINTING PHYSICAL DIMENSIONS Print Technology: Fused Filament Fabrication Without Spool: 19.1 x 12.8 x 14.7 in [49 x 32 x 38 cm] Build Volume: 11.2 L x 6.0 W x 6.1 H in [28.5 x 15.3 x 15.5 cm] With Spool: 19.1 x 16.5 x 14.7 in [49 x 42 x 38 cm] Shipping Box: 23 x 21.5 x 17 in [59 x 55 x 43 cm] Layer Resolution Settings: High 100 microns [0.0039 in] Weight: Standard 200 microns [0.0078 in] Shipping Weight: Low 300 microns [0.0118 in] Positioning Precision: XY: 11 microns [0.
HOW DOES IT WORK? The MakerBot Replicator 2 makes solid, three-dimensional objects out of melted MakerBot PLA Filament. Your 3D design files are translated into instructions for the MakerBot Replicator 2 and sent to the machine via SD card. Then the MakerBot Replicator 2 heats the MakerBot PLA Filament and squeezes it out through a nozzle to make a solid object layer by layer. This method is called Fused Filament Fabrication [FFF]. ® A WELCOME, LET’S GET STARTED MB2020_REP2_UserManual_V4.
B Setting Up Your MakerBot Replicator 2 Desktop 3D Printer ® MB2020_REP2_UserManual_V4.
When you set up your MakerBot® Replicator ®2 Desktop 3D Printer, remember that it was built and packaged very carefully at the MakerBot factory. We hope you’ll take your time and be just as careful unpacking it and getting it set up. NOTE: Do not force or tear anything during unpacking and setup. This may damage the MakerBot Replicator 2 Desktop 3D Printer. B SETTING UP YOUR MAKERBOT REPLICATOR 2 DESKTOP 3D PRINTER MB2020_REP2_UserManual_V4.
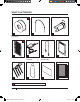
WHAT’S IN THE BOX * 1 1 MakerBot PLA Filament [1lb Spool] 1 Filament guide tube Spool holder * 1 1 Build plate 4 1 Hex wrenches * 10 Power supply and cable PTFE-based grease 1 USB-A to USB-B cable 1 Support card 1 SD card 3 Blue tape sheets More options available at makerbot.com/store B SETTING UP YOUR MAKERBOT REPLICATOR 2 DESKTOP 3D PRINTER MB2020_REP2_UserManual_V4.
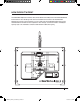
MAKERBOT REPLICATOR 2 DIAGRAM [1] GANTRY SYSTEM [2] LCD PANEL 1 2 [3] KEY PAD [4] THREADED Z-AXIS ROD [5] BUILD PLATE [6] BUILD PLATFORM 4 [7] FILAMENT GUIDE TUBE [8] EXTRUDER CABLE 5 6 [9] EXTRUDER 3 [10] FILAMENT SPOOL ® [11] SPOOL HOLDER 8 7 10 9 11 B SETTING UP YOUR MAKERBOT REPLICATOR 2 DESKTOP 3D PRINTER MB2020_REP2_UserManual_V4.
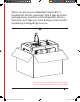
UNPACKING YOUR MAKERBOT REPLICATOR 2 1 Opening the Box 1 1a. Place the MakerBot Replicator 2 box on the ground. Open the box and remove the top cardboard sheet. 1b. Remove the MakerBot Replicator 2 User Manual. We recommend that you use the manual to guide you through the setup process and keep it at hand as you unpack the contents of the box. If you find that anything described in the manual is missing, email us at support@makerbot.com. 1c. Remove the layer of foam and the sheet of cardboard underneath.
UNPACKING YOUR MAKERBOT REPLICATOR 2 2 CONTINUED Removing the MakerBot Replicator 2 from the Box 2a. Open the plastic covering and firmly grasp the frame of the MakerBot Replicator 2 from the outside. Lift it out of the box and place it on a stable surface. NOTE: The black cable is not a handle. Do not pull or twist the black cable at any time. 3 Removing the Accessory Box 1 3a. Remove the two remaining protective foam pieces from the bottom of the Replicator 2’s box. 3b. Lift out the accessory box.
INSTALLING BUILD PLATE 4 Installing the Build Plate 4a. Locate and unwrap the build plate. Tilt and fit the notch in the build plate onto the tab at the back of the build platform. Fit the tab in the build plate between the two pegs at the front of the build platform. 4b. To remove the build plate, gently push the tab on the front of the build plate toward the back of the build platform to release the tab from the pegs. Lift the build plate from the build platform.
INSTALLING FILAMENT GUIDE TUBE AND SPOOL HOLDER 6 Installing the Filament Guide Tube 6a. Locate the filament guide tube. Insert one end into the hole at the top of the extruder and push the tube in as far as it will go. 6b. Insert the other end of the filament guide tube into the left guide tube holder [when viewed from the back] on the back of the MakerBot Replicator 2. Make sure that the end of the filament guide tube is flush with the bottom of the guide tube holder.
MOUNTING FILAMENT SPOOL AND ATTACHING USB CABLE 8 Mounting the Filament Spool 8a. Open the box containing the MakerBot PLA Filament. Remove the spool from its bag. 8b. Fit the spool onto the spool holder. Ensure that the MakerBot PLA Filament unwinds counterclockwise [when viewed from the back] . Squeeze the spool holder and push the spool on until it locks. 9 Spool Holder Attaching the Power Supply 9a. Locate the power supply and cable. Attach the cable to the power supply. 9b.
ATTACHING POWER SUPPLY AND POWERING ON 10 Powering On the MakerBot Replicator 2 10a. Plug the AC power cord into an electrical outlet. 10b. Set the power switch to the ON position. 10c. The MakerBot Replicator 2 will display welcome text on the LCD panel. This is the beginning of the startup script that will guide you through initial calibration and your first build. CAUTION: Do not use an extension cord or power supply other than the ones shipped with your MakerBot Replicator 2.
C Startup Process: Leveling, Loading, Testing MB2020_REP2_UserManual_V4.
After you power on the MakerBot® Replicator ®2 Desktop 3D Printer, the LCD panel will light up and display text. The LCD panel will now run the Startup Script. The Startup Script will guide you through leveling the build plate, loading MakerBot PLA Filament, and creating your first build. THE LCD KEYPAD • Four arrow buttons surround a central M button. Use the arrows to navigate through the LCD menus and make selections. • The left arrow usually allows you to go back or cancel an action.
LEVELING THE BUILD PLATE After the initial welcome message, the Startup Script will display the following: ! Why Leveling Is Important • If the build platform is too far from the extruder nozzle, or if one part of the plate is farther away from the nozzle than another part, your builds might not stick to the build plate. • If the build platform is too close to the extruder nozzle, the build plate can block the MakerBot PLA Filament from extruding from the nozzle. This can also scratch the build plate.
LEVELING THE BUILD PLATE 1 CONTINUED Make Some Room Between the Build Plate and the Nozzle When directed by the LCD screen, tighten each of the three knobs under the build platform about four turns. Support Card Leveling Knobs ® C STARTUP PROCESS: LEVELING, LOADING, TESTING MB2020_REP2_UserManual_V4.
LEVELING THE BUILD PLATE 2 CONTINUED Adjust the Knobs as Directed The script will prompt you to adjust the knobs individually. As you adjust each knob, make sure the MakerBot Support card just slides between the nozzle and build plate. You should feel some friction on the support card but still be able to easily pass the card between the plate and the extruder nozzle without tearing or damaging the card. 3 Adjust Each Knob Again The script will prompt you to adjust each knob again.
LOADING MAKERBOT PLA FILAMENT When you have completed the initial leveling tasks, the LCD menu will display the following text: “Aaah, that feels much better. Let’s go on and load some plastic!” Before building, you must load the MakerBot PLA Filament into the extruder. The extruder will heat the MakerBot PLA Filament and use the melted material to build things. What You Will Do • Remove the end of the filament guide tube from the hole in the top of the extruder.
LOADING MAKERBOT PLA FILAMENT 1 Detach the Filament Guide Tube Locate where the filament guide tube attaches to the top of the extruder. You must remove the filament guide tube from the extruder. To remove the tube, gently pull it out of the hole in the top of the extruder. 2 CONTINUED Pull here Feed the Filament Through the Filament Guide Tube Free the end of the MakerBot PLA Filament from the filament spool. With a pair of scissors, cut a clean edge.
LOADING MAKERBOT PLA FILAMENT 3 CONTINUED Press the M to Begin Heating the Extruder After you’ve fed the MakerBot PLA Filament all the way through the guide tube, press the M button on the LCD menu. The MakerBot Replicator 2 will start to heat your extruder. WARNING: Do not touch the extruder while it is heating — it heats to 230° C. Press the M 4 Press the M to Continue After the extruder reaches 230° C, the LCD panel will prompt you to load the MakerBot PLA Filament into the extruder.
LOADING MAKERBOT PLA FILAMENT 5 CONTINUED Push the Filament into the Extruder Push down on the Extruder Arm. Continue to hold it down as you insert the free end of the filament into the hole in the top of the extruder. Push the filament in as far as it will go. You will see plastic start to emerge from the extruder nozzle. Release the extruder arm. 6 Stop Extrusion The extruder motor will grab onto the filament and continue to draw it in.
LOADING MAKERBOT PLA FILAMENT 7 CONTINUED Return the Filament Guide Tube Push the guide tube back into the opening on the top of the extruder. NOTE: If you have problems or need to load the MakerBot PLA Filament again, you can use the up and down arrows to scroll through the top-level menu on the LCD panel and use the M button to select Utilities. Scroll to Change Filament and select it. Then select Load. You can use these menus to return to the load script at any time.
MAKING A TEST OBJECT FROM THE SD CARD 1 Locate the SD Card The MakerBot Replicator 2 package includes an SD card pre-loaded with files for making test objects. The SD Card is located in the SD port directly behind the LCD Panel.
MAKING A TEST OBJECT FROM THE SD CARD CONTINUED Projects Available on the SD Card CHAIN LINKS File Name: Chain Links Make Time: 15 Minutes COMB File Name: Comb Make Time: 26 Minutes MR JAWS File Name: Mr Jaws Make Time: 18 minutes Design By: Sal Thingiverse:28405 Design By: repraprook Thingiverse:1140 Design By: Mahoney Thingiverse:14702 NUT AND BOLT SET File Name: Nut and Bolt Make Time: 30 minutes STRETCHY BRACELET File Name: Stretchlet Make Time: 22 minutes NAME: File Name: Make Time: Design B
D Making an Object with MakerBot MakerWare MB2020_REP2_UserManual_V4.
How to make an object using a computer and MakerBot® MakerWare™. ™ D MAKING AN OBJECT WITH MAKERBOT MAKERWARE MB2020_REP2_UserManual_V4.
USING MAKERBOT MAKERWARE i MakerBot MakerWare is software that prepares 3D models for printing and turns them into instructions for your MakerBot Replicator 2X. 1 Download and Install MakerBot MakerWare 1a. Go to your computer and open a browser session. 1b. Enter the URL makerbot.com/makerware and download the correct MakerWare installer for your operating system. 1c. Open the installer and follow the directions to install the software. NOTE: You can find a video of this tutorial at http://www.
USING MAKERBOT MAKERWARE 2 CONTINUED Download an Object From MakerBot Thingiverse Thingiverse is a website where MakerBot users and others can share design files. 2a. Open a browser session and go to www.thingiverse.com. Use the search field at the upper right to search for “Minimalist NYC buildings.” Your search results should include “Minimalist NYC buildings by JonMonaghan.” Click on the link. 2b.
USING MAKERBOT MAKERWARE 3 Open MakerBot MakerWare [1] CAMERA HOME: Resets MakerWare to the default view of the object. [2] +/-: Zoom in and out. You can also use the scroll wheel on your mouse to zoom in and out. [3] LOOK: Click the Look button or hit the L key to go into Look mode. In this mode, click and drag with your mouse to rotate the plate and the object. Use the arrow at the side of the selected Look button to open the Change View submenu for Top, Side and Front views.
USING MAKERBOT MAKERWARE 3 1 CONTINUED Open MakerBot MakerWare | Continued 2 3 4 7 6 8 9 5 10 11 NUT AND BOLT Design By: aubenc Thingiverse: 9095 D MAKING AN OBJECT WITH MAKERBOT MAKERWARE MB2020_REP2_UserManual_V4.
USING MAKERBOT MAKERWARE 4 CONTINUED Open the .stl files in MakerBot MakerWare 4a. Click on the Add button. Navigate to the location of the file FlatIron.stl and select it. The file will open at the center of the build plate. 4b. Select the Move button and click and drag the Flatiron Building to the left. 4c. Click on the Add button again. Navigate to the location of the file Woolworth.stl and select it.
USING MAKERBOT MAKERWARE 4 CONTINUED Open the .stl files in MakerBot MakerWare | Continued 4e. Click on the Flatiron Building to select it. Hold down the shift key and click on the Woolworth Building. Then release the shift key. Both models should be selected. 4f. Select the Scale button. Click and drag to change the size of both models together. 5 Save your model and toolpath files 5a. Select the Save button. The save dialog gives you the option to save your plate as an STL or a .thing file.
USING MAKERBOT MAKERWARE 5 CONTINUED Save your model and toolpath files | Continued 5b. Select the Make It button. The Make dialog appears, with the following options: [1] MAKE WITH: Select The Replicator 2, if not already selected. [2] MATERIAL: Choose the type of plastic your are building with. [3] QUALITY: Specify the quality of your build. Smaller layer heights result in more detailed models and longer build times. [4] RAFT: Select this to have your object built on a raft.
USING MAKERBOT MAKERWARE 5 CONTINUED Save your model and toolpath files | Continued 5c. Insert your SD card into an SD card reader attached to your computer. 5d. Accept the default settings and click the Export! Button. MakerWare will open the Export dialog. 5e. Set the following options in the Export dialog: • Navigate to the location of your SD card and select it. • Enter “flatiron_woolworth” as the file name. • Ensure that X3G is selected from the file type dropdown menu. Then click the Save button.
USING MAKERBOT MAKERWARE CONTINUED Updating MakerBot MakerWare We are always improving our products – including MakerWare. Be sure to update your copy of MakerWare to the latest version so that you always have access to the newest features. A pop up will appear in MakerWare when a new version is available for download. USING REPLICATORG You can also use the open source ReplicatorG software to view and manipulate files from http://www.thingiverse.com and to send files to your MakerBot Replicator 2.
NOTES 41 MB2020_REP2_UserManual_V4.
E Troubleshooting, Diagnostics, and Maintenance MB2020_REP2_UserManual_V4.
This chapter describes basic troubleshooting and maintenance tasks for your MakerBot® Replicator ®2 Desktop 3D Printer. For details on more advanced troubleshooting and maintenance tasks, go to makerbot.com/support. ® E TROUBLESHOOTING, DIAGNOSTICS, AND MAINTENANCE MB2020_REP2_UserManual_V4.
TROUBLESHOOTING Common Problems and How To Fix Them PROBLEM SOLUTION Can’t load MakerBot PLA Filament into the extruder Make a fresh cut at the end of the MakerBot PLA Filament. Cut the filament at an angle—a narrow tip will help with loading. It is also important that the filament have no bends in it. If you are still having trouble, remove the fan assembly as described in the “Cleaning the Drive Gear” section beginning on Page 49.
TROUBLESHOOTING CONTINUED PROBLEM SOLUTION Object is stuck to build plate (Continued) In the future, you can cover your build plate with blue tape. This allows your objects to stick to the build plate but be removed more easily. Object won’t stick to build plate Relevel your build plate. Inconsistent plate height will lead to inconsistent adhesion. If any one part of your object does not adhere well to the build plate, the whole object might peel off of the plate. Ensure that the plate is clean.
TROUBLESHOOTING CONTINUED PROBLEM SOLUTION Extrusion stops during a build Your build plate might be so close to the extruder that it is preventing plastic from coming out of the nozzle. Tighten each knob on the bottom of the build plate by a quarter turn to move the platform farther from the extruder nozzle. Extrusion could also stop if your MakerBot PLA filament has been kept heated for too long. Unload the filament, cut a fresh edge, and load the filament again.
DIAGNOSTICS LCD PANEL | UTILITIES MENU UTILITIES Monitor Mode Displays the current temperature of the extruder. When making an object, displays the percent completed. Change Filament Scripts that walk you through tasks associated with the MakerBot PLA Filament. LOAD: Script that walks you through the process of loading the MakerBot PLA Filament. UNLOAD: Script that walks you through the process of unloading the MakerBot PLA Filament.
DIAGNOSTICS LCD PANEL | INFO AND SETTINGS MENU INFO AND SETTINGS Bot Statistics General Settings Displays the estimated total hours and minutes of building in the lifetime of your Makerbot Replicator 2 and the duration in hours and minutes of the last build. Optional settings and information. SOUND: Turns the MakerBot Replicator 2’s indicator sounds on or off. LED COLOR: Allows you to turn off the LED lights or select a color. Choices are Blue, Green, Pink, Orange, Purple, White, and Off.
DIAGNOSTICS LCD PANEL | INFO AND SETTINGS MENU INFO AND SETTINGS Version Number Restore Defaults Displays the version number of the firmware. Returns all the settings on the MakerBot Replicator 2 to factory settings. When you select this option, a new menu appears. Choose Yes or No. MAINTENANCE Lubricating the Threaded Rod and the X-Axis Idler Pulley After approximately 50 hours of build time, you should lubricate the threaded rod on your Z-axis and the X-axis idler pulley.
MAINTENANCE CONTINUED Lubricating the Threaded Rod and the X-Axis Idler Pulley | Continued 7. Locate the X-axis idler pulley. If you are facing the front of the MakerBot Replicator 2, the idler pulley is at the top left side. The idler pulley is one of the pulleys that allow the rubber belt to move the extruder from left to right, or along the X-axis. The pulley at the other side of the gantry is called the timing pulley and does not require lubrication. 8.
MAINTENANCE CONTINUED Cleaning the Drive Gear The drive gear is the part of the extruder that pushes filament through the extruder. When you make things with your MakerBot Replicator 2, small pieces of hardened PLA can stick to the drive gear. If you are having problems with your extruder, cleaning the drive gear might help. 1. Unload the MakerBot PLA Filament from the extruder.
MAINTENANCE CONTINUED Cleaning the Drive Gear | Continued 6. Reseat the motor assembly. 7. Plug in the motor wires. 8. Add the fan guard, the fan, the heat sink, and spacers to the front of the extruder and bolt them on. 9. Reload the MakerBot PLA Filament. To do this, go to the LCD panel and select Utilities > Filament Options > Load. 52 E TROUBLESHOOTING, DIAGNOSTICS, AND MAINTENANCE MB2020_REP2_UserManual_V4.
MAINTENANCE CONTINUED Updating Your Firmware Keeping your firmware up to date will ensure that your MakerBot Replicator 2 always operates at its best. When a new version of your bot’s firmware is available, MakerWare will display a message letting you know that it’s time to update. To update your firmware, follow these steps: 1. Locate the USB-A to USB-B cable that came with your MakerBot Replicator 2 and use it to connect your Replicator 2 to your computer. 2.
GLOSSARY OF TERMS ACTIVE COOLING FAN: The fan that cools the MakerBot PLA Filament as it extrudes. BLUE TAPE: Blue masking tape that makes a great build surface for objects printed with MakerBot PLA Filament. You can find blue tape at any hardware store. FIRMWARE: The software that runs on your MakerBot Replicator 2. GANTRY: The metal rods that allows the MakerBot Replicator 2’s extruder to move on the X and Y axes. BUILD PLATE: The acrylic surface on which the MakerBot Replicator 2 builds an object.
GLOSSARY OF TERMS CONTINUED MOTOR ASSEMBLY: The stepper motor and the drive block that push filament into the extruder. MOTOR WIRES: The bundle of electrical wires that provide power to the motor. NOZZLE: The opening on the end of the extruder from which heated MakerBot PLA Filament emerges to be spread onto the build plate. POWER SUPPLY: The A/C power supply for the MakerBot Replicator 2. It includes a block and two plugs. REPLICATORG: Free, open source software that allows you to manipulate .
CONTACT US SUPPORT makerbot.com/support Our website has extensive documentation and troubleshooting information about your MakerBot Replicator 2 Desktop 3D Printer. It’s a great resource when you want to try to solve issues quickly on your own. support@makerbot.com If you ever need help resolving an issue with your MakerBot Replicator 2, send an email to the address above to open a ticket with the MakerBot Support Team.
SAFETY AND COMPLIANCE RADIO AND TELEVISION INTERFERENCE This equipment has been tested and found to comply with the limits for a Class B digital device, pursuant to Part 15 of the FCC rules. These limits are designed to provide reasonable protection against harmful interference in a residential installation. This equipment generates, uses and can radiate radio frequency energy and, if not installed and used in accordance with the instructions, may cause harmful interference to radio communications.
WARRANTY, RETURNS, AND REPLACEMENT POLICY MakerBot products do not carry a long-term warranty. Returns are possible only on unaffected items, within 14 days of receipt. After such time, all sales are considered final. “Unaffected” means a device has never been assembled, powered up, programmed, or otherwise changed. MakerBot cannot accept returns on purchased items that have had electrical power applied to them, or been otherwise programmed, changed, or affected.
TERMS OF SERVICE CONTINUED DISCLAIMERS. Neither MakerBot nor any of our affiliates warrant the accuracy or completeness of the information, products or services provided by or through this Manual, which are provided “as is” and without any express or implied warranties of any kind, including warranties of merchantability, fitness for a particular purpose, or non-infringement of intellectual property.
MakerBot One MetroTech Center, 21st Floor, Brooklyn, NY MB2020_REP2_UserManual_V4.indd 60 support@makerbot.com makerbot.