
Instruction manual


12
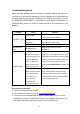
Operation Instructions
1. Place Minis Power Supply series on a sturdy and level surface in a safe, dry
place, away from laboratory traffic.
2. Ensure that the AC power switch is OFF, and then plug the three -pronged
power cord into a grounded three -prong AC outlet of the appropriate voltage
(110V to 240V as indicated on the rating sticker near the AC cord on the
back of the unit).
3. Turn the AC power ON by the switch on the rear .
4. Connect the DC output jacks from the electrophoresis unit; insert the red
lead (+) into the red output jack, and the black lead ( -) into the black output
jack.
6. Press Key to sele ct the suitable voltage.
7. Press Key, and then press Key or Key to adjust timer
upon you r request if setting time is required . It will auto stop while timer is
up.
8. Press Key to start the run. The LED is lit.
9. Press Key again to stop the u nit at any time if necessary.
10. When the run is completed, Press Key to terminate a timed run, and
Turn the AC power OFF by the switch on the rear .