MAJESTIC OUTDOOR GAS FIREPLACE Model: ODGSR36ANAU & ODGSR36APAU Installation and Operating Instructions Page 1 of 18
CONTENTS Part 1: For Your Safety Part 2: Installation Instructions • • • • • • • • • • • • • General Information Fireplace Dimensions Clearance to Combustibles Mantels Mantel Chart Hearth Framing and Finishing Final Finishing Gas Specifications Gas Inlet and Burner Pressures High Elevations Valve Access Gas Fitting Line Installation Part 3: • • • • • • • Operating Instructions Log Installation Lava Rock First Firing Flame Adjustment Flame Characteristics Lighting and Operating Instructions Troublesh
Part 1: For Your Safety For your safety do not operate this appliance before reading this instruction book. WARNING: Improper installation, adjustment, alteration, service or maintenance can cause injury or property damage. For assistance or additional information consult with Raypak Australia, your Raypak distributor, qualified installer or accredited Rheem Australia Service agency. WHAT TO DO IF YOU SMELL GAS? DO NOT try to light any gas appliance. DO NOT touch any electrical switch.
GENERAL INFORMATION FOR SAFE INSTALLATION AND OPERATION OF YOUR GAS APPLIANCE PLEASE NOTE THE FOLLOWING: a) This appliance gives off high temperatures and should be located out of high traffic areas and away from outdoor furniture and blinds or curtains. b) Children and adults should be alerted to the hazards of high surface temperatures of this appliance and should stay away to avoid burns or ignition of clothing. c) Children should be carefully supervised when they are in the vicinity of the appliance.
Ventilation Requirements Adequate combustion and ventilation air must be provided. The flow of combustion and ventilation air MUST NOT be obstructed. NOTE: THIS APPLIANCE MUST NOT BE INSTALLED OR USED INDOORS. This appliance shall only be used in an above ground, open-air situation with natural ventilation, without stagnant areas, where gas leakage and products of combustion are rapidly dispersed by wind and natural convection.
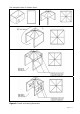
See examples below of Outdoor Areas: Figure 1: Overall and framing dimensions.
Clearance to Combustibles (Refer Figure 1) Top framing ……………………………………………………0 mm to standoff spacer Bottom……………………………………………………………0 mm Side framing …………………………………………………..0 mm to standoff spacer Back framing ………………………………………………….0 mm to standoff spacer Perpendicular Sidewall……………………………………..0 mm Top of unit to ceiling………………………………………..915 mm Front of unit to combustibles…………………………….915 mm Hearth A hearth is not mandatory but is recommended for aesthetic purposes. We recommend a non-combustible hearth.
: A minimum of 100mm above the fireplace must be non-combustible material (eg fibre cement sheeting). Figure 2a Figure 2b Framing and Finishing Warning: Check appliance to make sure it is levelled and properly positioned. The appliance should only be mounted on the following surfaces: • A flat combustible (burnable) surface. • A raised wooden platform. • A concrete block or other solid object placed beneath each of the four corners of the appliance. To mount the appliance: 1. Choose unit location. 2.
Figure 3 Finishing CAUTION: All joints between the finished wall and the appliance surround (top and sides) may be sealed only with a non-combustible material. Only non-combustible material can be applied as facing to the appliance surround as per Figures 2a and 2b.
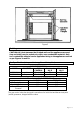
Valve Access Valve can be accessed in one of two ways: 1. Remove the front panel just below the front of the hearth pan. This is accomplished by lifting on the panel. To replace the valve access panel line up the two pins with the holes in the surround bottom and push the panel over the hearth pan. (Refer Figure 4) 2. Lift the brick with Majestic logo on it (Refer Figure 5) Figure 4 Figure 5 Gas Line Installation The gas valve inlet is ½” BSP internal (female) thread.
Part 3: Operating Instructions Log Installation Warning: As with all plastic bags, these bags are not toys and should always be kept away from children and infants. 1. Remove logs from packaging. 2. Place left rear log on rear support. Ensure that log is firmly positioned and there is no side to side movement. (Refer to Figure 11) 3. Carefully place ember log between grate and burner. 4. Place the front of right rear log on the burner and the back of the log on the rear log support. 5.
Flame Adjustment For units equipped with Hi/Lo valves, flame adjustment is achieved by rotating the Hi/Lo adjustment knob located near the centre of the gas control valve. Figure 12 – SIT 820 Gas Control Knob Flame Characteristics It is important to periodically perform a visual check of the pilot and the burner flames (refer Figures 13 & 14). The burner flame is checked after 5 minutes operation. It should be mainly a yellow flame with possibly some blue flame at the base.
Page 13 of 18
Troubleshooting Nova SIT 820 Standing Pilot START Gas Supply On CHECK No Yes Gas Supply On No Yes Pilot Stays Lit No Yes Pilot Lights Main Burner Yes System OK No Gas supply connected Shut off valve open Lockout has engaged. Wait 60 seconds and try again. Piezo not tight enough for good ground. For spark at electrode while depressing Piezo 1/8” gap to pilot hood required. All wiring connections. Replace Piezo ignitor. Thermodisk. Air in gas pipe. Thermopile requires a min of 325Mv.
Maintenance Burner and burner compartment It is important to keep the burner and the burner compartment clean. At least once a year the logs should be removed and the burner compartment vacuumed and wiped out. Remove and replace the logs as per the instructions in this manual. Always handle the logs with care as they are fragile and may also be hot if the fireplace is in use.
Parts List Page 16 of 18
Part 6: Warranty LIMITED LIFETIME WARRANTY PRODUCT COVERED BY THIS WARRANTY All Vermont Castings gas stoves, gas inserts, and gas fireplaces, and all Majestic or Northern Flame brand gas fireplaces equipped with an Insta-Flame Ceramic Burner or steel tube burner.
IF WARRANTY SERVICE IS NEEDED... 1) Contact your supplier. Make sure you have your warranty, your sales receipt, and the model/serial number of your Raypak Majestic Gas Log fire.