
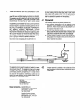
Technical data


6.
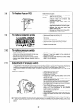
SERVICING INSTRUCTIONS
6.1
6.2
6.3
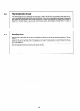
Before commencing any service work :
1. Isolate electrical supply.
2. Remove bottom trim by sliding forward.
3. Turn off gas at gas service cock.
4. Turn off water at water service cock.
5. Drain the appliance by opening hot water outlet tap and removing drain plug in the water service cock.
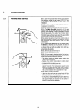
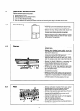
Front Casing
To remove :
- Pull off gas control and temperature selector knobs.
- Remove controls facia plate by sliding upwards.
- Remove the four fixing screws which secure the
front case (top, bottom and centre) taking care not
to loose facia retaining bracket and washers.
- Remove the front case by lifting off the to locating
lugs and pulling forward to clear the water section
at the base of the appliance.
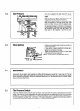
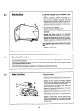
Burner
-
Remove the combustion chamber front panel as
detailed below.
- Remove two threaded screws which secure the
front panel of the combustion chamber skirt to the
flue hood (A) Section 6.4.
- Remove three self-tapping screws on either side of
combustion chamber skirt (B) Section 6.4.
- Unscrew the pilot tube clamping screw (A) and re-
move the clamp and screw and pilot tube. Discon-
nect the pressure test point tube from the left
hand end of the manifold.
- Remove the burner manifold by unscrewing the
two screws (B) and two screws and washers (0.
- Unplug ionisation electrode at the connector.
- Withdraw the burner head assembly taking care
not to damage the pilot bvurner/electrode assem-
bly or the ignition leads.
- The burner head should be turned upside down
and cleaned by brushing.
- Replace in reverse order making sure that the gas-
ket between the burner manifold and gas section is
in place and is in good condition. If necessary replace
gasket and ensure that the burner head assembly is
correctly located on the two spigots at the rear.
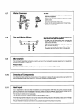
Pilot
- Remove combustion chamber front panel, burner
and pilot tube as in 6.2 if not already removed.
- Blow through the tube to remove any dust.
- Remove screw securing spark electrode. Lift out of
‘D’ slot and ease to one side,
- Unscrew the knurled pilot burner outer ring (A).
- Remove flame retention gauze.
- Unscrew the pilot body (B) with a 15 mm spanner.
Clean by brushing and blowing.
DO NOT CLEAN HOLES WITH A WIRE.
- Re-assemble in reverse order ensuring pilot body is
screwed down tightly.
15