
User Manual


10
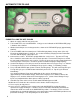
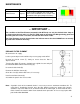
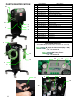
CLEAN AUTOMATIC DRAIN
Turn the filter bowl (A) counter-clockwise one eighth of a turn and
pull the filter bowl down from the filter housing.
Unscrew the nut (F).
Remove the drain unit (B-E) from the filter bowl (A).
Remove the O-ring (E).
Carefully pull the floating house (B) from the seat (D). Do not bend
the needle (C).
Clean the parts with soap and water. Make sure that the needle
bore is open and clean.
Assemble the parts in the opposite direction. Make sure that the
parts are dry before reassembly.
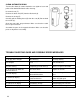
TROUBLE SHOOTING GUIDE AND POSSIBLE ERROR MESSAGES
Problem Possible Cause Solution
1. Display does not light Dead Battery Recharge battery
2. Inflation process starts, but does
not complete
Low supply pressure or leaks
exist
Check supply pressure & confirm
leaks do not exist
3. Air chucks will not seal to the
tire valve stem(s)
Air chucks worn or not
completely pushed on tire(s)
Make sure air chucks are pushed
on tires or replace connectors
4. Air chucks leak while not
connected to tires
Air chucks worn Replace air chucks
5. E4 on display
Over inflation due to
blocked/kinked hose
Remove blockage/kink or replace
hose
6. E6/E16 on display
Unit powered ON while
connected to tires
Remove hoses from tires and turn
power OFF/ON again
7. E5/E8/E9 on display PCB or sensor error Contact RTI Technologies
8. E10 or Lo on display Low battery charge Charge battery for 3-5 hours
9. E11/E12 on display PCB fault Contact RTI Technologies