
Instruction Manual

2 - Introduction
ExpressCard 2000| Instant Issuance Card Personalization System | Hardware Service Manual
Page 19
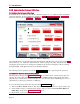
4) Re-home the daisy wheel by pressing either the Counter Clockwise Home or Clockwise Home
button. In normal operation, the daisy wheel homes counter-clockwise.
5) Press the All Motors Stop button to make sure the daisy wheel motor is not energized / holding still.
6) Press the Status button to return to the Status page.
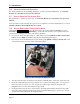
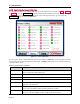
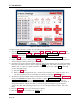
2.9.3.3 How to Move the Embosser Cams (Hammers)
The top and bottom embosser cams, which can be driven by the Top Clamp Motor Move button and
Bottom Clamp Motor Move buttons, squeeze the embosser hammers to imprint raised characters on
cards. In a typical emboss cycle, each of the cam motors takes about 600 steps forward to move the cam
from its home position to press into the card, and 600 in reverse to retract back to the home position. One
step is approximately equal to 0.225 degrees of rotation, so the total emboss cycle covers about 135
degrees.
To move the top embosser cam, bottom embosser cam, or both cams, follow these steps from the
Embosser Utility page:
1) Press the All Motors Stop button to make sure no motor is applying force.
2) If there is nothing in the way of the hammers, press the Top & Bottom Home button to make sure
the cams are not closed. The “home” position is the standard starting position for an emboss cycle.
3) Press either the Counter Clockwise Home button or the Clockwise Home button to make sure the
daisy wheel has a character positioned between the embosser hammers. If the daisy wheel is off-
center, the hammers could damage it.
4) You may encounter a situation during testing where you want to close the hammers to their calibrated
close position, but prevent one embosser hammer from moving during testing; for example, to
prevent damage if something is jammed in the device, or if moving a specific cam would be a safety
hazard. In that type of situation, you can prevent one or both of the cams from moving in the next
step by checking the Do Not Move Top and / or Do Not Move Bottom checkbox. Note: This
feature only locks out movement when pressing the Close Clamp button and will not prevent
clamp movement for any other buttons on the page or during normal device operation.
7) Set the number of steps you want the cam(s) to move (see section 2.9.3.1 About the Embosser
Utility Page) and press the Top Clamp Motor Move or Bottom Clamp Move button, OR press the
Close Clamp button, OR press the All Motors Stop button if you find you have moved too far and
need to release the cams immediately.
8) Repeat the moves as necessary to complete the test.
9) Press the Top & Bottom Home button to make sure the cams are not left closed.
10) Press the All Motors Stop button to make sure no motor is applying force.
11) Press the Status button to return to the Status page.
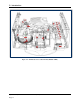
2.9.3.4 How to Change the Embosser Character Depth and Dwell Time
Over time or after embosser service, an individual embossed character’s height may change to the point
that it doesn’t match other characters. The Emboss Settings page provides access to settings for each
tine on the embosser daisy wheel, which affect the pressing force and hold time for that one character.
The Emboss Settings page provides two ways to change these settings: You can import settings for all
tines from a file on the EC2000’s solid state drive or a USB thumb drive using the Read button, or you
can change each tine’s settings individually. The page also provides a Reset button that will reset all
tine settings to factory defaults.