
Manual


Tearing Down Your Tripod
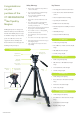
Setting Up Your Tripod
1
Assess Shooting Area
To set up your tripod, begin by removing the
tripod from the box and/or carry case. Assess
your shooting area to determine a stable area
to set up your camera.
7
Remove the Mounting Plate
Rotate the mounting plate lock so that the
flat side is against the mounting plate. The
mounting plate will pop free.
1
Unmount Camera
Rotate the mounting plate lock forward until the
mounting plate pops free. Lift the camera up
and out until it is free of the tripod.
3
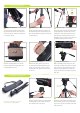
Spread the Tripod
Plant the front leg of the tripod. Lift the back two
legs and pull back to spread the tripod to the
full extension of the mid-level spreader. Check
the float level to verify that the tripod is level.
Readjust the legs if necessary. Lock the mid-level
spreader by rotating the knob clockwise.
9
Mount Camera to Tripod
Make certain that your tripod legs are locked
and the tripod is stable and ready for mounting
your camera. From the right side of the tripod,
slide the mounting plate down and left onto
the tripod head. Push down until the mounting
plate clicks.
2
Extend Legs
Always extend the legs from the top flip-locks
first. Pull each flip-lock and extend the leg to its
desired height. Match the length of the legs and
relock the flip-locks.
8
Mount Camera to Plate
Attach the mounting plate to your camera.
Be certain that the retractable alignment pin
sets into its pocket on the camera. Screw the
threaded stud on the plate into the bottom of
the camera.
2
Lower Center Column (if raised)
Release the center column locking knob. Using
the hand crank, lower the center column all the
way down. Secure the locking knob and fold the
hand crank down.
All images are for illustrative purposes only.
Your tripod may look slightly different.
Center Column
Lock Knob
Float
Level