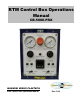
RTM Control Box Operations Manual CB-5000-PRX MAGNUM VENUS PLASTECH RTM Control Box Operations Manual Rev: 2/08
TABLE OF CONTENTS: 1. Introduction 2. RTM Control Box Programming 3. Making Control Box Connections 4. Start up & Shut down Procedures 5. Trouble Shooting 6.
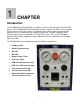
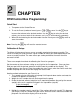
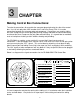
1 CHAPTER Introduction: The CB-5000-PRX RTM Control Box is a modular system used to manually control the RTM process. The CB-5000-PRX RTM Control Box includes a Digital Resin Meter. Using an optical sensor, pulses are sent to the meter as the pump moves and then when a preset number (amount of resin) is reached the gun & pump are turned off. It can be used with a basic Primax pumping system or added to an existing RTM system.
2 CHAPTER RTM Control Box Programming: Quick Start 1. Turn power to the Control Box on 2. To set the Preset (number of counts) press or key once. Use the key to increase that column to the desired number. Use the key to select the desired column; you must set each of the columns, one’s, ten’s, and hundred’s separately. 3. When finished entering the desired number into the Preset press the store the number. Note: Pressing the key once to key will reset the counter to zero.
Front Panel Description: The front panel bezel material is flame and scratch resistant, textured plastic with clear viewing window that meets NEMA 4X/IP65 requirements, when properly installed. Continuous exposure to direct sunlight might accelerate the aging process of the plastic material used in the bezel. The bezel should be cleaned only with a soft cloth and neutral soap product. Do NOT use solvents.
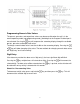
Programming Numeric Data Values: The presets, prescaler, and output time values may be accessible when the unit is in the normal operating mode (not programming mode), providing that the Program Disable input is not activated. Pressing the key will sequence the secondary display through the available presets, prescaler, and output time values. To change a numeric data value it must be visible on the secondary display. Pressing the or key will allow changing of the value.
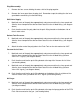
3 CHAPTER Making Control Box Connections: To make the connections disassemble the connector plug attached to the side of the control box. Use 1/4 inch poly tube, MVP number 01417 and Hose Clamp 7701-2-1 to make connections between the connector plug and component. Connections are made by sliding the Hose Clamp onto the correct poly tube pushing the poly tube onto the correct barb fitting and thread the Hose Clamp over the poly tube and barb fitting.
Plug Disassembly: 1. Remove the four screws holding the outer shell of the plug together. 2. Remove the inner guard from the plug shell. Remember to put the tubing thru the inner guard before connecting it to the barb fitting. Shift Valve Supply: 3. Mark both ends of the poly tube appropriately and put one end thru the inner guard and slide the hose clamp onto the tube and then attach it to the #1 barb fitting. (see diagram above) 4.
Solvent Purge: 13. Mark both ends of the poly tube appropriately and put one end thru the inner guard and slide the hose clamp onto the tube and then attach it to the #6 barb fitting (Solvent Purge). (see diagram above) 14. Push the other end into the push fitting located at the top of solvent purge portion of the RTM Flush Valve mounted on the gun. (see drawing below) RTM Valve / Injection Port: 15.
MAS-1000 VACCUM VALVE - OFF SIGNAL (#3) VACCUME VALVE - ON SIGNAL (#4) TO WASTE TANK / BUCKET VACUUM ASSIST LINE RTM-LT-CK MAS-1000 TO WASTE TANK/BUCKET Auto Pro Gun MAS-1001 Inner/Part Seal Outer Mold Seal VACCUM VALVE FLUSH ASSY.
PIN OUT/ PLUMBING DECAL CONNECTOR PLUG & INNER GUARD REGULATED AIR SUPPLY TO AIR MOTOR SENSOR CABLE (APS-1024) USED WITH APS & UPS UNITS SENSOR (APS-1025) ATTACHES TO CSD-1000-UPS and CSD-1000APS, LOCATED ON THE PUMP BASE PLATE – USE SENSOR ESEN-102 FOR PATRIOT UNITS. MAIN AIR SUPPLY TO THE CB5000-PRX RTM CONTROL BOX Miscellaneous Connections: 1.
4 CHAPTER Start up and Shut down procedures: RTM LITE SYSTEM DAILY START UP: 1. Check all hoses for damage. 2. Check all material supplies and fill or replace as needed. 3. Open main inlet air valve on the air manifold. 4. Turn on power to the Control Box. 5. Open recirculation valve on Catalyst Manifold 6. Remove the Pivot Pin from the UPS catalyst pump drive. 7.
17. Insert the Catalyst Injector and injector seal into the aperture in the Distribution Ring. The spring goes into the gun block. 18. Place Mix Chamber and Catalyst Injector onto the front of the Pro Gun, secure it with the 2 screws. 19. Flush the assembled mix chamber with solvent. 20. Apply a little red grease (6706-2-1) to the threads of the mix chamber. 21. Install the RTM-LT-CK onto the mix chamber. DAILY SHUT-DOWN: 1. Disconnect the gun from the injection port. 2. Flush the gun with solvent. 3.
5 CHAPTER TROUBLESHOOTING: The majority of problems can be traced to improper connections or incorrect set-up parameters. Be sure all connections are clean and tight, that the correct output board is fitted, and that the set-up parameters are correct. Also, be sure the DIP switch settings and the User Input Plug Jumper position are correct for the particular application. PROBLEMS POSSIBLE CAUSE REMEDIES NO DISPLAY 1. Power off. 2. Loose connection or improperly wired. 3.
PROBLEMS POSSIBLE CAUSE UNIT COUNTS INCORRECTLY 1. Input signal type incorrectly selected. REMEDIES 1. Check DIP switches. Set HI/LO FRQ. switch to LO for count speed of less than 50 Hz. 2. Check sensor input connections. 3. Check power source for noise. a. Check signal wire routing. 4. Verify count input mode. 5. Verify prescaler. 2. Inputs improperly connected. 3. Electrical noise interference. 4. Incorrect counting mode 5. Prescaler incorrect. UNIT COUNTS WHILE RESET IS ACTIVATED 1.
6 CHAPTER Component Drawings: 1. CB-5000-PRX RTM CONTROL BOX 2. RTMFLUSH RTM DUAL FLUSH ASSEMBLY 3. SPG-1000-A AUTOMATIC SUPER PRO GUN ASSEMBLY 4. CPC-1000-A AUTOMATIC CLASSIC PRO GUN 5. CPC-2000-A AUTOMATIC CLASSIC PRO GUN – FIT MIX CHAMBER 6. Electrical Diagram 7. CSD-1000-UPS SENSOR ASSEMBLY – UPS 8. CSD-1006 PUMP BASE PLATE MODIFICATION 9. CSD-1000-HV SENSOR ASSEMBLY – HV UPS 10.
66 65 64 63 62 61 60 59 58 57 56 55 54 53 52 51 50 49 48 47 46 45 44 43 42 41 40 39 38 37 36 35 34 33 32 31 30 29 28 27 26 ITEM 09169-1 F-BHCS-04C-08 09613 BV-6F6F-LP PF-ME-06 NOF-06 PF-SE-04-BR F-HN-06C F-SW-06 F-HB-06C-40 COL-CLMP PF-HN-06-04 07645 07640 07644 01659 TRU-1021 07225 00446-1 PF-HN-04 F-KN-440 F-PH-440-10 07254 09575 7701-3-19 7701-6-3 MPM-2585 PF-AP-04 00416 09852 07234 PF-RB-04-02 08804 08185 F-PH-832-20 7701-6-7 F-FW-03 08807 09750 09187 F-HN-832 5 3-WAY PNL MNT VALVE 4 Hex Socket Button
25 24 23 22 21 20 19 18 17 16 15 14 13 12 11 10 9 8 7 6 5 4 3 2 1 ITEM INCL WITH VALVE INCL WITH VALVE 09524 08801 F-KN-832 F-PH-832-06 09068 CB-5003-PRX 07414 F-HB-04C-08 CB-5003-PRX-11 9807-1-1 9807-2-1 F-HN-632 F-PH-632-06 F- STS-632-06 07641 F-HN-04C 9811-1-1 07311 05804 CB-5002-PRX CB-5005-PRX CB-5001B-PRX CB-5001A-PRX 1 LOCK WASHER 1 NUT 1 PULSE VALVE 27 1/16 barb to 10-32 connector 4 KEP NUT 2 PAN HEAD SCREW 2 ANGEL MNT BRKT - MINI VALVE 1 2 WATTS REGULATOR 4 1/4 HEX BOLT 2 MOUNTING BRACKET 5 PILOT
7 19 10 8 FLUSH VALVE ASSY 6 20 7 2 7 21 1 12 10 16 7 8 3 15 8 5 14 18 9 11 8 FLUSH VALVE ASSY 23 17 15 4 13 22 22 TYPICAL FLUSH VALVE ASSY SHOWN ABOVE 3 REQUIRED MAGNUM VENUS PRODUCTS RTM DUAL FLUSH ASSEMBLY REV.
RTM DUAL FLUSH ASSEMBLY PARTS LIST ITEM 1 2 3 4 5 6 7 8 9 10 11 12 13 14 15 16 17 18 19 20 21 22 23 PART NO.
18 19 9 15 14 7 16 13 12 6 10 5 17 11 8 22 20 NOTE: REPLACE 5104-24-1 (FLUSH VALVE BODY) WITH 58681-1 (AUTO FLUSH VALVE BODY) 4 25 24 21 3 24 2 25 1 4 REQD 23 MAGNUM VENUS PRODUCTS SuperPro Automatic Gun Assembly REV.
SuperPro Automatic Gun Assembly SPG-1000-A PARTS LIST ITEM 1 2 3 4 5 6 7 8 9 10 11 12 13 14 15 16 17 18 19 20 21 22 23 PART NO.
5 4 PART OF 2 8 7 6 3 PART OF 2 2 PART OF 2 1 9 2 REQD MAGNUM VENUS PRODUCTS Auto Pro Gun Assembly REV.
Auto Pro Gun Assembly CPC-1000-A PARTS LIST ITEM 1 2 3 4 5 6 7 8 9 PART NO. QTY 58704-1 1 CPC-1200-A 1 5104-00-01-A 1 F-SW-04 1 F-HB-04C-08 1 5107-27-3 1 T-002552C 1 8704-4-1 1 02806-2 2 DESCRIPTION MOUNTING PAD - PRO GUN ACTUATOR ASSEMBLY GUN BLOCK ASSEMBLY LOCK WASHER HEX BOLT STD TURBULENT MIXER SPRAY NOZZLE .052 X 50 NOZZLE CAP PAN HEAD SCREW OPTIONAL PARTS AND ASSEMBLIES ITEM 3A 6A PART NO.
5 4 PART OF 2 8 7 6 3 PART OF 2 2 PART OF 2 1 9 2 REQD MAGNUM VENUS PRODUCTS Auto Pro Gun Assembly (International) REV.
Auto Pro Gun Assembly CPC-1000-A-INT PARTS LIST ITEM 1 2 3 4 5 6 7 8 9 PART NO. QTY 58704-1 1 CPC-1200-A 1 5104-00-01-A-INT 1 F-SW-04 1 F-HB-04C-08 1 5107-27-3 1 T-002552C 1 8704-4-1 1 02806-2 2 DESCRIPTION MOUNTING PAD - PRO GUN ACTUATOR ASSEMBLY GUN BLOCK ASSEMBLY LOCK WASHER HEX BOLT STD TURBULENT MIXER SPRAY NOZZLE .052 X 50 NOZZLE CAP PAN HEAD SCREW OPTIONAL PARTS AND ASSEMBLIES ITEM 3A 6A PART NO.
5 4 PART OF 2 9 8 7 6 3 PART OF 2 2 PART OF 2 1 10 2 REQD MAGNUM VENUS PRODUCTS Auto Pro Gun Assembly REV.
Auto Pro Gun Assembly CPC-2000-A PARTS LIST ITEM 1 2 3 4 5 6 7 8 9 10 PART NO. QTY 58704-1 1 CPC-1200-A 1 VFTC-4100-A 1 F-SW-04 1 F-HB-04C-08 1 VPG-1003 1 VPG-1002 1 VFIT-6025 1 8704-4-1 1 02806-2 2 DESCRIPTION MOUNTING PAD - PRO GUN ACTUATOR ASSEMBLY GUN BLOCK ASSEMBLY LOCK WASHER HEX BOLT STATIC MIXER DIFFUSER FIT NOZZLE NOZZLE CAP PAN HEAD SCREW OPTIONAL PARTS AND ASSEMBLIES ITEM 3A PART NO. QTY VFTC-4100-F-A 1 DESCRIPTION ABRASIVE GUN BLOCK 8.69 2-1/2 4-1/4 1.75 2.
5 4 PART OF 2 9 8 7 6 3 PART OF 2 2 PART OF 2 1 10 2 REQD MAGNUM VENUS PRODUCTS Auto Pro Gun Assembly REV.
Auto Pro Gun Assembly CPC-2000-A-INT PARTS LIST ITEM 1 2 3 4 5 6 7 8 9 10 PART NO. QTY 58704-1 1 CPC-1200-A 1 VFTC-4100-A-INT 1 F-SW-04 1 F-HB-04C-08 1 VPG-1003 1 VPG-1002 1 VFIT-6025 1 8704-4-1 1 02806-2 2 DESCRIPTION MOUNTING PAD - PRO GUN ACTUATOR ASSEMBLY GUN BLOCK ASSEMBLY LOCK WASHER HEX BOLT STATIC MIXER DIFFUSER FIT NOZZLE NOZZLE CAP PAN HEAD SCREW OPTIONAL PARTS AND ASSEMBLIES ITEM 3A PART NO. QTY DESCRIPTION VFTC-4100-F-A-INT 1 ABRASIVE GUN BLOCK 8.69 2-1/2 4-1/4 1.75 2.
5 4 PART OF 2 3 7 PART OF 2 8 2 PART OF 2 1 6 2 REQD MAGNUM VENUS PRODUCTS Automatic Pro Duo 1:1 Gun Assembly REV.
Auto Pro Gun Assembly CPD-4000-A PARTS LIST ITEM 1 2 3 4 5 6 7 8 PART NO. QTY 58704-1 1 CPC-1200-A 1 DUO-4100-A 1 F-SW-04 1 F-HB-04C-08 1 02806-2 2 01443 2 FT. 06946 1 DESCRIPTION MOUNTING PAD - PRO GUN ACTUATOR ASSEMBLY GUN BLOCK ASSEMBLY LOCK WASHER HEX BOLT PAN HEAD SCREW 2 - 1 FT. TUBE SECTIONS Y CONNECTOR 7.80 2-1/2 4-1/4 1.75 2.
24 47 27 45 25 43 17 46 29 44 42 41 38 22 18 15 14 13 28 37 19 NOTE: 21 24 FLUSH VALVE ASSEMBLY IS THE SAME ON BOTH SIDES OF THE GUN BLOCK.
ASSEMBLY - 1:1 GUN BLOCK CPD-4100-A PARTS LIST ITEM 1 2 3 4 5 6 7 8 9 10 11 12 13 14 15 17 18 19 20 21 22 23 24 25 26 27 28 29 30 31 32 33 34 35 36 37 41 42 43 44 45 46 47 1 PART NO.
ELECTRICAL DIAGRAM Item 11 14 15 16 18 Part No. APS-1025 APS-1024 07254 9807-1-1 9807-2-1 9811-1-1 Qty.
11 5 3101-8 (REF) PISTON ROD ADAPTER 4 9 10 12 8 2 8 8 3 7 6 1 MAGNUM VENUS PRODUCTS Hardware Kit - UPS Catalyst Sensor REV.
Hardware Kit - UPS Catalyst Sensor PARTS LIST ITEM 1 2 3 4 5 6 7 8 9 10 11 11 PART NO. QTY 02670-8 1 7102-15-16 1 CSD-1002 1 CSD-1003-UPS 1 CSD-1004-UPS 1 CSD-1005-M12 1 CSD-1006 1 CSD-1007 3 CSD-1008 1 F-CS-04C-12 1 F-HN-O4C 1 F-HN-O4F 1 CSD-1000-UPS DESCRIPTION SHOULDER BOLT SET SCREW MAGNET HOLDER CONNECTING ROD PIN - CAT SENSOR MNT SENSOR MOUNT MODIFIED PUMP PLATE MAGNET ROD END SOCKET HEAD CAP SCREW HEX NUT HEX NUT OPTIONAL PARTS AND ASSEMBLIES ITEM 6A PART NO.
CSD-1006 SENSOR MOUNTING HOLE – PUMP BASE PLATE PUMP BASE PLATE MODIFICATION ADD SENSOR MOUNTING HOLE TO EXISTING SYSTEMS AS SHOWN ABOVE.
11 VLS-4613 (REF) PISTON ROD ADAPTER 5 4 9 10 12 2 8 8 7 8 3 6 1 MAGNUM VENUS PRODUCTS Hardware Kit - HVLS Resin Sensor REV.
Hardware Kit - HVLS Resin Sensor PARTS LIST ITEM 1 2 3 4 5 6 7 9 10 11 12 PART NO. QTY 02670-8 1 7102-15-16 1 CSD-1002 1 CSD-1003-UPS 1 CSD-1004-UPS 1 CSD-1005-M12 1 HVLS-1002-CSD 1 CSD-1008 1 F-CS-04C-12 1 F-HN-04C 1 F-HN-04F 1 CSD-1000-HV DESCRIPTION SHOULDER BOLT SET SCREW ASSY - MAGNET HOLDER CONNECTING ROD PIN - CAT SENSOR MNT SENSOR MOUNT MODIFIED PUMP PLATE ROD END SOCKET HEAD CAP SCREW HEX NUT HEX NUT OPTIONAL PARTS AND ASSEMBLIES ITEM 6A 8 PART NO.
MAGNUM VENUS PLASTECH CORPORATE HEADQUARTERS and MANUFACTURING th 5148 113 Ave. N. *Clearwater, FL 33760 * Tel 727-573-2955 * Fax 727-571-3636 TECHNOLOGY CENTER and MANUFACTURING 1862 Ives Ave. * Kent, WA 98032 * Tel 253-854-2660 * Fax 253-854-1666 MVP Plastech UK Chilsworthy Beam, Gunnislake, Cornwall, PL18 9AT UK, * Tel:+44 (0) 1822 832621 Fax: +44 (0) 1822 833999 www.mvpind.