
Installation guide


Installation Guide
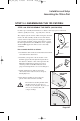
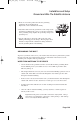
3. Slip the weather boot(s) onto the LNBF cable(s). To do this, insert the end of the cable
with the screw connector into the smaller end of the boot and work it through. When
you are finished the boot should slide freely over the cable but hold snugly when
slipped up over the the screw connector. Be patient. This is a difficult and somewhat
painstaking job. (If possible, place weather boot on cable before putting on “F”
connector).
4. Attach the LNBF to the LNBF cable(s). Slide the weather boot up securely to
cover the cable/LNBF connection at the base of the LNBF.
5. Slip the LNBF onto the end of the arm as shown, until contact is made with the LNBF
bracket stops and put in screw through arm and LNBF.
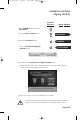
6. Route and fasten the cable in a neat, unobtrusive manner in such a way so it cannot be
damaged by accident. Connect the opposite end of the cable to your receiver, to the
connector marked “Satellite In”.
7. See page I-42 for instructions concerning safety grounding.
The assembly and mounting of the 120 cm Dish is now complete.
Proceed to page I-41 Installing the Receiver.
Page I-40
4100_Ins_eng 6/16/05 12:34 PM Page 44