
Installation guide


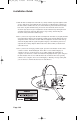

9. Note the Y-bracket is labeled ‘82˚’ on one side and ‘91˚’ on the other. Only use the
RG-6 coaxial cable for all connections between the LNBFs and receiver. Label one
coaxial cable '91' on both ends and the other coaxial cable '82' on both ends. If you are
installing two receivers,repeat this step for the additional two cables. You will then
have two cables labeled ’91’ and two labeled ’82’. This will help reduce confusion
later.
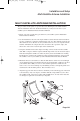
10.Thread the labeled coaxial cables through the support arm and the Y-bracket. Make
sure the cable(s)labeled ’91’ are threaded through the ’91’ side and the ’82’ cable(s)
are threaded through the ’82’ side as shown. Attach to Y-bracket using the Y-bracket
screw. Connect the cable(s) to each LNBF. Attach one LNBF to the Y-bracket in slot
labeled '91' using the two LNBF screws. Repeat for '82' LNBF.
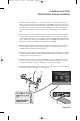
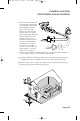
11.Slide the dish assembly down onto the mast. Make sure the pivot bolt rests on top of
the mast. Turn the dish assembly so that it points in the general direction of the
satellite using the azimuth angle from step two.
12.Ground the coaxial cable(s) by following the wiring diagram outlined in your satellite
system’s Installation Instructions/User Manual. Ensure that the grounding conforms
with your area’s local electrical code.
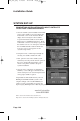
13.Connect the coaxial cable from the '91' LNBF directly to the satellite receiver. You
may use a female-to-female connectore to do this (optional). Connect the receiver to
the television using the composite (RCA-type) video and audio outputs.
14.Turn ON the televisionand receiver. Adjust video input setting on television until the
'Point Dish and Signal Strength' menu is displayed.
Page I-23
Installation and Setup
Multi-Satellite Antenna Installation
4100_Ins_eng 6/16/05 12:34 PM Page 27