
Installation guide


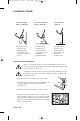

Tighten the mast clamp bolts so that the clamp is snug,
but can still be moved back and forth.
11. Thread the LNBF cable into the cable hole near
the mast foot, up the mast and out the top of the mast.
Do not kink or pinch the cable.
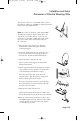
12. Take the end of the cable coming out the top of the
mast, and thread it up the mast sleeve of the support arm.
13. Loop the end of the cable over the pivot bolt.
14. Bring the cable back down on the outside of the
mast sleeve, between the dish supports.
15. Thread the cable through the arm and out the end of the arm.
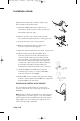
16. Slip the weather boot(s) onto the LNBF cable(s).
To do this, insert the end of the cable with the screw
connector into the smaller end of the boot and work
it through. When you are finished the boot should slide
freely over the cable but hold snugly when slipped up
over the screw connector. Be patient. This is a difficult
and somewhat painstaking job. (If possible, place
weather boot on cable before putting on "F" connector).
17. Attach the LNBF to the LNBF cable(s). Slide the
weather boot up securely to cover the cable/LNBF
connection at the base of the LNBF.
18. Fit the LNBF onto the end of the dish support arm, sliding
it until it is inserted firmly. Attach LNBF to the support arm
using the LNBF screw and washer.
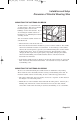
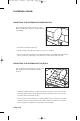
INSTALLING A METAL POLE MOUNT
You can mount the satellite antenna on a metal pole if
necessary. This allows you a wider range of locations for
installation.
Note: If used, the metal pole should have an outside diameter
of approximately 1 5/8 inches (approx. 4 cm), and should be
sturdy enough not to flex in high winds. If the clamp ends up
being slightly loose, use weather proof sandpaper or emery
cloth to shim the clamp, and tighten.
Page I-16
Installation Guide
4100_Ins_eng 6/16/05 12:34 PM Page 20