
Installation guide


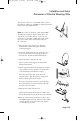

You may have either one or two LNBF cables to attach,
depending on which type of LNBF you purchased and how
many receivers are being installed.
Note: If you have to attach two cables to the LNBF,
the following instructions apply to both cables. Use
only RG-6 coaxial cables with "F" connectors. Do
not use the 1.8-meter RF or VHF cable supplied with
the receiver. This cable is used for the receiver to
TV connection.
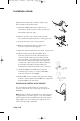
5. Place the dish on the support arm. Align the
flathead bolts with the dish support bolt holes
on the dish supports.
6. Insert each flathead bolt into one of the holes, and
secure it by threading a lock nut onto the bolt on
the back side. Do this for all the flathead bolts.
7. Tighten the bolts so that they are snug.
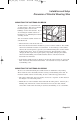
This is a picture of the support arm and bracket
with the dish attached.
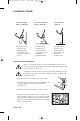
8. Tilt the support bracket to the approximate elevation
of the satellite. Use the elevation you found earlier
on the Satellite Location Reference Chart.
If you have the bracket with points above the
elevation washer, align the elevation marks on the
bracket with the points on the washer.
If you have the bracket where the edge of the mast
shows through the curved slot, align the edge with
the desired elevation mark.
9. Slide the mast clamp onto the mast.
Tighten the elevation bolts and the pivot bolt so that
the bracket is snug, but can still be moved up and down.
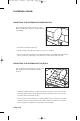
10.Turn the antenna mount on the mast or pole to align
the LNBF support arm in the direction of the satellite.
Use the direction you found earlier in the Satellite
Location Reference Chart.
Page I-15
Installation and Setup
Discussion of Potential Mounting Sites
60
10
20
50
30
40
60
CM
46
70
80
90
4100_Ins_eng 6/16/05 12:34 PM Page 19