User guide S M A RT. V E RY S M A RT. DIGITAL VIDEO DISC PLAYER VIDEO CASSETTE RECORDER Congratulations on purchasing this Magnavox product. We’ve included everything you need to get started. If you have any problems, Magnavox Representatives can help you get the most from your new product by explaining: • Hookups, • First Time Setup, and • Feature Operation. Do not attempt to return this product to the store.
Return your Warranty Registration card today to ensure you receive all the benefits you’re entitled to. Once your MAGNAVOX purchase is registered, you’re eligible to receive all the privileges of owning a MAGNAVOX product. So complete and return the Warranty Registration Card enclosed with your purchase at once. And take advantage of these important benefits.
Safety and General Information 3 Safety Precautions Warning: To prevent fire or shock hazard, do not expose this equipment to rain or moisture. Federal Communications Commission (FCC) Warning: Any unauthorized changes or modifications to this equipment void the user’s authority to operate it. Department of Health and Human Services (DHHS) Certification: Complies with 21 Center for Radiation (CFR) chapter 1 subchapter J applicable at time of manufacture. Laser Safety: This unit employs a laser.
Table of Contents English General Information Playable Discs . . . . . . . . . . . . . . . . . . . . . . . . . . . . . .5 Disc Related Terms . . . . . . . . . . . . . . . . . . . . . . . . . .5 Types of video CDs . . . . . . . . . . . . . . . . . . . . . . . . . .5 Remote Control Battery Installation . . . . . . . . . . . . .5 Remote Control Operation Range . . . . . . . . . . . . . .5 Precautions . . . . . . . . . . . . . . . . . . . . . . . . . . . . . . . .6 Notes on Discs . . . . . . . . . . . . . .
Playable Discs Disc-related Terms Title (DVD only) The main film content, title or accompanying feature content or music album. Each title is assigned a title reference number enabling you to locate it easily. DVD (8 cm/12 cm disc) Video CD (VCD) (8 cm / 12 cm disc) Audio CD (8 cm/12 cm disc) In addition, this unit can play a SVCD, Kodak PICTURE CD, and CD-R/RW, DVD-R/±RW that contains audio titles, MP3, JPEG or WMA files.
General Information English Precautions Handling the unit When shipping the unit The original shipping carton and packing materials come in handy. For maximum protection, re-pack the unit as it was originally packaged at the factory. When setting up the unit The picture and sound of a nearby TV, VCR, or radio may be distorted during playback. In this case, position the unit away from the TV, VCR, or radio, or turn off the unit after removing the disc.
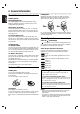
Front Panel Controls STANDBY ON Switches the DVD+VCR ON and OFF. VIDEO IN/AUDIO IN (Left/Right) Connect the audio/video output of an external source (Audio system, TV/Monitor, VCR). D.DUBBING Copies a DVD in the DVD deck to a VHS tape in the VCR deck. Cassette Compartment (VCR deck) Insert a video cassette here. Disc Tray (DVD deck) Insert a disc here. PLAY ( N ) Starts playback of a disc or tape. Remote Sensor Point the DVD+VCR remote control here.
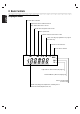
Basic Controls English Display Window The DVD deck is selected. Lights when a disc is loaded in the DVD deck. Flashes when there is no disc. Indicates when Progressive scan is active. Indicates repeat mode. Indicates when the DVD+VCR is locked. A timer recording is programmed or in progress (VCR deck only). A cassette is in the VCR deck. The VCR deck is selected. DVD [P] VCR REC PM TV Lights when TV mode is active (See page 22.) Indicates PM time. (AM is not displayed.) DVD+VCR is Recording.
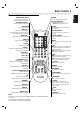
Remote Control OPEN/CLOSE, EJECT - Opens and closes the disc tray. - Ejects the tape in the VCR deck. 0-9 number buttons " Selects channels or menu items. RETURN " Exits the setup menu. DISPLAY " Shows the on-screen display. Switches among the clock, tape counter and tape remaining modes on the display. SUBTITLE " Selects available subtitle languages. ANGLE " Selects a DVD camera angle if available. ZOOM " Magnifies video image.
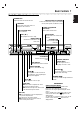
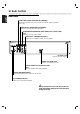
Basic Controls English Rear Panel VCR IN LINE 1 (VIDEO IN/AUDIO IN (Left/Right)) Connect the audio/video output of an external source (Audio system, TV/Monitor, another VCR). DVD/VCR OUT (VIDEO/AUDIO (Left/Right)) Connect to a TV with video and audio inputs. COMPONENT/PROGRESSIVE SCAN VIDEO OUT (Y Pb Pr) (DVD OUT) Connect to a TV with Y Pb Pr inputs. AUDIO OUT (Left/Right) (DVD OUT) Connect to a TV, amplifier, receiver, or stereo system. AC Power Cord Plug into the power source.
Connections Tips " " " Depending on your TV and other equipment, there are various ways you could connect the DVD+VCR. Use connections described on pages 11-13. Please refer to the manuals of your TV, VCR, Stereo System or other devices as necessary to make the best connections. For better sound reproduction, connect the DVD+VCR’s DVD/VCR AUDIO OUT jack to the audio in jacks of your amplifier, receiver, stereo or audio/video equipment. See “Optional, Preferred TV Connections” on pages 12-13.
Getting Started English Basic TV Connections " Make one of the following connections, depending on the capabilities of your existing equipment. RF coaxial connection Connect the RF.OUT jack on the DVD+VCR to the Antenna In jack on the TV using the supplied 75-ohm Coaxial Cable (R). Note If you use this connection, tune the TV to the DVD+VCR’s RF output channel (CH 3 or 4). How to set the DVD+VCR’s RF output channel 1. Set the TV to the VCR channel (3 or 4) depending upon the selected channel. 2.
Getting Started 13 English Optional, Preferred TV Connections (Continued) Note You can listen to DVD playback using COAXIAL (X) and AUDIO OUT (A2) connections. The tuner and VCR will still be heard through the RF.OUT (R) or DVD/VCR AUDIO OUT (A1) jacks. (See page 12.
Getting Started English Before VCR Operation On-Screen Display (OSD) The On-Screen display provides feedback on the current status of the DVD+VCR. ❶ ❷ ❸ PLAY SP HI-FI ❹ ❺ CH 4 STEREO OCT 8 , FRI ❻ ❶ TAPE SPEED DISPLAY 2:15 PM ❼ Shows the current tape speed.
Setting the VCR Setup Menu Channel Selection SYSTEM MENU and the MAIN menu will 1 Press appear. v/V V to select the SETUP menu, then press 2 Press OK. This DVD+VCR is equipped with a frequency synthesized tuner capable of receiving up to 181 channels. These include VHF channels 2-13, UHF channels 14-69 and CATV channels 1-125. The SETUP menu will appear. Preparation: " Connect the DVD+VCR to the desired type of antenna or cable TV system, as shown in Connecting Antenna/Cable TV to DVD+VCR on page 11.
Getting Started English Note Setting the Clock The DVD+VCR gives you two ways to set the time and date: the Auto Clock Feature or manually. The Auto Clock Feature enables the DVD+VCR to set the clock when the DVD+VCR is turned off. Things to know before starting " " The clock uses the 12-hour system. (Be sure to set AM and PM correctly.) The initial Clock Setting is JANUARY 1, 2004, 12:00 AM.
Getting Started 17 Temporary Feedback Field Icons TITLE General Explanation This manual gives the basic instructions for operating the DVD+VCR. Some DVDs require specific features or allow only limited operation during playback. When this occurs, the symbol appears on the TV screen. This shows that the operation is not permitted by the DVD+VCR or is not available on the disc.
Getting Started English Initial Settings Picture You can set your own Personal Preferences on the DVD+VCR. TV Aspect General Operation 1 Press SYSTEM MENU. The setup menu appears. DVD 4:3 Letterbox: Select when a standard 4:3 TV is connected. Displays playback images with masking bars above and below the picture. 4:3 Panscan: Select when a standard 4:3 TV is connected. Displays pictures cropped to fill your TV screen. Both sides of the picture are cut off.
Sound Digital Audio Output Each DVD disc has a variety of audio output options. Set the DVD+VCR’s Digital Audio Output according to the type of audio system you use. DOLBY DIGITAL/PCM: Select DOLBY DIGITAL/PCM if you have connected the DVD+VCR’s DIGITAL AUDIO OUT jack to a Dolby Digital decoder (or an amplifier or other equipment with a Dolby Digital decoder).
Getting Started English Parental Control Country Code Rating Enter the code of a country whose standards were used to rate the DVD video disc, referring to the list (See “Country Code List”, page 38.). DVD Movies on DVDs may contain scenes not suitable for children. Therefore, discs may contain Parental Control information that applies to the complete disc or to certain scenes on the disc. These scenes are rated from 1 to 8, where some discs offer more suitable scenes for selection.
Tape Operation Normal Playback Preparation: " " " " Turn on the TV. Tune the TV to the DVD+VCR output channel (CH 3 or 4) or set the TV’s source selector to VIDEO (if using Video Inputs). If a direct VIDEO/AUDIO connection is made between the DVD+VCR and the TV, set the TV’s source selector to correct VIDEO mode. Set the Output Source to VCR as shown in “Setting the Output Source” on page 6. 1 Insert a prerecorded video cassette. The indicator will light and the DVD+VCR will powerup automatically.
Operation English Normal Recording Timer Recording Preparation: This DVD+VCR can be programmed to record up to 8 programs within a period of 1 year. For unattended recording, the timer needs to know the channels to be recorded and the program start and end times. " " " Turn on the power for both the DVD+VCR and TV. Tune the TV to the DVD+VCR output channel (CH 3 or 4) or set the TV’s source selector to VIDEO (if using Video Inputs).
10 Use V to choose the SPEED option. B to choose between AUTO, SP or Use b/B SLP. " 11 AUTO mode determines how much tape is left and switches speed from SP to SLP, if necessary, to complete recording the program. There will be some picture and sound distortion at the point of the speed change. Use V to choose the REPEAT option. B to choose between ONCE, WEEKLY Use b/B or DAILY events. ONCE ....for recording up to 8 programs on a single day or other days up to 1 year. WEEKLY ....
Operation English Instant Timer Recording Dubbing and Editing Instant Timer Recording allows you to easily make a preset recording without using the program timer. If you wish to edit or dub your camcorder (or VCR) recordings to this DVD+VCR, the rear (or Front) panel mounted Audio and Video (A/V) input jacks make connections quick and easy. These direct A/V jacks will also provide better picture results than using the RF jack on the rear panel.
VHS Hi-Fi Stereo System / MTS Broadcast The DVD+VCR is equipped with the VHS Hi-Fi audio sound system for recording and playback. The information below gives a brief description of Hi-Fi audio and how to record and play a tape in the Hi-Fi audio mode. Playback with Hi-Fi Stereo Audio Sound A stereo TV with AUDIO/VIDEO input jacks or a stereo audio system is required for correct stereo playback.
Operation English Tape Counter Memory Feature Additional Information Real-Time Counter Shows length of tape run in hours, minutes, and seconds. Press DISPLAY to select the real-time counter display. Every press of DISPLAY changes the TV screen as shown below. " In manual recording, Timer recording, Instant Timer Recording, playback, or fast forward modes, the DVD+VCR automatically starts rewinding the tape at the end of the tape.
DVD and Video CD Operation General Features Playing DVDs and Video CD Note Unless stated otherwise, all operations described use the remote control. Some features may also be available on the Setup menu. Playback Setup " " " DVD VCD2.0 VCD1.1 Turn on the TV and select the video input source connected to the DVD+VCR. Audio system: Turn on the audio system and select the input source connected to the DVD+VCR. Set the Output Source to DVD as shown in “Selecting the Viewing Source” on page 6.
Operation English General Features (continued) Still Picture and Frame-by-Frame Playback DVD VCD2.0 VCD1.1 1 Press PAUSE/STEP (X) during playback. The DVD+VCR will go into PAUSE mode. 2 With a DVD, you can advance the picture frame by frame by pressing PAUSE/STEP (X) repeatedly on the remote control. 3 To return to playback, press PLAY (N). Search DVD VCD2.0 Video CDs - Repeat Track/All/Off 1 To repeat the track currently playing, press REPEAT. The Repeat Track icon appears on the TV screen.
General Features (Continued) Zoom DVD VCD2.0 VCD1.1 The Zoom function allows you to enlarge the video image and to move through the enlarged image. 1 Press ZOOM during playback or still playback to activate the Zoom function. If you press ZOOM repeatedly, the magnification level increases up to six steps. 2 Use b/B/v/V buttons to move through the zoomed picture. 3 Press CLEAR to resume normal playback or return to the paused image. Notes The zoom function may not work for some DVDs.
Operation English Operation with Audio CD and MP3/WMA Disc Notes on MP3/WMA Recordings About MP3 Playing an Audio CD and MP3/WMA Disc CD MP3 WMA The DVD+VCR can play MP3/WMA formatted recordings on CD-ROM, CD-R or CD-RW discs. Before playing MP3/WMA recordings, read the notes on MP3/WMA Recordings on right. JPEG Program Folder1 Folder2 Folder3 Folder4 Folder5 Folder6 Folder7 Folder8 00:00 2 Clear All OFF Use v/V to select the MP3/WMA then press OK. The MP3/WMA menu appears on the TV screen.
Pause CD MP3 Repeat A-B WMA 1 Press PAUSE/STEP (X) during playback. 2 To return to playback, press PLAY (N) or press PAUSE/STEP (X) again. Moving to another Track " CD MP3 WMA Press . or > briefly during playback to go to the next track or to return to the beginning of the current track. " Press . twice briefly to step back to the previous track. " In case of audio CD, to go directly to any track, enter the track number using the numbered buttons (0-9) during playback.
Operation English Operation with JPEG Disc Viewing a JPEG disc JPEG Press . or > once during viewing a picture to advance to the next file or to the previous file. Still Picture This DVD+VCR can play discs with JPEG files and Kodak picture CD. Before playing JPEG recordings, read the notes on JPEG Recordings on right. MP3 WMA JPEG 1 Moving to another File 1 Press PAUSE/STEP (X) during slide show. The player will now go into PAUSE mode.
Programmed Playback Programmed Playback with Video CD Programmed Playback with Audio CD and MP3/WMA Disc Note On a Video CD with PBC, you must set PBC to Off on the setup menu to use the Program function (see page 19). 1 Insert Video CD and close the tray. 2 Press PROGRAM while playback is stopped. The Program function enables you to store your favorite tracks from any disc in the player memory. Program can contain 30 tracks. The VCD Program menu will appear.
Operation English Additional Information - DVD Screen Saver The screen saver picture appears when you leave the DVD+VCR in stop mode for about fifteen minutes. Last Condition Memory DVD VCD1.1 This player memorizes the user settings for the last disc that you have viewed. Settings remain in memory even if you remove the disc from the player or switch off the player. If you load a disc that has its settings memorized, the latest stop position is automatically recalled.
Check the following guide for the possible cause of a problem before contacting service. Symptom Cause The power cord is disconnected. Correction No power. " The power is on, but the DVD+VCR does not work. " No picture. " The TV is not set to receive DVD+VCR signal output. " " TV/VCR mode for DVD+VCR is set to TV. " " The video cable is not connected securely. " " The connected TV power is turned off.
Troubleshooting (Continued) English Cause Symptom Correction Some channels are skipped over when using 3/4. " Those channels were deleted with the CH. ADD/DEL option. " Use CH. ADD/DEL. to restore channels. See “Channel Selection” on page 15. Picture and sound of broadcasting channel are weak or missing. " Antenna or cables are loose. " Tighten connections or replace cable. " Wrong TUNING BAND option is being used. " Try all TUNING BAND options.
Enter the appropriate code number for the initial settings “Disc Audio”, “Disc Subtitle” and/or “Disc Menu” (See page 18).
Country Code List English Enter the appropriate code number for the initial setting “Country Code” (See page 20).
General Power requirements Power consumption Dimensions (approx.) Mass (approx.) Operating temperature Operating humidity Signal system AC 120V , 60 Hz 19W 430 X 78.5 X 273 mm (16.9 x 3.1 x 10.8 inches) (w x h x d) 4.0 kg (8.82 lbs) 5˚C to 40˚C (41˚F to 104˚F) 5 % to 90 % NTSC Inputs ANTENNA IN VHS VIDEO IN VHS AUDIO IN 75 ohms (VHF/UHF/CATV) 1 Vp-p 75 ohms, sync negative, RCA jack x 2 -6.
Limited Warranty English MAGNAVOX LIMITED WARRANTY 90 Days Free Product Exchange MAGNAVOX warrants this product against defect in material or workmanship, subject to any conditions set forth as follows: PROOF OF PURCHASE: You must have proof of the date of purchase to exchange the product. A sales receipt or other document showing the product and the date that you purchased the product, as well as the authorized retailer included, is considered such proof.
Information Index 41 a-b repeat . . . . . . . . . . . . . . . . . . . .31 a-b repeat button . . . . . . . . . . . .28, 31 ac power cord . . . . . . . . . . . . . . . . .10 angle button . . . . . . . . . . . . . . . .17, 29 angle icon . . . . . . . . . . . . . . . . . . . . .17 antenna connections (am/fm) . . . . . .11 arrow buttons . . . . . . . . . . . . . . . . . .9 audio jacks . . . . . . . . . . . . . . . . . .10-13 audio language (dvd) . . . . . . . . . . . . .29 auto power off . . . . . . . . . . . .
Indice de Materias Información general Español Discos reproducibles . . . . . . . . . . . . . . . . . . . . . . . .43 Términos relacionados con discos . . . . . . . . . . . . .43 Tipos de Video CD . . . . . . . . . . . . . . . . . . . . . . . . .43 Instalación de pila de control remoto . . . . . . . . . . .43 Radio de acción del control remoto . . . . . . . . . . . .43 Precauciones . . . . . . . . . . . . . . . . . . . . . . . . . . . . . .44 Notas sobre los discos . . . . . . . . . . . . . . . . . . .
Información general 43 DVD Disco de 8 cm/ 12 cm Video CD (VCD) Disco de 8 cm/ 12 cm Audio CD Disco de 8 cm/ 12 cm IAdemás, esta unidad puede reproducir un SVCD, CD Kodak PICTURE , y CD-R/RW, DVD-R/±RW que contenga títulos de audio, MP3, JPEG o archivos WMA. Notas – Según las condiciones del equipo de grabación del disco CDR/RW (o DVD-R/±RW) en sí, algunos discos CD-R/RW (o DVD-R/±RW) no pueden reproducirse en la unidad. – La unidad no puede reproducir discos que contengan datos que no sean de MP3 y CD-DA.
Información general Precauciones Español Manipulación de la unidad Transporte de la unidad La caja de cartón y los materiales de embalaje originales son útiles. Para protección máxima, empaquete la unidad tal como se empaquetó originalmente en fábrica. Cuando se instala la unidad La imagen y el sonido de un televisor, VCR, o radio cercana puede distorsionarse durante la reproducción. En este caso, sitúe la unidad lejos del televisor, VCR o radio, o apague la unidad después de retirar el disco.
Controles básicos 45 Controles del panel delantero STANDBY ON Activa y desactiva el DVD+VCR D.DUBBING Copia un DVD en la platina del DVD a una cinta VHS en la platina del VCR. Bandeja de disco (platina DVD) Inserte un disco aquí. Compartimiento de casete (Platina de VCR) Inserte un videocasete aquí. PLAY ( N ) Inicia la reproducción de un disco o una cinta. Español VIDEO IN/AUDIO IN (Izquierda/ Derecha) Conecte la salida de audio/ video de una fuente externa (sistema de audio, TV/ monitor, otro VCR).
Controles básicos Ventana de visualización. La platina del DVD está seleccionada. Español Se enciende cuando se coloca un disco en la platina del DVD. Destella cuando no hay disco Indica cuando la exploración progresiva está activada. Indica el modo de repetición Indica cuando el DVD+VCR está bloqueado. Una grabación de temporizador está programada o se está programando (platina de VCR solamente). Hay una casete en la platina del VCR. La platina del VCR está seleccionada.
Controles básicos 47 OPEN/CLOSE, EJECT - Abre y cierra la bandeja de disco. - Expulsa la cinta de la platina del VCR Botones numéricos 0-9 " Seleccionan canales o elementos de menú RETURN " ESale del menú de configuración. DISPLAY " Accede a la visualización en pantalla. Conmuta entre los modos de reloj, contador de cinta y cinta restante en la pantalla. SUBTITLE " Selecciona los idiomas de subtítulos disponibles. ANGLE " Selecciona un ángulo de cámara de DVD si está disponible..
Controles básicos Panel trasero VCR IN LINE 1 (VIDEO IN/AUDIO IN (Izquierda/ Derecha)) Conecta la salida de audio/ video de una fuente externa (sistema de audio, TV/ monitor, otro VCR). Español DVD/VCR OUT (VIDEO/AUDIO(Izquierda/ Derecha)) Conecta a un televisor con entradas de video y audio. COMPONENT/PROGRESSIVE SCAN VIDEO OUT (Y Pb Pr) (SALIDA DE DVD) Conecta a un televisor con entradas Y Pb Pr.
Preparativos 49 Tips Consejos prácticos " " " Según su televisor y otro equipo que desee conectar, hay diversas formas en que puede conectar el DVD+VCR. se las conexiones descritas en las páginas 49-51. Consulte los manuales de su televisor, VCR, sistema de estéreo u otros dispositivos, según sea apropiado, para realizar las mejores conexiones.
Preparativos Conexiones de TV básicas " Realice una de las conexiones siguientes, según las capacidades de su equipo actual. Español Conexión coaxial de RF Conecte el conector RF.OUT del DVD+VCR al conector de entrada de antena del televisor utilizando el cable coaxial de 75 ohmios suministrado (R). Nota Si utiliza esta conexión, sintonice el televisor al canal de salida de RF del DVD+VCR (CH 3 o 4). Cómo ajustar el canal de salida de RF del DVD+VCR 1.
Preparativos 51 Conexiones de TV opcionales, preferidas (continuación) Parte trasera del DVD+VCR Español Nota SOLAMENTE puede escuchar reproducción de DVD utilizando conexiones COAXIAL (X) y AUDIO OUT (A2) . El sintonizador y el VCR se seguirán oyendo a través de los conectores RF.OUT (R) o DVD/VCR AUDIO OUT (A1) .
Preparativos Antes de utilizar el VCR Visualización en pantalla La visualización en pantalla proporciona información sobre el estado actual del DVD+VCR. Español ❶ ❷ ❸ PLAY SP HI-FI ❹ ❺ CH 4 STEREO AGO 8 , DOM 2:15 PM ❻ ❼ ❶ VISUALIZACIÓN DE LA VELOCIDAD DE LA CINTA Muestra la velocidad actual de la cinta. ❷ VISUALIZACIÓN DE FUNCIÓN Indica la función en curso. ❸ VISUALIZACIÓN DE HI-FI Indica cuando esta unidad está reproduciendo una cinta grabada en Hi-Fi.
Preparativos 53 Ajuste del menú de configuración del VCR Selección de canales SYSTEM MENU y aparece el menú PRIN1 Pulse CIPAL seleccionar el menú de 2 Pulse v/VVy para después pulse OK. Este DVD+VCR está equipado con un sintonizador sintetizado de frecuencia capaz de recibir hasta 181 canales. Éstos incluyen canales VHF 2-13, canales UHF 14-69 y canales CATV 1-125.
Preparación Nota Ajuste del reloj El DVD+VCR le ofrece dos formas de establecer la hora y la fecha: la función de reloj automático o manualmente. La función de reloj automático permite que el DVD+VCR ajuste el reloj cuando el DVD+VCR está desactivado. Español Cosas que deben saberse antes de comenzar " " El reloj utiliza el sistema de 12 horas. (Asegúrese de establecer AM o PM según sea apropiado.) El ajuste de reloj inicial es 1 DE ENERO DE 2004,12hr00.
Preparación 55 Iconos de campo de retroinformación temporal TITLE Explicación general Este manual da instrucciones básicas para utilizar el DVD+VCR. Algunos DVDs requieren una operación específica o permiten solamente una operación limitada durante la reproducción. Conde ocurre esto, aparece un símbolo en la pantalla del televisor que indica que la operación no es permitida por el DVD+VCR o no está disponible en el disco.
Preparación Ajustes iniciales Imagen Puede establecer sus preferencias personales en el DVD+VCR. Aspecto TV Funcionamiento general Español 1 Pulse SYSTEM MENU. Aparece el menú de configuración.
Preparación 57 Otros Cada disco DVD tiene una serie de opciones de salida de audio. Establezca la salida de audio digital del DVD+VCR de acuerdo con el tipo de sistema de audio que utilice. DOLBY DIGITAL/PCM: Seleccione DOLBY DIGITAL/ PCM si ha conectado el conector de AUDIO OUT DIGITAL del DVD+VCR a un decodificador Dolby Digital (o un amplificador u otro equipo con un decodificador Dolby Digital).
Preparación Control parental Código del país Indice Introduzca al código de un país cuyos estándares fueron utilizados para establecer la clasificación del disco de vídeo DVD, consultando la lista (Véase "Lista de códigos de país", página 76.). DVD Español Ciertas películas de DVDs pueden contener escenas no aptas para menores. Por consiguiente, los discos pueden encontrar información de Control Parental que es aplicable al disco completo o a ciertas escenas del mismo.
Funcionamiento 59 Reproducción normal Preparación: " " " " 1 Encienda el televisor. Sintonice el televisor al canal de salida del DVD+VCR (CH 3 ó 4) o ponga el selector de fuente del televisor a VIDEO. Si se realiza una conexión directa de VIDEO/ AUDIO entre el DVD+VCR y el televisor, ponga el selector de fuente del televisor a VIDEO. Ponga la fuente de salida a VCR tal como se muestra en "Selección de la fuente de visualización", en la página 6.
Funcionamiento Grabación normal Grabación con temporizador Preparación: Este DVD+VCR puede programarse para grabar hasta 8 programas dentro de un periodo de un año. Para realizar grabaciones automáticamente, el temporizador necesita saber los canales que deben grabarse y los tiempos de inicio y de finalización. " " " Español Encienda el DVD+VCR y el televisor. Sintonice el televisor al canal de salida del DVD+VCR (CH 3 ó 4) o ponga el selector de fuente del televisor a VIDEO.
Funcionamiento 61 Use V para seleccionar la opción de VELOCIDAD. B para seleccionar la velocidad de Pulse b/B grabación deseada (AUTO, SP o SLP). " 11 El modo AUTO determina cuánta cinta queda y cambia la velocidad de SP a SLP, si es necesario, para terminar de grabar el programa. Habrá alguna distorsión de imagen y sonido en el punto en que la velocidad cambia. Utilice V para seleccionar la opción de REPETIR. B para seleccionar la repetición Utilice b/B deseada (UNA VEZ, SEMANAL o DIARIO).
Funcionamiento Grabación con temporizador instantánea Doblaje y edición La grabación con temporizador instantánea le permite realizar fácilmente una grabación de una duración preestablecida sin utilizar el temporizador del programa. Si desea editar o doblar las grabaciones de su cámcorder (u otro VCR) a este DVD+VCR, los conectores de entrada de Audio y Video (A/V) montados en el panel trasero (o delantero) hacen que las conexiones serán rápidas y fáciles.
Funcionamiento 63 Este DVD+VCR está equipado con el sistema de sonido VHS Hi-Fi para grabación y reproducción. La información siguiente le proporciona una descripción breve del audio Hi-Fi y cómo grabar y reproducir una cinta en el modo de audio HiFi. Reproducción con sonido de audio Hi-Fi Para una reproducción de estéreo correcta se requiere un televisor estéreo con conectores de entrada de AUDIO/ VIDEO o un sistema de audio estéreo.
Funcionamiento Español Función de memoria de contador de cinta Información adicional Contador en tiempo real Muestra el tiempo transcurrido de la cinta reproducida en horas, minutos y segundos. Pulse DISPLAY para seleccionar la visualización de contador en tiempo real. Cada pulsación de DISPLAY cambia la pantalla del televisor de la forma ilustrada a continuación.
Funcionamiento de DVD y Video CD Funciones generales Reproducción de DVD y Video CD Nota A menos que se indique de otra manera, todas las instalaciones descritas utilizan el control remoto. Es posible que algunas funciones también estén disponibles en el menú de configuración. Configuración de la reproducción " " " DVD VCD2.0 VCD1.1 Encienda el televisor y seleccione la fuente de entrada de video conectada al DVD+VCR.
Funcionamiento Funciones generales (continuación) Imagen fija y reproducción cuadro por cuadro DVD VCD2.0 VCD1.1 Español 1 Pulse PAUSE/STEP (X) durante la reproducción. El DVD+VCR ahora pasa al modo de PAUSA. 2 Con un DVD, puede avanzar la imagen cuadro por cuadro pulsando PAUSE/STEP (X) repetidamente en el control remoto. 3 Para volver a la reproducción, pulse PLAY (N). DVD Búsqueda VCD2.0 VCD1.1 1 Mantenga apretado . o > durante dos segundos aproximadamente durante la reproducción.
Funcionamiento 67 Zoom DVD VCD2.0 VCD1.1 La función de Zoom le permite aumentar la imagen de vídeo y desplazarse por la imagen aumentada. 1 Pulse ZOOM durante la reproducción normal o reproducción de imagen fija para activar la función de Zoom. Si pulsa ZOOM repetidamente, el nivel de aumento se incrementa en hasta seis pasos. 2 Utilice los botones b/B/v/V para desplazarse por la imagen aumentada con zoom.
Funcionamiento Funcionamiento con Audio CD y disco MP3/ WMA Reproducción de un Audio CD y disco MP3/ WMA CD MP3 WMA Español El DVD+VCR puede reproducir grabaciones con formato MP3/ WMA en discos CD-ROM, CD-R o CD-RW. Antes de reproducir grabaciones MP3/ WMA, lea las notas sobre grabaciones MP3/ WMA, a la derecha. Notas sobre grabaciones de MP3/ WMA Acerca de MP3 " " Un archivo MP3 está formado por datos de audio comprimidos utilizando el esquema de codificación de audio de 3 capas MPEG1.
Funcionamiento 69 CD MP3 Repetición de A-B WMA 1 Pulse PAUSE/STEP (X) durante la reproducción. 2 Para volver a la reproducción, pulse PLAY (N) o vuelva a pulsar PAUSE/STEP (X). Desplazamiento a otra pista CD MP3 WMA CD Para repetir una secuencia. 1 Durante la reproducción del disco, pulse A-B en el punto de inicio escogido. El icono de repetición y “A * ” aparecen en la pantalla del menú. 2 Pulse A-B de nuevo en el punto de finalización escogido.
Funcionamiento Funcionamiento con disco JPEG Visualización de un disco JPEG JPEG Español Este DVD+VCR puede reproducir discos con archivos JPEG y CD Kodak Picture. Antes de reproducir grabaciones JPEG , lea las notas sobre grabaciones JPEG, a la derecha. MP3/WMA JPEG 1 Desplazamiento a otro archivo Pulse . o > una vez durante la visualización de la imagen para avanzar al archivo siguiente o al archivo anterior. Imagen fija 1 Pulse PAUSE/STEP (X) durante la muestra de diapositivas.
Reproducción programada Reproducción programada con Video CD Reproducción programada con Audio CD y disco MP3/ WMA Nota En un Video CD con PBC, debe desactivar PBC en el menú de configuración para utilizar la función de programa. Véase la página 57. La función Programa le permite almacenar sus pistas favoritas de cualquier disco en la memoria del reproductor. El programa puede contener 30 pistas. 1 Pulse PROGRAM durante la reproducción o el modo de parada para entrar en el modo de edición de programa.
Funcionamiento Información adicional - DVD Protector de pantalla Español La imagen del protector de pantalla aparece cuando se deja el DVD+VCR en modo de parada durante 15 minutos aproximadamente. Memoria de última condición DVD VCD1.1 Este reproductor memoriza los ajustes del usuario para el último disco que ha visto. Los ajustes permanecen en la memoria aunque retire el disco del reproductor o apague el reproductor.
Resolución de problemas 73 Antes de contactar al servicio técnico, consulte la guía siguiente para ver la posible causa de un problema. Causa Corrección No recibe corriente.. " El cable de alimentación está desconectado. " Enchufe el cable de alimentación en el tomacorriente de pared de forma segura. La corriente está conectada, pero el DVD+VCR no funciona. " No hay disco colocado No hay cinta colocada. " Inserte un disco o una cinta.
Resolución de problemas (continuación) Causa Síntoma Corrección Español Algunos canales se pasan por alto cuando se utiliza v/V. " Estos canales fueron borrados con la opción CAMBIAR/ BORRAR CANAL. " Utilice AÑADIR/ BORRAR CANAL para restaurar canales. Consulte "Selección de canales" en la página 53. La imagen y el sonido del canal transmisor son débiles o faltan. " La antena o los cables están flojos. " Apriete las conexiones o cambie el cable.
Lista de códigos de idioma 75 Idioma Código Idioma Código Idioma Código Idioma Código Abkhazian 6566 Fiji 7074 Lingala 7678 Sinhalese 8373 Afaro 6565 Finlandés 7073 Lituano 7684 Eslovaco 8375 Afrikaans 6570 Francés 7082 Macedonio 7775 Eslovenio 8376 Albanés 8381 Frisón 7089 Malagasio 7771 Somalí 8379 Amharico 6577 Gallego 7176 Malayo 7783 Español 6983 Árabe 6582 Georgiano 7565 Malayalam 7776 Sudanés 8385 Armenio 7289 Alemán 6869 Maltés 7784 Swah
Lista de códigos de país Introduzca el número del código apropiado para el ajuste inicial de "Código de país" (Véase la página 58).
Especificaciones 77 Requisitos eléctricos: Consumo de corriente Dimensiones (aprox.) Masa (aprox.) Temperatura operativa Humedad operativa Sistema de señales AC 120v, 60 Hz 19 W 430 X 78,5 X 273 mm (16,9 x 3,1 x 10,8 pulgadas) (w x h x d) 4,0 kg (8,82 lbs) 5°C a 40°C (41°F a 104°F) 5 % a 90 % NTSC Entradas ENTRADA DE ANTENA ENTRADA DE VIDEO VHS ENTRADA DE AUDIO VHS 75 ohmios (VHF/UHF/CATV) 1 Vp-p 75 ohmios, sinc. negativa, 2 conectores RCA -6.
Garantia Limitada GARANTÍA LIMITADA DE MAGNAVOX Cambio gratuito del producto hasta 90 días Español MAGNAVOX garantiza este producto frente a defectos en el material o en la mano de obra, sujeto a las condiciones que se establecen a continuación: • Un producto usado para propósitos comerciales o institucionales (incluyendo, entre otros, los de alquiler). • Producto vendido TAL COMO ESTÁ o RENOVADO COMPROBANTE DE COMPRA: Para cambiar el producto, debe presentar un comprobante de la fecha de su compra.
Índice de información 79 ángulo de cámara . . . . . . . . . . . . . .67 aspectos de pantalla de tv . . . . . . . .56 botón angle . . . . . . . . . . . . . . . .47, 67 botón D de avance rápido .47,66,69 botón h de rebobinado . .47,66,69 botón disc/ menu . . . . . . . . .47, 65,67 botón dvd . . . . . . . . . . . . . . . . . . . .47 botones play B . . . .45, 47, 59, 65, 68 botones stop C . . . . . . . . . . . . .45, 47 botón ok . . . . . . . . . . . . . . . . . . . . .47 botón open/close A . . . . . . . . .
P/No:3834RV0009G