OWNER’S MANUAL MC194DMG COLOR TV WITH BUILT-IN VCR READ THIS MANUAL FIRST! ON PURCHASING THIS PRODUCT.WE’VE INCLUDED EVERYTHING YOU NEED TO GET STARTED. IF YOU HAVE ANY PROBLEMS, OUR REPRESENTATIVES CAN HELP YOU GET THE MOST FROM YOUR NEW PRODUCT BY EXPLAINING: • HOOKUPS • FIRST TIME SETUP • FEATURE OPERATION DO NOT ATTEMPT TO RETURN THIS PRODUCT TO THE STORE.
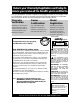
Return your Warranty Registration card today to ensure you receive all the benefits you’re entitled to. Once your MAGNAVOX purchase is registered, you’re eligible to receive all the privileges of owning a MAGNAVOX product. So complete and return the Warranty Registration Card enclosed with your purchase at once. And take advantage of these important benefits.
Introduction 3 Welcome to your TV/VCR owner’s manual. This manual describes the MC194DMG TV/VCR and explains how to use all the features listed below.
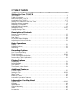
Table of Contents Setting Up Your TV/VCR Introduction . . . . . . . . . . . . . . . . . . . . . . . . . . . . . . . . . . . . . . . . . . . . . . . . . . . . . . . . . .3 Table of Contents . . . . . . . . . . . . . . . . . . . . . . . . . . . . . . . . . . . . . . . . . . . . . . . . . . . . . .4 Before Using the TV/VCR . . . . . . . . . . . . . . . . . . . . . . . . . . . . . . . . . . . . . . . . . . . . . . . .5 Hooking Up the TV/VCR . . . . . . . . . . . . . . . . . . . . . . . . . . . . . . . . . . .
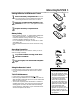
Before Using the TV/VCR 5 Putting Batteries in the Remote Control 1 2 3 Remove the battery compartment lid on the bottom of the remote control by sliding the lid down and off, following the direction of the arrow on the lid. Place two AA batteries inside the battery compartment with their + and – ends aligned as indicated. Replace the battery compartment lid.
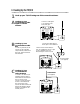
Hooking Up the TV/VCR 1 Hook up your TV/VCR using one of the connections shown. A Hooking Up Your TV/VCR With a Cable Signal or Outdoor Antenna Connect a Cable signal or an antenna to the ANT(enna) Jack. ANT. ANT. B Hooking Up Your TV/VCR With a Cable Box To view any channel, set the TV/VCR to the Cable Box output channel (channel 03 or 04). Then, select channels at the Cable Box. Connect the Cable signal to the IN Jack on the Cable Box.
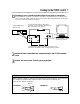
Hooking Up the TV/VCR (cont’d) 7 D Hooking Up Your TV/VCR to Another Video Source (VCR or Camcorder) You may need this connection if you want to copy tapes or view tapes that you are playing on the VCR or camcorder. Select channel 00 (AUX) at the TV/VCR when viewing tapes that are playing on the VCR or camcorder. Details are on page 30. AUDIO/VIDEO OUT Jacks on VCR 3CH 4CH AUDIO VIDEO OUT IN Connect an Audio cable to the AUDIO OUT Jack on the VCR and to the AUDIO In Jack on the front of the TV/VCR.
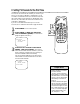
Setting TV Channels for the First Time The TV/VCR can memorize the channels you receive in your area. If you are using a Cable Box or Satellite Box, you do not need to set channels at the TV/VCR. Set the TV/VCR to the output channel of the Cable Box or Satellite Box (channel 03 or 04). Then select the channel to be viewed on the Cable Box or Satellite Box. If you do not see these menus when you turn on the TV/VCR, set TV channels as instructed on page 10 instead. 1 2 Press POWER to turn on the TV/VCR.
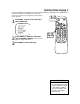
Selecting a Menu Language 9 This function affects only the language of the TV/VCR’s menu, not the audio of TV programming or video tapes or closed captioning. 1 Press MENU. Press PLAY/▲ or STOP/▼ to select LANGUAGE. 1-2 POWER SLEEP/WAKE UP PLAY –MENU– F.FWD REW TIMER PROGRAMMING PICTURE CONTROL SETTING CLOCK CHANNEL SET UP USER’S SET UP V-CHIP SET UP B LANGUAGE [ENGLISH] CAPTION [OFF] ZERO RETURN TIME SEARCH INDEX SEARCH 2 3 Press F.FWD/B or REW/s to select ENGLISH or ESPAÑOL (Spanish).
Resetting TV Channels Although the TV/VCR may automatically memorize the channels you receive when you turn it on for the first time, you may set up channels again by following the steps below. 1 1-2 Press MENU. Press PLAY/▲ or STOP/▼ to select CHANNEL SET UP. Then, press F.FWD/B. POWER SLEEP/WAKE UP PLAY F.
Adding/Deleting Channels 11 The channels you no longer receive or seldom watch can be deleted from the memory. (Of course, you can add deleted channels into the memory again.) 1 Press MENU. Press PLAY/▲ or STOP/▼ to select CHANNEL SET UP. Then, press F.FWD/B. 1-4 POWER SLEEP/WAKE UP PLAY –MENU– TIMER PROGRAMMING PICTURE CONTROL SETTING CLOCK B CHANNEL SET UP USER’S SET UP V-CHIP SET UP LANGUAGE [ENGLISH] CAPTION [OFF] ZERO RETURN TIME SEARCH INDEX SEARCH 2 F.
Setting the Clock Set the clock accurately for proper timer recording. If a Public Broadcasting Station (PBS) is available in your area, follow Auto Clock Setting below. If not, follow Manual Clock Setting on pages 14-15. 1-2 POWER SLEEP/WAKE UP Auto Clock Setting You can have the TV/VCR set the clock automatically by using the PBS channel in your area. Once you have set the clock, the TV/VCR will automatically monitor the correct time and date being broadcast by the PBS station.
Setting the Clock (cont’d) 13 3 Press PLAY/▲ or STOP/▼ to select AUTO CLOCK CH. Then press F.FWD/B or REW/s until the channel number of your local PBS station appears. If you do not know the PBS channel number, leave it set to [AUTO], which is located before [2]. The TV/VCR will automatically search all available channels for the local PBS station and will select that channel. POWER PLAY 5 – SETTING CLOCK – AUTO CLOCK [ON] B AUTO CLOCK CH [AUTO] MANUAL CLOCK SET D.S.T.
Setting the Clock (cont’d) Manual Clock Setting 1 Press MENU. Press PLAY/▲ or STOP/▼ to select SETTING CLOCK. Then, press F.FWD/B. 1-4 POWER SLEEP/WAKE UP –MENU– PLAY TIMER PROGRAMMING PICTURE CONTROL B SETTING CLOCK CHANNEL SET UP USER’S SET UP V-CHIP SET UP LANGUAGE [ENGLISH] CAPTION [OFF] ZERO RETURN TIME SEARCH INDEX SEARCH 2 Press PLAY/▲ or STOP/▼ to select MANUAL CLOCK SET. Then, press F.FWD/B. F.FWD REW STOP MENU 1 ALT.
Setting the Clock (cont’d) 15 5 Press PLAY/▲ or STOP/▼ until your desired year appears. (Example: 2002) Then, press F.FWD/B. – MANUAL CLOCK SET– MONTH DAY 5-7 POWER SLEEP/WAKE UP YEAR 0 5 / 0 7 TUE 2 0 0 2 HOUR PLAY F.FWD REW MINUTE STOP –– : –– –– MENU 6 Press PLAY/▲ or STOP/▼ until your desired hour appears. (Example: 05 PM) Then, press F.FWD/B. – MANUAL CLOCK SET– MONTH DAY YEAR 0 5 / 0 7 TUE 2 0 0 2 HOUR 8 ALT.
Daylight-Savings Time When Daylight-Savings Time (D.S.T.) is ON, the TV/VCR clock will automatically move forward one hour on the first Sunday in April and move back one hour on the last Sunday in October. To turn Daylight-Savings Time ON or OFF, follow the steps below. 1 1-2 POWER SLEEP/WAKE UP PLAY Press MENU. Press PLAY/▲ or STOP/▼ to select SETTING CLOCK. Then, press F.FWD/B. F.FWD REW STOP MENU ALT.
Remote Control Buttons 17 PLAY/▲ Button Press to play a tape. Details are on page 22. Press to select a menu item. Press to enter digits when setting a timer recording or the clock. SLEEP/WAKE UP Button Press to set the Sleep Timer. Details are on page 39. Press to set the Wake Up Timer. Details are on page 40. POWER POWER Button Press to turn on or off the TV/VCR. REW/{ (Rewind) Button When tape playback is stopped, press to rewind the tape at high speed.
Front Panel Cassette Compartment Insert a video cassette tape here. Remote Sensor Receives a signal from your remote control so you can operate the TV/VCR from a distance. CHANNEL ▲/▼ Buttons Press to select a TV channel for viewing or recording. To access the TV/VCR’s menu, press CHANNEL ▲ while in line input (AUX) mode. Press again to remove the menu. Press to adjust the tracking during tape playback. Details are on page 41. VOLUME o/p Buttons Press to adjust the sound level.
Rear Panel 19 Antenna Hole Connect the stem of an indoor antenna here. Details are on page six. ANT. AC Power Cord Connect to a standard AC outlet to supply power to the TV/VCR. ANT(enna) Jack Connect your antenna or cable here. Details are on page six.
On-Screen Status Displays To check the Counter, Clock, and Channel number on the TV screen, press DISPLAY on the remote control. Each time you press DISPLAY, the TV screen will change as described below. When Closed Captions are OFF (details are on page 35) ● Counter mode: After five seconds, only the counter remains. To clear it, press DISPLAY. ● Clock mode: After five seconds, only the clock and channel number remain. To clear them, press DISPLAY.
Adjusting the Picture Controls 21 Follow these steps to adjust the TV/VCR’s brightness, picture, color, tint, and sharpness. 1 Press MENU. Press PLAY/▲ or STOP/▼ to select PICTURE CONTROL. Then, press F.FWD/B. 1-3 POWER SLEEP/WAKE UP PLAY –MENU– F.FWD REW TIMER PROGRAMMING B PICTURE CONTROL SETTING CLOCK CHANNEL SET UP USER’S SET UP V-CHIP SET UP LANGUAGE [ENGLISH] CAPTION [OFF] ZERO RETURN TIME SEARCH INDEX SEARCH 2 STOP MENU 1 ALT.
Playing Follow the steps below to play a tape. 1 2 3 4 5 Insert a tape in the TV/VCR. The power will come on. If the tape’s record tab is missing, playback should start automatically. 4 POWER SLEEP/WAKE UP 2 If playback does not start automatically, press PLAY/▲ to start playback. PLAY F.FWD REW STOP Press STOP/▼ to stop playback. MENU Press REW(ind)/{ to rewind the tape. When the tape finishes rewinding, press STOP/EJECT on the TV/VCR to remove the tape. 3 ALT.
Playback Options 23 Forward and Reverse Searching (SP/LP/SLP) 1 2 During tape playback, press and release F.FWD/B or REW(ind)/{. A fast forward or reverse picture search will begin. POWER PLAY To return to normal playback, press PLAY/▲. MENU 1 During tape playback, press F.FWD/B or REW(ind)/{, then press again. The TV/VCR will now search in super high speed. Press F.FWD/B or REW(ind)/{ repeatedly to switch between regular and super high speed searching. 2 To return to normal playback, press PLAY/▲.
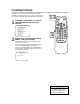
Recording Read and follow the steps below to record a TV program. 1 Place a tape with its record tab intact (see page five) in the TV/VCR. The power will come on. Or, if the tape is already in the TV/VCR, press POWER to turn on the TV/VCR, if necessary. 2 3 4 Press SPEED until the desired tape speed appears on the TV/VCR screen. See tape speed details below. 5 To pause the recording (for example, during commercials), press PAUSE/STILL. To resume recording, press PAUSE/STILL again or press RECORD.
One-Touch Recording 25 A One-Touch Recording (OTR) is an immediate timed recording from 30 minutes to eight hours long. ● This function cannot be done from the remote control. ● Recording starts immediately when you press REC/OTR. Before you begin, make sure ... The TV/VCR power is on. ● Insert a cassette tape with its erase prevention tab in place. (If necessary, rewind or fast forward the tape to the point at which you want to begin recording.
Timer Recording Follow the steps below to program the TV/VCR to record TV programs while you’re away from home. Before you begin, make sure ... ● The clock is set. If the clock is not set, MANUAL CLOCK SET appears. See page 14 to set the clock, then set the recording. ● Channels are set. Details are on pages eight and 10. ● A tape is in the TV/VCR. 1-4 POWER SLEEP/WAKE UP PLAY F.FWD REW STOP 1 Press MENU. Press PLAY/▲ or STOP/▼ to select TIMER PROGRAMMING. Press F.FWD/B.
Timer Recording (cont’d) 27 5 Press PLAY/▲ or STOP/▼ until the desired beginning hour appears. (Example: 7:12 PM) Then, press F.FWD/B. POWER SLEEP/WAKE UP – TIMER PROGRAMMING – CH DATE BEGIN END ---- -/- - - - -/- - - - -/- - - - - - -/-/-/-/- B 61 7:05 FRI 6 - - - - - -:- -:- -:- 7:12PM -:- -:- -:- -:- - -:- -:- -:- -:- -:- -:- -:- -:- - --------- Press PLAY/▲ or STOP/▼ until the desired beginning minute appears. (Example: 7:30 PM) Then, press F.FWD/B.
Timer Recording (cont’d) Extending a Timer Recording To make a Timer Recording start and end later than originally scheduled, follow these steps. 1 Press POWER to turn on the TV/VCR. 2 Press MENU. Press PLAY/▲ or STOP/▼ to select TIMER PROGRAMMING. Press F.FWD/B. 3 Press RECORD, then press PLAY/▲ or STOP/▼ to select the desired program. 4 Press RECORD again. Each press of RECORD will shift forward the beginning/end time by 10 minutes.
Timer Recording Auto Return 29 With this feature, after timer recording is finished, the beginning of the recorded program(s) can be searched for automatically. 1 POWER SLEEP/WAKE UP Press MENU. Press PLAY/▲ or STOP/▼ to select USER’S SET UP. Then, press F.FWD/B. PLAY –MENU– F.FWD REW TIMER PROGRAMMING PICTURE CONTROL SETTING CLOCK CHANNEL SET UP B USER’S SET UP V-CHIP SET UP LANGUAGE [ENGLISH] CAPTION [OFF] ZERO RETURN TIME SEARCH INDEX SEARCH 2 1-2 Press PLAY/▲ or STOP/▼ to select AUTO RETURN.
Rerecording (Tape Duplication) AUDIO and VIDEO OUT Jacks on source unit (VCR or Camcorder) Audio Cable from AUDIO OUT to AUDIO In VIDEO AUDIO POWER VOLU VIDEO AUDIO OUT Video Cable from VIDEO OUT to VIDEO In 1 Make the connections shown above, using audio and video cables (not supplied). Connect the source unit (VCR or camcorder) to a power source after connections are made. 2 3 The VCR or camcorder will play your tape. Insert a prerecorded tape in the source unit.
Repeat Play 31 Repeat Play allows you to repeat a tape indefinitely without using PLAY/▲. ALL REPEAT will repeatedly play the tape from the beginning to the end. BLANK REPEAT will repeatedly play the tape from its beginning to the first part that is blank for more than 10 seconds. 1 POWER SLEEP/WAKE UP PLAY Press MENU. Press PLAY/▲ or STOP/▼ to select USER’S SET UP. Then, press F.FWD/B. F.
Rental Playback This function enables you to improve picture quality when playing worn cassettes such as rented tapes. 1 Press MENU. Press PLAY/▲ or STOP/▼ to select USER’S SET UP. Then, press F.FWD/B. 1,2,4 POWER SLEEP/WAKE UP –MENU– PLAY TIMER PROGRAMMING PICTURE CONTROL SETTING CLOCK CHANNEL SET UP B USER’S SET UP V-CHIP SET UP LANGUAGE [ENGLISH] CAPTION [OFF] ZERO RETURN TIME SEARCH INDEX SEARCH 2 Press PLAY/▲ or STOP/▼ to select RENTAL. Press F.FWD/B or REW/s until [ON] appears. F.
Zero Return 33 Follow the steps below to reset the counter to zero at a tape location you want to refer to later. 1 2 3 4 Play, rewind, or fast forward the tape to the location you would like to refer to later. Stop the tape. 1,3,4 POWER SLEEP/WAKE UP PLAY F.FWD REW Press RESET to set the counter to 0:00:00. STOP MENU Press RECORD (for recording) or PLAY/▲ (for playback). Press STOP/▼ when recording or playback is completed. Press MENU. Press PLAY/▲ or STOP/▼ to select ZERO RETURN. Then, press F.
Time Search, Index Search Time Search You can quickly advance the tape to a position simply by entering the amount of playback time you want to skip. 1 2 With a tape in the TV/VCR, press TIME SEARCH. 2-3 Press PLAY/▲ or STOP/▼ until your desired time appears (for example, 2:50 for 2 hours 50 minutes). Each button press changes the time by 10 minutes. To cancel the Time Search at this point, press MENU. POWER PLAY F.
Closed Caption 35 Follow the steps below to select closed captions for TV programming. Not all TV programs and commercials have closed captions or all types of closed captions (second language, half-screen text, etc.). If closed captioning is not broadcast, you cannot receive it. This does not indicate a problem with the TV/VCR. Check your TV program listings for shows with closed captions.
Setting V-Chip V-CHIP enables parents to prevent their children from watching inappropriate material on TV. V-CHIP reads the ratings for programming (except for news and sports programs, unedited movies on premium cable channels, and Emergency Broadcast System signals), then denies access to programming if the program’s rating meets or exceeds the limitations you select. In this case, the message PROTECTED PROGRAM by ... appears on the TV screen.
Setting V-Chip (cont’d) 37 3 Press PLAY/▲ or STOP/▼ to select a rating. Press F.FWD/B to select [BLOCK] or [VIEW]. B TV-Y TV-Y7 ( TV-G TV-PG ( TV-14 ( TV-MA( ) ) ) ) [VIEW] [VIEW] [VIEW] [VIEW] [VIEW] [VIEW] If you select TV-Y7, TV-PG, TV-14, or TV-MA, then press F.FWD/B to select [BLOCK], the selected category’s sub-ratings will appear. This indicates each sub-rating may be individually set to [BLOCK] or [VIEW]. To set the sub-ratings individually: ● When you select [TV-Y7]: Press F.
Setting V-Chip (cont’d) MPAA Rating Settings 1 Press MENU. Press PLAY/▲ or STOP/▼ to select V-CHIP SET UP. Then, press F.FWD/B. –MENU– 1-3 TIMER PROGRAMMING PICTURE CONTROL SETTING CLOCK CHANNEL SET UP USER’S SET UP B V-CHIP SET UP LANGUAGE [ENGLISH] CAPTION [OFF] ZERO RETURN TIME SEARCH INDEX SEARCH 2 Press PLAY/▲ or STOP/▼ to select MPAA RATING. Then, press F.FWD/B. POWER SLEEP/WAKE UP PLAY F.FWD REW STOP MENU 1,4 ALT.
Sleep Timer 39 Use the Sleep Timer to program the TV/VCR to shut off in a certain amount of time. 1 2 Press SLEEP/WAKE UP until SLEEP TIMER appears. Press PLAY/▲, STOP/▼, F.FWD/B, or REW/s until your desired sleep time appears. Each button press will increase the time by 30 minutes up to 120 minutes. SLEEP TIMER [2:00] 3 2 POWER SLEEP/WAKE UP PLAY F.FWD REW STOP MENU 3 ALT.CH DISPLAY 1 2 3 4 5 6 7 8 9 0 +100 RESET PAUSE/STILL SLOW TIME SEARCH SPEED RECORD 1 CH. VOL.
Wake Up Timer The Wake Up Timer turns on the TV/VCR automatically at a specified time within the next 24 hours. You may set the TV/VCR to turn on at a TV channel or with VCR playback. To set the Wake Up Timer, follow the steps below. Before you begin: ● Set the clock. Details are on pages 12-15. If the clock is not set, you will not be able to set the Wake Up Timer. ● Put a tape in the TV/VCR if you want the TV/VCR to start tape playback at the specified time.
Automatic Operation Features 41 The following playback features will always operate. Automatic Playback When you put a tape in the TV/VCR, the power will come on automatically. If the tape’s record tab is missing, playback will begin. If a timer recording is set, the power will not come on automatically when you insert a tape with the record tab intact. If a timer recording is set and the TV/VCR power is off, the TV/VCR will eject the tape if the record tab is missing.
Helpful Hints If you are having problems with your product, check this list of problems and possible solutions before requesting service. You may be able to solve the problem yourself. If you need to call a customer service representative, please know the model number and serial number of your product before you call. This information is on the back of the product. Also, please take a moment to identify the problem you are having, and be prepared to explain this to the representative.
Helpful Hints (cont’d) 43 The remote control is not available, or the remote control will not access the menu. • Use the buttons on the front of the TV/VCR to access the menu. You cannot enter numbers (for example, to program a timer recording) using the front panel buttons. Details are on page 18. TV/VCR power shuts off after 15 minutes.
Glossary AUDIO In Jack: jack on the front of the TV/VCR which is used to record audio from another source. Automatic Channel Setup: process in which the TV/VCR memorizes all available channels. Then, when you push the CH(annel) ▲/▼ button, you only scan through channels you receive. Auxiliary (AUX): the channel to which you set your TV/VCR during dubbing or when viewing material that is playing on another device that is connected to the TV/VCR (for example, a camcorder or VCR).
Specifications 45 General CRT: 19-inch in line gun Television system: NTSC Closed caption system: Section 15.119, FCC (Federal Communications Commission) Standard Video Heads: four heads Tape width: 1/2 inch (12.65 mm) Tape speed SP: 33.35 mm/sec. LP: 16.67 mm/sec. SLP: 11.12 mm/sec.
Limited Warranty TV/VCR COMBINATION 90 Days Free Labor/One Year Free Parts Exchange (Two Years Free Exchange on Color Picture Tube) This product must be carried in for repair. countries where Magnavox does not distribute the WHO IS COVERED? You must have proof of purchase to receive warranty product, the local Magnavox service organization will attempt to provide service (although there may be a service.
Index 47 accessories . . . . . . . . . . . . . . .48 alt.ch button . . . . . . . . . . . . . .17 ant(enna) jack . . . . . . . . . . .6, 19 audio in jack . . . . . . . . .7, 18, 30 auto return . . . . . . . . . . . . . . .29 automatic playback . . . . . . . . . . . . . . .41 rewind . . . . . . . . . . . . . . . .41 auxiliary mode (aux) . . .7, 30, 44 long play . . . . . . . . . . . . . .24, 44 lp . . . . . . . . . . . . . . . . . .24, 44 menu button . . . . . . . . . . . . . . . .
SUPPLIED ACCESSORIES The following items are supplied with your TV/VCR; they are provided to help you use or set up your TV/VCR. PO DIS 4 2 7 9 PAU UP F.FW D AY AL T.C H 6 0 RE SE T SL OW PL 3 8 SP EE D RE CO RD 5 R PLA Y STO P U N E M 1 WE SLE EP /WA KE RE W CH . +1 00 SE/ TIM E SE AR CH STI LL VO L. MU TE Remote Control 4835 218 37343 Two AA Batteries 4835 138 17012 This owner’s manual is made of recycled paper.