
User`s guide


Graphics contained within this publication are for representation only.
32
Graphics contained within this publication are for representation only.
33
Chapter 3: Recording, Playback & Features
The top menu bar is the name of the disc. With the disc name highlighted, press OK and the options
described below appear:
Note: You cannot select the disc name for a nalized DVD+R disc.
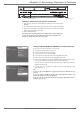
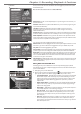
1- Disc name
Caroline’s Bday
Rename Title
Play Title
Play Full Title
Delete Title
Clear Chapters
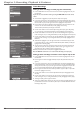
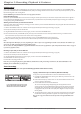
Maggie’s Disc
6 Title(s) on Disc
0h 24min available
*1 Best
Rename Disc
Erase Disc
Lock Disc
Make Compatible
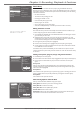
Maggie’s Disc
6 Title(s) on Disc
0h 24min available
*1 Best
Maggie’s Disc
Caroline’s Bday
Simon at soc-
Anniversary
Steve’s vacation
Steve & Maggie
Maggie’s Disc
6 Title(s) on Disc
0h 24min available
*1 Best
Rename Disc: press OK, on-screen keyboard appears so you can change the name of the disc (1 on
illustration above left).
Erase Disc: DVD+RW discs only. Erases a DVD+RW disc so you can record new programming onto
it (not available for DVD+R disc).
Lock Disc: DVD+RW discs only. Protects contents of the DVD so nobody can record new
programming onto it. If the disc has been locked, the menu option changes to Unlock Disc (not
available for DVD+R discs).
Finalize Disc: DVD+R only. Enables a DVD+R disc to be played in other DVD players. Not available if
the disc has already been nalized. After a disc is nalized, you can’t record more programs to the disc.
Make Compatible: DVD+RW discs only. If you have made edits to the disc (described in the next
section), such as adding or deleting chapter markers or hiding chapters, this option enables the edited
version of the disc to be compatible with other DVD players.
If you press OK when a title is highlighted, the following options appear:
Rename Title: Press OK when highlighted, and the on-screen keyboard appears. Follow the on-screen
instructions to give the disc a different name. Highlight Done when you’re nished, and press OK.
Play Title: Press OK when highlighted to play the title.
Play Full Title: Press OK when highlighted to play a title which has been edited by hiding chapters if
you want to play the title in its entirety (even the hidden chapters). Not available for DVD+R discs.
Delete Title: Press OK when highlighted to delete the title. Follow the on-screen instructions on the
conrmation screen to delete the title. (Not available for nalized DVD+R discs.) If you delete a title
from a non-nalized DVD+R disc, the information will still be on the disc but the title will be erased
so there won’t be any way to access the title.
Clear Chapters: The DVD/VCR adds a chapter marker every 5 minutes of recording. You can also add
chapters manually. When you highlight this option and press OK, all chapter markers are erased. (Not
available for DVD+R discs).
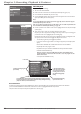
Editing DVD+R and DVD+RW discs
While playing the disc, press the INFO button on the remote (the Info Display appears). Details
about the different icons appear in Chapter 4: Playing Discs. However, the edit feature includes special
options for DVD+RWdiscs.
1. While playing a disc, press the INFO button.
2. Press the right arrow button to highlight the Edit icon , and press OK. The following choices
appear (use the up/down arrow buttons to highlight a choice and press OK to select).
• Insert Chapter Marker (DVD+RW discs only). When you’re recording to a disc, the DVD
Recorder adds a chapter marker automatically every 5 minutes. Additionally, you can insert
chapter markers manually to segment different parts of the title. To insert a chapter marker,
simply highlight Insert Chapter Marker during playback at the point where you want the
chapter to start.
• Delete Chapter Marker (DVD+RW discs only). Since the DVD/VCR automatically adds
chapter markers every 5 minutes, you may want to make each chapter longer by deleting a
chapter marker during playback.
• Hide Chapter (DVD+RW discs only). During playback you can hide a specic chapter so it
is automatically skipped. For more information, go to page 34.
• New Title Frame You can change the thumbnail image that appears in the Player Menu
(described in the next section). When the video appears that you want to use to visually
represent the title, press OK (the next time you access the Player Menu a still image of this
video will appear).
• Split Title (DVD+RW discs only). You can divide one recording into smaller segments so
that each title appears separately in the Disc Title Menu. This is a helpful feature when you
record a block of programming that contains several shows and/or when you copy camcorder
videocassette tapes to a disc.
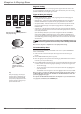
The Edit icon
Insert Chapter Marker
Delete Chapter Marker
Hide Chapter
New Title Frame
Split Title