II ÷ Read this manual firs!! Congratulations on purchasing this Philips product. We've included everything you need to get started, If you have any problems, Philips Representatives can help you get the most from your new product by explaining: • Hookups, • First Time Setup.
• Once your Philips purchase is registered, you're eligible to receive all the privileges of owning a Philips product. • So complete and return the Warranty Registration Card enclosed with your purchase at once, and take advantage of these important benefits. Know theset. PHILIPS Congratulations and welcome _ _7 _ _ T symbo,s on your purchase, to the "family!" Dear Philips product owner: Thank you for your confidence in Philips.
Index Canada English: This digitalappatatusdosnot xc dtheClass Blim slot tadionose mssionsfromdigital English appar-atusas sot out in the Radio Fnt_r_erence Regulations ofth Canadian Department of Communications 27 Franc;ais Fran_ais: Cet apparel hum rique n'eme{ pas de bruits t adio61ecttiques d6passan{ les I mites applicables aux appareiB hum riques de Class B preset tea darts le R6glement sur le Brouillage Radio61ectt q_e dot6 par le bdinst6re des Communications du Canada Espabol Manufactured under
IMPORTANT these SAFETY INSTRUCTIONS |. Read instructions. 2. Keep these instructions. 3. Heed all warnings. 4. Follow all instructions. 5. Do not use this apparatus 6. Clean only with dry cloth. 7. Do not block any ventilation openings. Install in accordance with the manufacturer's instructions.
Contents Introduction and General Operations Discs information Information Features............................................................................... 6 Discs for playback ............................................................. 6 Player zone Supplied accessories ......................................................... 6 Environmental information .............................................. 6 Installation ...........................................................................
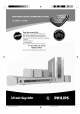
Introduction and General Information Features Supplied You_ complete 7 piece 200 Watt DVD Digital Home Cinema System creates th same dynamic sound qual ies that you find n full-fledged tin mas and Incorpot _tes some of the best f_stums in home heater technology Other leatures include: Built-in DTS and Dolby :_ Digital decoder, supporting Dolby R ProLogic and virtual surround Lts yoq use the ltorn Cinema Aqdio System 1or a movie theater surround so_nd experience Additional Component Connections Lets you
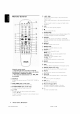
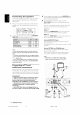
Functional Front and Rear (1_ STANDBY ON panels O to switch between _ PREV _ power on and s andby modes (_ OPEN/CLOSE _A (in Disc mode ony) to open or close the dsc tray _ Display screen to disD ay details _o_ _set's information _5_ SOURCE to select the desired source or extetna / NEXT I_1_1 in Disc mode, press to skip to tile prev ous/next chapter/track in Disc mode, hold down to fast _everse/lot_vard disc _2_ Disc Tray (TV/AV, DISC,TUNER Overview in Tuner mode, to tune to a lower ot h
Remote Control in disc mode, press to skip to the previous/next chapter/track in disc mode, hod down o f4st reverse/_orwa_d disc in -Tuner mode, to tune to a lower ot hgher frequency to start or Jr' errup @to stop playing he radio disc playback disc (S} SURROUND to adjust the center speaker's level TVVOL q-l-- to adjust Philips ¸television's volume level¸ PHILIPS _ SLEEP to set the sleep (auto off) irner unctior' _ DIM tosNectdiP_rent he dispayscreen Notes for remote control: - First, se
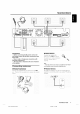
Connections [] IMPORTANT! FM Indoor Antenna - Before connecting theAC power cord to the wall outlet, ensure that all other connections have been made. Connect the suppied FPI antenna to the FM jack¸ Move the antenna in various directions - Never make or change any connections with the power switched on. - The type plate is located at the rear or bottom of the system.
Connecting the speakers Conn cttllesuppied sp al
Preparations into Inserting batteries remote control the Setting up the surround sound system Yoq must conr, ct all the sp akets and s_t qp the system properly in order to enoy the Digital Cinema experience _t home (refer o "Connections Connect rig the speakers') Close he cove_ ¥oq will have Lheleel ng of-being in the middle of'the action because sound s coming Pore everywhere around yo_ The subwool_r can enhance the bass pedot mance of yo_r sysem dt amatica I}/ CAUTION! IMPORTANT! - Remove batt
Changing the volume level System You can change the speakers' sound d stribut on to suit your surround sound needs • • speaker: 4 "EI',T ¢_',_ _2"isdispayed Press REAR Jr/-- to adjust the level of the mar surround speakers 4 "hE +;_x D_" s dsplayed To access the System Setup menu, playback must be stopped. Press CENTER Jr-/-- to adjust the level of the center IMPORTANT Note: "x ;_"denotes General the volume level between -15db to lOdb.
Setting the sound 16:9 (Wide screen) 4:3 LB (Letter Box) - Digital 4:3 PS Digita output selection enables you to spec fy the type 01digital ouput suitab}e for your ampl fer or receive_ (Pan Scan) • Select ALL (delault settng),ifyou have connected he digital outpqt (COAXIAL or OPTICAL) to a mul ichanne dcodr recev R No_e_ - Output If your DVD is not encoded co allow you to change the • aspect ratio, TV shape cannot be changed, Sleet PCM 961(if the xtemal componen is capab}e 01- processing
Setting the language - Audio - Subtitle - Disc Menu • • 2 Use Av b, ys to select a rating evel 3 Press OK to confirm Rating - NO PARENT If parenta control is not actwted, it will pay al dscs This is to select the audio language,subtitle anguage and the anguage used onTV screen menus or DVD men_s that will always be used for every dsc to be played back.
Basic Functions Selecting mode the surround VSS (Virtual Surround Sound) The ProLogic bdPEGor Doby D gital sutround channel is processed by a'vit tualize¢ DSP to add surround effec from jus he two front speakers sound IMPORTANT! Stereo - For proper surround sound, make sure you have followed the "Connections" and "Preparations" AI sound is reproduced and played through the front eft and rght speal
Operations Notes: - Your player will not play discs that have a region code different from the region code of your playe_ _ If the inhibit icon appears on the TV screen when a _ button is pressed,it means the function is not available on the disc you are playing. • • To interrupt DVD video discs may have one or moreTtles, and each Title may have one or more Chapters Payback sops at the end of eachTtle • playback Press I_11 -_ The pcture freezes and he sound wil be muted • _ _sume playback.
Special Repeat play You can only select the repeat play mode dutn£ playback Press REPEAT repeatedly to select he folowing : 4 "F? 7 repeaLchaphen 4 "h _" repeat itle/disc For VCDICDIMP3-CD • features A numb¢,r of operations can be cart led oqt d_ ctly via the multiple menu bars on theTV screen without interrupting dsc playback For DVD - Repeat chapter/title/disc • DVD/VCD From the lel', SETUP MENU -* SUBTITLE-" LANGUAGE-* SLOW -* FAST REVERSE-" FAST FORWARD -* STATUS - Repeat traclddisc Press REPE
3 Changing sound track language This operation works only on DVDs wh soundtrad< language¸ • Select _ multiple lo resume normal play press Ipll Note: - The sound will be muted during fast reverse or forward search, from the menu bar and press • key to select the desired language¸ Display the disc information • For VCD : Press • o select tile desired audio channels for sound : LEFTVOCAL-÷ RIGHTVOCAL -* MONO LEFT -* MONO RIGHT-" STEREO _ LEFTVOCAL • Select _ during playback 1,ore Ihe menu ba_ and pr
Zooming in Checking This 1 _nction a}lows you to enlarg the picture on theYV screen and to pan through the enlarged mage | the contents of DVD Press DISC MENU on the remote control 4 If the cut rerl title has a menq, he menu wll appear on the screen Otherwise, the disc menu wll be disp ayed 9 Use • • A• keysto select the desired rite or chapter, followed by •11 orOK.
Special MP3-CD features jPEG lot mat Nax 12 characters Nax nested directory is 7 levels The max album number is 32 Suppor_d VBR bibrate Supported sampling _quencies 32 kHz, 441 _z, 48 Idlz for P1P3 disc are : Suppor ted Bit_r_tes of NP3 disc are: 32, 64, 96,128, I92, 256 (ksps) The disc reading time may exceed 30 seconds due to the large number of songs compled onto one dsc MP3-CD | 4 2 menu Press DISC MENU to switch on the NP3 CD menu The album menu appears on heTV screen To select a desired alb
Other Tuning to radio stations 'l Press STANDBY 2 Adjust SOURCE mode 3 PressTUNER 4 Press and hold 1414 or _ unil he fmq_ency indicsion starts to change, then release 4 Th system automaticaly unes to the r_ext strong radio slat on Listening stations ON to swtch on he ast seec ed Souse • * (or press TUNER) to selectTUNER again o seect he desired band : FFdor API _ F II_4 %onn° IU O, UU 5 Repes step 4 if necessary until yo_ find he desired radio ssion When you reach the desired length of
Specifications AMPLIFIER SECTION SPEAKERS Output powm Sereo mode (DIN) .................................................................................... 2 x 28 W Surround mode (1 kHz) ..................................................... 1 SW RedS/channel Total Harmonic Distortion ............................... 10% _t rated powe_ (1 kHz) Fr_quen_ Response .................................................. 180 Hz 14 kHz / +1 dB Signal to Noise R_io .....................................................
Troubleshooting WARNING! Under no circumstances not open If a fault the system occurs, solve a problem should as there first check the by following you try to repair is a risk of electric points these Problem listed hints, the below consult system yourself, as this will before your taking dealer the system or service the warranty. Do for repair. If you are unable to center. Solution No power. Checl< i the AC powel No picture.
AUDIO SYSTEM OneYear OneYear This WHO product Free Free must Labor Service on be carried IS COVERED? Parts in for BEFORE repair. REQUESTING SERVICE... YOU must have proof of purchase to receive warranty service.A sales receipt or other document showing that you purchased tile product is considered proof of purchase. Please check your owner's manual before requesting service. Adjustments of the controls discussed there may save you a service call.