
Technical data

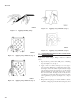


the surface with one hand and allow adhesive to touch
only as pressure is applied. Be sure the edges are firmly
adhered. (See Figure 7-6.) - Step 4.
7.4 DECALS APPLIED USING APPLICATION TAPE.
This method is particularly useful with large or intricately
shaped emblems or for hot weather applications. Steps 1, 2,
and 3 under Figure 7-7, Figure 7-8, and Figure 7-9 are not
necessary when decals are supplied premasked (cut to same
shape as decal with application tape).
a. Place a piece of application tape with the adhesive side
up on a flat, rigid surface. (See Figure 7-7.)
b. Align emblem or letter with film side down and drop
onto the adhesive. (See Figure 7-8.)
c. Starting in the middle of the decal, squeegee to appli-
cation tape with firm strokes of the plastic squeegee.
(See Figure 7-9.)
d. Tape into position and follow application steps under
hinge method.
e. Remove tape by pulling directly back upon itself at
180°. Re-squeegee decal, especially the edges. (See
Figure 7-10.)
7.5 EDGE SEALING.
Seal all edges of decals applied over the topcoat on the
exterior of the aircraft. Decals that have been applied pre-
masked over primer coat and subsequently top coated do not
require edge sealing.
NOTE
Seal decal edges when required with 3M Co.
(Cage Code 34360) Edge Sealer, PN 4150 under
NSN 8030-00- 195-7660, or PN 3950 under NSN
8030-00-936-9940. Use of other edge sealers will
cause early failure of 4000 series decal ink and
A-A-59485 polyester film decals.
a. Use the felt wick applicator attached to screw top can or
use small narrow striping brush.
b. Apply sufficient sealer to effect a feather edging along
the entire decal edge. (See Figure 7-11).
Figure 7-7. Use of Application Tape (Step 1)
Figure 7-8. Use of Application Tape (Step 2)
Figure 7-9. Use of Application Tape (Step 3)
Figure 7-10. Use of Application Tape (Step 4)
TO 1-1-8
7-3