
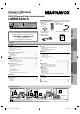
DVD VCR Combo User Manual

–
6
–
EN
S
etu
p
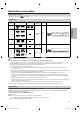
SETUP > AUDIO >
DOLBY DIGITAL
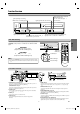
Connecting to a Do
lb
y Digita
l
d
eco
d
er
f
or Dolby Digital audio output.
B
IT
S
TREA
M
Connecting to ot
h
er equipment (an MD
d
ec
k
or DAT
d
ec
k
etc.)
wit
h
out Do
lb
y Digita
l
d
eco
d
er.
P
CM
Connection
Setting
H
in
t
fo
r
Cab
l
e
B
o
x
o
r
Sate
lli
te
B
ox
LR
VCRDVD/VCR
AUDIO OUT
L
R
DIGITAL
AUDIO OUT
or
AUDIO
OUT
DVD
S-VIDEO
OUT
COMPONENT
VIDEO OUT
L
R
S
tereo s
y
ste
m
Met
h
od
1
A
na
l
og au
d
io
i
nput jac
ks
A
UDI
O
O
U
T
(Ana
l
og)
Connection to an Au
d
io Syste
m
Aud
i
o
cab
l
e
pp
(su
ppl
ie
d)
* To complete these settings, re
f
er to pages 20-21
.
Hi
n
t
•
T
h
e au
d
io source on a
d
isc in a Do
lb
y Digita
l
Mu
l
ti c
h
anne
l
surroun
d
f
ormat cannot be recorded as digital sound b
y
an MD or DAT deck
.
•
B
y
hooking this unit up to a Multi channel Dolb
y
Digital decoder,
y
ou
c
an enjo
y
high-qualit
y
Dolb
y
Digital Multi channel surround sound as
hea
r
d
in
t
h
e
m
o
vi
e
t
h
eate
r
s.
•
P
l
a
y
ing a DVD using incorrect settings ma
y
generate noise
d
istortion
a
n
d
ma
y
a
l
so
d
amage t
h
e spea
k
ers
.
(DVD mode onl
y)
Di
g
ital audio
input jac
k
D
I
G
ITAL
AU
DI
O
OUT
A
u
d
io Coaxia
l
Digita
l
ca
bl
e
(commercia
ll
y avai
l
a
bl
e
)
M
et
h
od
2
D
o
lb
y Digita
l
d
eco
d
er,
MD
deck
o
r DAT
deck
Setu
p
I
f channel 3 has been alread
y
occupied for
b
roa
d
castin
g,
1) Set your TV to c
h
anne
l
4.
2) Insert a pre-recor
d
e
d
tape into t
h
is unit.
3)
Press
[
SOURCE
]
on t
h
e unit so t
h
at t
h
e VCR
SOURCE
l
ig
h
t is
l
it
.
•
If
noise appears on the TV screen, press
[
VCR/TV
]
on t
h
e remote contro
l.
4
)
Press
[
PLAY
B
]
on
c
e.
5
) After a few seconds,
p
ress and hold
[
PLAY
B
]
o
n
t
h
e
u
ni
t
fo
r
3
seco
n
ds.
•
T
he RF output channel will chan
g
e to chan
-
nel 4
f
rom channel 3 and you will see a
p
l
a
yb
ac
k
picture
.
•
When a picture does not appear on the TV
screen, repeat step
4
.
6)
Press
[
STOP
C
]
to stop p
l
ay
b
ac
k.
R
F Output C
h
anne
l
Connect
i
on
s
H
in
t
•
T
h
e RF out
p
ut c
h
anne
l
d
oes not
ch
ange w
h
en
y
ou a
d
just trac
k
ing
d
uring p
l
ay
b
ac
k
. In case RF output
ch
anne
l
c
h
anges, you can easi
l
y
s
witch it back. Start the playback
a
gain then press and hold
[
PLAY
B
]
o
n
t
h
e
u
ni
t
f
o
r
3
seco
n
ds.
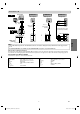
S
elect this connection when
y
ou want to view or record a
s
crambled channel. With this connection
,
channels cannot be
ch
ange
d
on t
h
e unit. You can view or recor
d
ONLY t
h
e c
h
anne
l
s
y
ou
ha
v
e
se
l
ected
o
n
t
h
e
cab
l
e
bo
x
o
r
t
h
e
sate
lli
te
bo
x
.
•
Wh
i
l
e
y
ou are recor
d
ing, on
ly
t
h
e recor
d
e
d
c
h
anne
l
can
b
e viewe
d.
T
o select channels o
f
the cable box or satellite box
1) Turn on the unit b
y
pressing
[
STANDBY-ON
]
,
then
p
ress
[
VCR/TV
]
.
The STANDBY-ON indicator on the front
p
anel will
l
i
gh
t, t
h
en press
[
SKIP/CH.
G
/
K
,
H
/
L
]
to
select
cha
nn
el
3
o
r 4 (the same channel as the out
p
ut channel of the cable box
o
r satellite box
).
• If
y
ou use the channel 4,
y
ou need to change the unit’s RF
out
p
ut to channel 4. Refer to “RF Out
p
ut Channel”
.
2) At the TV, select channel 3 or 4 (the same channel as
y
ou have
selected at ste
p
1)
.
3) On the cable box or satellite box, select the channel
y
ou want
to
vi
e
w
o
r r
eco
r
d.
ANT-OUT
ANT-IN
RF cable
(supplied)
(Back of DVD/VCR)
IN
OUT
(Back of TV)
Satellite or
Cable TV
signal
(Cable box or
Satellite box)
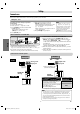
P
lease re
f
er to “Basic TV Connection” on the
f
ront page be
f
ore you use this unit.
Audio
DVD/VCR
DIGITAL
AUDIO OUT
COAXIAL
AUDIO
OUT
DVD
S-VIDEO
OUT
COMPONENT
VIDEO OUT
COAXIAL
E8C6BCD_CMWD2206 A_EN.indd 6E8C6BCD_CMWD2206 A_EN.indd 6 2009/12/01 18:55:012009/12/01 18:55:01