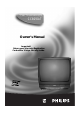
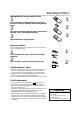
Color TV with built-in VCR CCB255AT Owner’s Manual Important! Return your Warranty Registration Card within 10 days. See why inside.
Return your Warranty Registration card today to ensure you receive all the benefits you’re entitled to. Once your PHILIPS purchase is registered, you’re eligible to receive all the privileges of owning a PHILIPS product. So complete and return the Warranty Registration Card enclosed with your purchase at once. And take advantage of these important benefits.
Introduction 3 Welcome to your TV/VCR owner’s manual. This manual has seven sections: Setting Up Your TV/VCR; Description of Controls; Basic Operations; Recording Options; Playing Options; Additional Features; and Information You May Need. The instructions explain all of the TV/VCR’s features, which are listed below.
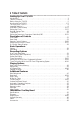
Table of Contents Setting Up Your TV/VCR Introduction . . . . . . . . . . . . . . . . . . . . . . . . . . . . . . . . . . . . . . . . . . . . . . . . . . . . . . . . . .3 Table of Contents . . . . . . . . . . . . . . . . . . . . . . . . . . . . . . . . . . . . . . . . . . . . . . . . . . . . . .4 Before Using the TV/VCR . . . . . . . . . . . . . . . . . . . . . . . . . . . . . . . . . . . . . . . . . . . . . . . .5 Hooking Up the TV/VCR . . . . . . . . . . . . . . . . . . . . . . . . . . . . . . . . . . .
Before Using the TV/VCR 5 Putting Batteries in the Remote Control 1 1 2 2 3 3 Remove the battery compartment lid on the bottom of the remote control by pressing in the tab, then pulling up the lid. Place three AA batteries inside the battery compartment with their + and – ends aligned as indicated. Replace the battery compartment lid. Erasure Prevention Video cassette tapes have record tabs to ensure that recordings are not accidentally erased.
Hooking Up the TV/VCR 1 Hook up your TV/VCR using one of the connections shown. A. Hooking Up Your TV/VCR With a Cable Signal or Outdoor Antenna Connect a Cable signal or an antenna to the ANT(enna) Jack. ANT. ANT. B. Hooking Up Your TV/VCR With a Cable Box To view any channel, set the TV/VCR to the Cable Box output channel (channel 03 or 04). Then, select channels at the Cable Box. Connect the Cable signal to the IN Jack on the Cable Box.
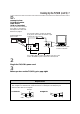
Hooking Up the TV/VCR (cont’d) 7 D. Hooking Up Your TV/VCR to Another Video Source (VCR or Camcorder) You may need this connection if you want to copy tapes or view tapes from a camcorder. Details are on page 32. AUDIO/VIDEO OUT Jacks on VCR 3CH 4CH AUDIO VIDEO OUT IN Use an Audio cable to connect the AUDIO OUT Jack on the VCR to the AUDIO In Jack on the front of the TV/VCR. IN ANT. OUT AUDIO VIDEO POWER AUDIO VIDEO 3CH 4CH AUDIO VIDEO OUT IN STOP EJECT REW PLAY REC F.
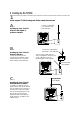
Turning On the TV/VCR Before you turn on the TV/VCR, make sure batteries are in the remote control and the TV/VCR is hooked up correctly. The instructions on this page work only when you turn on the TV/VCR for the first time. 1 Press the COMBI button, then press the POWER button. The TV/VCR will come on and the screen shown below will appear.
Language Selection 9 Follow the steps below to change the language of the on-screen displays and menus. 2-4 1 EJECT POWER Press the COMBI button, then press the MENU button. SLEEP/WAKE UP SPEED MEMORY PAUSE/STILL REC/OTR PRESS B > PRIM. SETUP VCR PROGRAM VCR SETUP CAPTION REMINDER BRIGHTNESS PLAY REW F.FWD STOP 1 2 Press the PLAY/▲ button or the STOP/▼ button to select PRIM. SETUP. Then, press the F.FWD/B button.
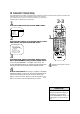
Automatic Channel Setup Although the TV/VCR may automatically memorize the channels you receive when you turn it on for the first time, you may set up channels again by following the steps below. 2-3 1 Press the COMBI button, then press the MENU button. EJECT POWER SLEEP/WAKE UP > PRIM. SETUP MEMORY PAUSE/STILL REC/OTR PRESS B VCR PROGRAM VCR SETUP CAPTION REMINDER BRIGHTNESS PLAY REW F.FWD STOP 1 2 SPEED Press the PLAY/▲ button or the STOP/▼ button to select PRIM.
Automatic Channel Setup (cont’d) 11 Adding/Deleting Channels 2,4 1 Press the COMBI button, then press the MENU button. EJECT POWER TO ADJUST PRESS { / B CH123 SAVED > CHANNEL FM ANTENNA SMARTLOCK REVIEW EXIT PRIM. SETUP SLEEP/WAKE UP SPEED MEMORY PAUSE/STILL REC/OTR PLAY REW F.FWD STOP 2 Press the PLAY/o button or the STOP/p button to select CHANNEL. TO ADJUST PRESS { / B CH123 SAVED > CHANNEL FM ANTENNA SMARTLOCK REVIEW EXIT PRIM.
Setting the Clock There are three ways to set the clock: Manually, with Automatic PBS Channel Selection, or with Manual PBS Channel Selection. With manual clock setting, you tell the TV/VCR the current time. With Automatic or Manual PBS Channel Selection, the TV/VCR gets the time from your local PBS station. If you use either Manual PBS Channel Selection or Automatic PBS Channel Selection, follow the steps on page 19 to have the TV/VCR maintain the clock according to your Time Zone.
Setting the Clock (cont’d) 13 4 Press the PLAY/▲ button or the STOP/▼ button to select SET MANUAL CLOCK, then press the F.FWD/B button. 5-6 EJECT POWER SET MANUAL CLOCK TIME – – : – – DATE – – / – – / – – – – SLEEP/WAKE UP SPEED MEMORY PAUSE/STILL REC/OTR PLAY TO END PRESS EXIT REW F.FWD STOP 5 MENU Press two Number buttons for the hour(s) and two Number buttons for the minute(s). Then press 1 for AM or 2 for PM. For example, for 9:30 PM, press 09, 30, 2.
Setting the Clock (cont’d) Automatic PBS Channel Selection 1 2-4 Press the COMBI button, then press the MENU button. EJECT POWER > PRIM. SETUP VCR PROGRAM VCR SETUP CAPTION REMINDER BRIGHTNESS PRESS B SLEEP/WAKE UP SPEED MEMORY PAUSE/STILL REC/OTR PLAY 2 REW F.FWD STOP MENU STATUS/EXIT Press the PLAY/▲ button or the STOP/▼ button to select PRIM. SETUP. Then, press the F.FWD/B button. PRIMARY SETUP 1 2 3 4 5 6 7 8 9 FM 0 SURF CABLE/DBS COMBI CLEAR CH.
Setting the Clock (cont’d) 15 5 Press the PLAY/▲ button or the STOP/▼ button to select SET PBS CH. AUTO. Then, press the F.FWD/B button. 6 Wait for the TV/VCR to find the time. SET AUTO CLOCK TIME ––:–– DATE ––/––/–––– EJECT POWER SLEEP/WAKE UP SPEED MEMORY NOW SEARCHING PAUSE/STILL REC/OTR TO END PRESS EXIT PLAY 6 7 REW F.FWD STOP NOW SEARCHING flashes on the TV/VCR screen. 7 MENU STATUS/EXIT 1 2 3 4 5 6 7 8 9 FM 0 SURF CABLE/DBS COMBI 5 CLEAR CH.
Setting the Clock (cont’d) Manual PBS Channel Selection 2-3 1 Press the COMBI button, then press the MENU button. EJECT POWER SLEEP/WAKE UP > PRIM. SETUP VCR PROGRAM VCR SETUP CAPTION REMINDER BRIGHTNESS SPEED MEMORY PRESS B PAUSE/STILL REC/OTR PLAY REW F.FWD STOP 2 Press the PLAY/▲ button or the STOP/▼ button to select PRIM. SETUP. Then, press the F.FWD/B button. 1 MENU STATUS/EXIT 1 2 3 4 5 6 7 8 9 FM 0 SURF CABLE/DBS COMBI CLEAR CH.
Setting the Clock (cont’d) 17 5 Press the PLAY/▲ button or the STOP/▼ button to select SET PBS CH. MANUAL. Then, press the F.FWD/B button. 7 AUTO CLOCK (PBS) CH 02 TIME ––:–– DATE ––/––/–––– Wait for the TV/VCR to find the time. EJECT POWER SLEEP/WAKE UP SPEED MEMORY PAUSE/STILL REC/OTR SELECT CHANNEL NUMBER TO END PRESS EXIT PLAY REW 6 F.FWD STOP MENU Use the Number buttons to select your PBS station.
Daylight-Savings Time When the Daylight-Savings Time feature is ON, the TV/VCR clock will automatically move forward one hour on the first Sunday in April and move back one hour on the last Sunday in October. To turn Daylight-Savings Time ON or OFF, follow the steps below. 2-4 EJECT POWER 1 SLEEP/WAKE UP SPEED MEMORY PAUSE/STILL REC/OTR Press the COMBI button, then press the MENU button. PLAY REW F.FWD STOP > PRIM.
Time Zone 19 When you set the clock using AUTO CLOCK, specify your time zone. The TV/VCR will maintain the clock according to your time zone. 1 2-5 Press the COMBI button, then press the MENU button. > PRIM. SETUP VCR PROGRAM VCR SETUP CAPTION REMINDER BRIGHTNESS PRESS B EJECT POWER SLEEP/WAKE UP SPEED MEMORY PAUSE/STILL REC/OTR 2 PLAY REW F.FWD STOP Press the PLAY/▲ button or the STOP/▼ button to select PRIM. SETUP. Then, press the F.FWD/B button.
Setting the Remote to Operate a Cable Box/DBS Your TV/VCR remote control may operate your Cable Box/DBS. If the remote control doesn’t operate your Cable Box/DBS now, follow the steps below to program your remote control. 1 Turn on your Cable Box/DBS. Point the remote control at your Cable Box/DBS and press the CABLE/DBS button. Then, press the POWER button. If your Cable Box/DBS turns off, try the other Cable Box/DBS buttons (see pages 24-25 for details).
Setting the Remote to Operate a Cable Box/DBS (cont’d) 21 5 Within 30 seconds, press the Number buttons to enter the two-digit code for your Cable Box/DBS. For example, if you have a Zenith Cable Box, press Number buttons 0, 7. 6 EJECT POWER SLEEP/WAKE UP SPEED MEMORY PAUSE/STILL REC/OTR PLAY REW 6 Repeat step 1. If the remote control works your Cable Box/DBS, you’re finished.
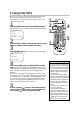
Front Panel Cassette Compartment Insert a video cassette tape here. STOP/EJECT Button Press once to stop the tape. When playback is stopped, press to eject the tape. Press to select an item in the menu. POWER Button Press to turn the power on or off. Press to activate the Remote Locator. Details are on page 59. Wireless Remote Sensor Receives a signal from your remote control so you can operate the TV/VCR from a distance. VIDEO In Jack Connect this jack to the video out jack of a camcorder or a VCR.
Rear Panel 23 ANT. AC Power Cord Connect to a standard AC outlet to supply power to the TV/VCR. ANT(enna) Jack Connect your antenna or cable here. Details are on page six. Antenna Hole Connect the stem of an indoor antenna here. Details are on page six.
Remote Control Buttons EJECT Button Press to eject the tape. SPEED Button Press to select the recording speed (SP or SLP). POWER Button Press to turn on or off the TV/VCR, Cable Box, or Direct Broadcast System. (You must first press the COMBI or CABLE/DBS button.) Details are on pages five and 20-21. SLEEP/WAKE UP Button Press to set the Sleep Timer. Details are on page 52. Press to set the Wake Up Timer. Details are on page 53. PLAY/▲ Button Press to play a tape. Details are on page 29.
Remote Control Buttons (cont’d) 25 PAUSE/STILL Button During recording, press to temporarily stop the recording. Press again to resume recording. Details are on page 30. You cannot pause a One-Touch Recording. During tape playback, press to freeze the picture. Press again to resume playback. Details are on page 46. MEMORY Button Press to memorize a tape position at which the real-time counter was set to 0:00:00. Details are on page 42.
Adjusting the Picture Controls Follow these steps to adjust the TV/VCR’s brightness, picture, color, tint, and sharpness. 1 EJECT POWER Press the COMBI button, then press the MENU button. SLEEP/WAKE UP 2 3 Press the PLAY/▲ button or the STOP/▼ button to select the desired control (BRIGHTNESS, for example). Press the REW(ind)/{ button or the F.FWD/B button to adjust the picture control. (Refer to the chart on page 27.
Adjusting the Picture Controls (cont’d) 27 Decrease decreased brightness decreased contrast paler more purple softer BRIGHTNESS PICTURE COLOR TINT SHARPNESS Increase increased brightness increased contrast more brilliant more green clearer Press the REW(ind)/{ button to decrease a picture control. Press the F.FWD/B button to increase a picture control. POWER AUDIO VIDEO STOP EJECT REW PLAY REC F.
On-Screen Status Displays A status display will appear when you press the STATUS/EXIT button or certain function buttons. The contents of the status display will vary. To choose the status display mode, follow the steps below. If you select STATUS ON, then select COUNTER ONLY OFF: ● Whenever you press the STOP/p button or the PLAY/o button, the status display will appear for five seconds. Portions of the status display also may appear when you press other function buttons.
Playing 29 Follow the steps below to play a tape. 1 1 Insert a tape in the TV/VCR. The power will come on. If the tape’s record tab has been removed, playback should start automatically. 2 If playback does not start automatically, press the COMBI button, then press the PLAY/▲ button to start playback. 3 4 5 Press the STOP/▼ button to stop playback. Insert a tape in the TV/VCR. EJECT POWER SLEEP/WAKE UP MEMORY PAUSE/STILL 4 3 PLAY REW F.
Recording Read and follow the steps below to record a TV program. 1 Press the COMBI button, then place a tape with its record tab intact (see page five) in the TV/VCR. The power will come on. Or, if the tape is already in the TV/VCR, press the POWER button to turn on the TV/VCR, if necessary. 2 2 1 EJECT POWER SLEEP/WAKE UP SPEED MEMORY PAUSE/STILL REC/OTR Press the SPEED button until the desired tape speed appears on the TV/VCR screen. Details about tape speed are given below.
One-Touch Recording 31 The One-Touch Recording (OTR) function allows you to program an immediate timed recording from 30 minutes to eight hours long without setting the timer. Before you begin, make sure: ● Channels are set up. ● There is a tape in the TV/VCR. The record tab must be intact. 1 EJECT POWER n Press the COMBI button, then use the CH(annel) m/n button or the Number buttons to select the channel you want to record.
Rerecording (Tape Duplication) AUDIO and VIDEO OUT Jacks on source unit (VCR or Camcorder) POWE AUDIO VIDEO REC VIDEO AUDIO OUT IN Audio Cable (white) from AUDIO OUT to AUDIO In Video Cable (yellow) from VIDEO OUT to VIDEO In AUDIO and VIDEO In Jacks on TV/VCR 1 Make the connections shown above, using audio and video cables. Make sure the source unit (VCR or camcorder) is connected to a power source. 2 The source unit will play your tape. Insert a prerecorded tape in the source unit.
Defeat Recording 33 Follow the steps below to prevent accidental recording. 2-3 1 EJECT POWER Press the COMBI button, then press the MENU button. SLEEP/WAKE UP SPEED MEMORY PAUSE/STILL REC/OTR > PRIM. SETUP PRESS B VCR PROGRAM VCR SETUP CAPTION REMINDER BRIGHTNESS F.FWD STOP 1 2 Press the PLAY/▲ button or the STOP/▼ button to select VCR SETUP, then press the F.FWD/B button.
Timer Recording Follow the steps below to program the TV/VCR to record TV programs while you’re away from home. The TV/VCR will turn itself on, record, and turn itself off automatically. Before you begin, make sure: ● The clock is set. If not, CLOCK MUST BE SET appears, followed by the SET CLOCK menu. ● Channels are set up. ● There is a tape in the TV/VCR. (Make sure the tape’s record tab is intact and the tape is long enough to record the program.
Timer Recording (cont’d) 35 4 Use the Number buttons (1-8) to select a position in which to store the timer recording. Flashing numbers indicate an open position (one in which a timer recording has not been stored yet). NOTE: If you select a number that already has been used to store a timer recording, PREVIOUSLY SET PROGRAM will appear on the screen for a few seconds. Then information about the program in that position will appear on the screen. If this happens, press the STATUS/EXIT button.
Timer Recording (cont’d) 8 11 Press the Number 1 button to record in SP speed or press the Number 2 button to record in SLP speed. Details about tape speed are on page 30. You cannot use the SPEED button at this time.
Timer Recording (cont’d) 37 Checking or Clearing Timer Recordings 2-4 1 With the TV/VCR on, press the COMBI button, then press the MENU button. 2 3 SLEEP/WAKE UP 4 Press the F.FWD/B button to display information about the next programmed timer recording. (If you do not press a button within 10 seconds, information about the next programmed timer recording will appear.) This will continue until all positions have been displayed. Then, the menu will disappear.
Setting Up the VCR Plus+ Programming System 1 First, fill in the boxes on this page. It will only take a few minutes, and you must do it if you want the VCR Plus+ programming system to work properly. Since the channel numbers of the stations you receive may not be the same as the station numbers, and since channel numbers differ from area to area, you must program the TV/VCR with your local channel information.
Setting Up the VCR Plus+ Programming System (cont’d) 39 2 Now, compare the channel numbers you have written in the VCR PLUS+ CH. and CABLE/TV CH. columns. You’ll notice that some stations have VCR Plus+ and Cable/TV channel numbers that are the same, and other stations have channel numbers that do not match. Where the channel numbers DO NOT match, you must tell the TV/VCR the VCR Plus+ and Cable/TV channel numbers according to the following steps. ● Make each entry within 60 seconds of the previous entry.
Timer Recording With the VCR Plus+ Programming System Follow the steps below to program a timer recording using the PlusCode programming numbers in your TV guide. Before you begin, make sure: ● The clock has been set. If not, CLOCK MUST BE SET appears. ● Channels are programmed. ● There is a tape in the TV/VCR (make sure the tape’s record tab is intact and the tape is long enough to record the program). ● You have completed the steps on pages 38-39.
Timer Recording With the VCR Plus+ Programming System (cont’d) 41 4 Press the Number 1 button to record in SP speed or the Number 2 button to record in SLP speed. Your selection will appear to the right of REC SPEED on the screen, although SP=1 SLP=2 will continue to flash. For details about tape speed, see pages 30 and 63. You cannot use the SPEED button at this time.
Real-Time Counter Memory Follow the steps below to reset the real-time counter to zero at a tape location you want to refer to later. 1 1,5 EJECT POWER Play, fast forward, or rewind a tape to the location that you would like to refer to later. Stop the tape. SLEEP/WAKE UP 2 SPEED MEMORY PAUSE/STILL REC/OTR 4 PLAY REW Press the STATUS/EXIT button. The real-time counter will appear on the screen. 01:08 PM CH10 STOP F.
Repeat Play 43 Follow the steps below to program the TV/VCR to play a tape over and over. 2-3 1 EJECT POWER SLEEP/WAKE UP Press the COMBI button, then press the MENU button. SPEED MEMORY PAUSE/STILL REC/OTR PLAY > PRIM. SETUP PRESS B VCR PROGRAM VCR SETUP CAPTION REMINDER BRIGHTNESS 2 REW F.FWD STOP 1 MENU STATUS/EXIT 1 2 CLEAR 4 3 CH. Press the PLAY/▲ button or the STOP/▼ button to select VCR SETUP, then press the F.FWD/B button.
A-B Repeat Play Follow the steps below to program the TV/VCR to play the material between two specified points (A and B) on a tape over and over again. 1 1 2 Insert a tape in the TV/VCR. 3-5 EJECT POWER Insert a tape in the TV/VCR. SLEEP/WAKE UP SPEED MEMORY PAUSE/STILL REC/OTR PLAY REW Press the COMBI button, then press the MENU button. > PRIM.
A-B Repeat Play (cont’d) 45 6 7-8 Press the STATUS/EXIT button to remove the menu. AB REPEAT will appear on the screen. Beneath it, the letter A will flash beside the real-time counter. EJECT POWER . SLEEP/WAKE UP SPEED MEMORY PAUSE/STILL REC/OTR PLAY REW A F.FWD A-B REPEAT 0:12:34 7 Play, fast forward, or rewind the tape to the position at which you want to begin playback. Stop the tape, then press the MEMORY button to set the start position (A). The flashing A will become a flashing B. .
Playback Options Forward and Reverse Searching (SP/LP/SLP) 1 During tape playback, press and release the F.FWD/B button or the REW(ind)/{ button. A fast forward or reverse picture search will begin. EJECT POWER SLEEP/WAKE UP SPEED MEMORY PAUSE/STILL REC/OTR PLAY REW 2 F.FWD STOP MENU STATUS/EXIT CLEAR To return to normal playback, press the PLAY/▲ button. Super High Speed Searching (LP/SLP) 1 During tape playback, press the F.FWD/B button or the REW(ind)/{ button, then press again.
Blue Background 47 If you want the TV screen to be solid blue when a weak signal is received, set BLUE BACKGROUND to ON. The screen will be blue and the sound will be muted. Or, if you want to receive the weak signal, set BLUE BACKGROUND to OFF. When you select a channel that is receiving a weak signal, you will see and hear the static in the TV programming. To set BLUE BACKGROUND to ON or OFF, follow the steps below.
SmartLock 2,4 SmartLock enables parents to prevent their children from watching inappropriate material on TV. SmartLock reads the ratings for programming (except for news and sports programs, unedited movies on premium cable channels, and Emergency Broadcast System signals), then denies access to programming if the program’s rating meets or exceeds the limitations you select. The ratings are defined on page 51. To block ratings, follow the steps below.
SmartLock (cont’d) 49 5-6 5 Press the PLAY/▲ button or the STOP/▼ button to select Movie Ratings or Parental Guidelines. Then, press the F.FWD/B button. EJECT POWER SLEEP/WAKE UP SPEED MEMORY BLOCK > Movie Ratings PAUSE/STILL REC/OTR Parental Guidelines PLAY REW SELECT KL CHOOSE B TO END PRESS EXIT F.FWD STOP MENU 6 Press the PLAY/▲ button or the STOP/▼ button to select the rating you want to block. Then, press the F.FWD/B button so that ON appears beside the rating.
SmartLock (cont’d) 2,4 To change the access code, follow these steps. 1 EJECT POWER Press the COMBI button, then press the MENU button. SLEEP/WAKE UP > SMARTLOCK REVIEW EXIT PRIM. SETUP VCR PROGRAM VCR SETUP PRESS B SPEED MEMORY PAUSE/STILL REC/OTR PLAY REW F.FWD STOP 1 2 Press the PLAY/▲ button or the STOP/▼ button to select SMARTLOCK. Then, press the F.FWD/B button. SMARTLOCK _ _ _ _ MENU STATUS/EXIT 1 2 3 4 5 6 7 8 9 FM 0 SURF CABLE/DBS COMBI CLEAR 6 CH. VOL.
SmartLock (cont’d) 51 To check the SmartLock settings, follow these steps. 1 Press the COMBI button, then press the MENU button. EJECT POWER > REVIEW PRESS B EXIT PRIM. SETUP VCR PROGRAM VCR SETUP CAPTION SLEEP/WAKE UP SPEED MEMORY PAUSE/STILL REC/OTR PLAY REW 2 F.FWD STOP Press the PLAY/▲ button or the STOP/▼ button to select REVIEW. Then, press the F.FWD/B button so that the SmartLock settings appear. Ratings that are blocked will appear on the screen.
Sleep Timer Use the sleep timer to program the TV/VCR to shut off in a certain amount of time. 1 Press the COMBI button, then press the SLEEP/WAKE UP button. TO ADJUST PRESS { / B > SLEEP EJECT POWER –TIMER– OFF WAKE UP ON-TIME 1 SLEEP/WAKE UP SPEED MEMORY PAUSE/STILL REC/OTR PLAY REW 2 MENU o button or the STOP/p p button to select Press the PLAY/o s button or the SLEEP. Then press the REW(ind)/s B button to select 30 MIN(utes), 60 MIN(utes), 90 F.FWD/B MIN(utes), 120 MIN(utes) or OFF.
Wake Up Timer 53 The Wake Up Timer turns on the TV/VCR automatically at a specified time within the next 24 hours. You may set the TV/VCR to turn on at a TV channel (the channel at which the TV/VCR was set last) or with VCR playback. To set the Wake Up Timer, follow the steps below. Before you begin: ● Make sure the clock is set. If the clock has never been set, CLOCK MUST BE SET will appear on the screen at step 2. Then the SET CLOCK menu will appear.
Closed Caption When you watch a program that is being broadcast with closed captions, you can access on-screen boxes containing the program’s dialogue (for example, what a character is saying), dialogue in a foreign language, or information (such as a channel guide, schedule, or announcements). Follow the steps below to select closed captions. Not all TV programs and commercials are broadcast with closed captions. Similarly, all types of closed captions (second language, half-screen text, etc.
Closed Caption (cont’d) 55 4 Press the STATUS/EXIT button. The type of closed captions you selected at step 3 will appear on the screen if available. EJECT POWER SLEEP/WAKE UP SPEED MEMORY PAUSE/STILL REC/OTR PLAY REW F.FWD STOP MENU STATUS/EXIT CLEAR 4 HELLO Standard Closed Captions 1 2 3 4 5 6 CH. 7 8 9 FM 0 SURF CABLE/DBS COMBI VOL. VAR.SLOW VCR PLUS+ /ENTER MUTE TRACKING F.
Volume Bar/Smart Sound Volume Bar Usually, the volume bar appears when you press the VOL(ume) m/n n button. If you do not need it, set the VOLUME BAR to OFF. For example, when you watch a program that is being broadcast with closed captions, you may choose to set the VOLUME BAR to OFF so the captions can remain on the screen. The captions will n remain on the screen even when you press the VOL(ume) m/n button or the MUTE button.
Automatic Operation Features 57 The following playback features will always operate. Automatic Playback When you put a tape in the TV/VCR, the power will come on automatically. If the tape’s record tab is missing, playback will begin. If a timer recording is set, the power will not come on automatically when you insert a tape with the record tab intact. If a timer recording is set and the TV/VCR power is off, the TV/VCR will eject the tape if the record tab is missing.
SmartPicture/FM Radio SmartPicture The SmartPicture feature allows you to improve the TV/VCR’s picture when viewing sports, a movie, or video games; to improve the picture when the antenna/cable signal is weak; or to reset the picture controls to their original settings. 1 Press the COMBI button, then press the SMART PICTURE button repeatedly until the SmartPicture mode you want appears on the screen. Your selection will remain on the screen for about 10 seconds, then disappear.
Remote Locator 59 Your TV/VCR can find your remote control for you. When you press the POWER button on the TV/VCR to turn on the TV/VCR, your remote control beeps and LOCATING REMOTE appears on the screen. The remote control will beep for about 30 seconds. Or, press any button on the remote control to stop the beeping. If another remote control beeps ... 2-3 If another remote control beeps... The TV/VCR may find other remote controls.
Reminder The channel number will remain on the screen at all times when you set REMINDER to ON. The exception is when closed captioning is selected or during tape playback. Set REMINDER to ON or OFF by following the steps below. EJECT POWER SLEEP/WAKE UP 1 Press the COMBI button, then press the MENU button. TO ADJUST PRESS { / B > REMINDER OFF BRIGHTNESS PICTURE COLOR TINT SHARPNESS Press the PLAY/▲ button or the STOP/▼ button to select REMINDER. PAUSE/STILL 3 1 PLAY REW F.
Index Search 61 This feature allows you to index the starting points of programs that you have recorded on a tape. Then, you can easily rewind or fast forward to that point. Example: If you are watching program number 4 and you want to fast forward to program number 7, skip three programs. EJECT POWER SLEEP/WAKE UP SPEED MEMORY PAUSE/STILL REC/OTR CURRENT PLAYBACK PROGRAM Beginning of tape End of tape 3 Pro. 1 Pro. 2 Pro.3 Pro. 4 Pro. 5 Pro. 6 Pro. 7 4 3 2 1 1 2 PLAY REW F.
Specifications General CRT: 25-inch in line gun Television system: NTSC-M Closed caption system: Section 15.119, FCC (Federal Communications Commission) Standard Video Heads: Four heads Tape width: 1/2 inch (12.65 mm) Tape speed SP: 33.35 mm/sec. LP: 16.67 mm/sec. SLP: 11.12 mm/sec. Operating Temperature: 41˚F (5˚C) to 104˚F (40˚C) Relative Humidity: 10% to 75% Power requirement: AC 120V, 60Hz Power consumption: 115W Sound output: 1W Dimensions: 24-1/2" (H) x 25-1/32" (W) x 20-3/32" (D) 622.
Glossary 63 AUDIO In Jack: jack located on the front of the TV/VCR which is used to record audio from another source. Automatic Channel Setup: process in which the TV/VCR scans all available channels and places the ones you receive in its memory. Then, when you push the CHANNEL o/p buttons, you only scan through channels you receive. Bands: settings that allow you to tune channels. • Antenna – VHF (very high frequency; channels 2-13) and UHF (ultra high frequency; channels 14-69).
Helpful Hints If you are having problems with your product, check this list of problems and possible solutions before requesting service. You may be able to solve the problem yourself. If you need to call a customer service representative, please know the model number and serial number of your product before you call. This information is displayed on the back of the product. Also, please take a moment to identify the problem you are having, and be prepared to explain this to the representative.
Helpful Hints (cont’d) 65 The remote control is not available, or the remote control will not access the pop up menu. • Use the buttons on the front panel of the TV/VCR to access the pop up menu. Details are on page 22. You can not enter numbers (for example, to program a timer recording) using the front panel buttons. TV/VCR has no power. • Make sure the power plug is connected completely to an AC (alternating current) outlet. Channel reception is poor. • Check connections, then set up the channels again.
RENEWED 90 DAY LIMITED WARRANTY
Index 67 a-b repeat play . . . . . . . . .44-45 accessories . . . . . . . . . . . . . . .68 ant(enna) jack . . . . . . . . . . .6, 23 audio jack . . . . . . . . . . .7, 22, 32 automatic playback . . . . . . . . . . . . . . .57 rewind . . . . . . . . . . . . . . . .57 batteries . . . . . . . . . . . . . . . . . .5 blue background . . . . . . . . . . .47 brightness, adjusting . . . . .26-27 cable/dbs button . . . . .20-21, 25 channel above 100 . . . . . . . . . . . . .24 adding . . . . . . . . . . . . . . . .
SUPPLIED ACCESSORIES The following items are supplied with your TV/VCR; they are provided to help you use or set up your TV/VCR. PO WE R SLE EP /WA KE RE UP C/O EJE SP TR CT EE D ME MO RY RE W PA US PL E/S AY ME ST NU OP TIL L F.F WD ST AT US /EX IT 1 CLE 3 5 6 8 LE/D CH . 9 0 BS AR 2 4 7 FM CAB CO SU MB RF I VA R.S LO W VO TR VC R /EN PLU TE S+ R AC KIN G PIC TU SM RE AR SO T UN D TE DV SEINDEX AR CH L. MU F.