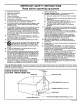
Your Television's Directions for Use 51PW9363 55PW9363 60PW9363 Product ....
Once your PHILIPS purchase is registered, you're ehglble to receive all the pnwleges of owmng a PHILIPS product. So complete and return the Warranty Registration Card enclosed with your purchase at once. And take advantage of these important benefits. Warranty Verification Owner Confirmation Model Registration Registering your product within 10 days confirms your right to maximum protection under the terms and conditions of your PHILIPS warranty.
IMPORTANT SAFETY INSTRUCTIONS Read before operating equipment 1, 2, 3, 4, Read these instructions, Keep these instructions, Heed all warnings. Follow all instructions. Alliance: www.eiae,org 16, Damage Requiring Service - The appliance should be serviced by qualified service personnel when: A. The power supply cord or the plug has been damaged; or B. Objects have fallen, or liquid has been spilled into the appliance; or C. The appliance has been exposed to rain; or D.
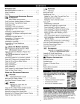
INTRODUCTION We]come/Registration of Your TV .................... Safbty/Precantions ........................... Features ........................................ _ TO YOUR TV CONNECTING • • _ 2 .z,--.) _ " 5 Setting the Clock ................................ 39 Displaying the Time .............................. 4(1 ACCESSORY DEVICES Jacks, CaNes, and Connectors ................. Panel Overviews: Standard Inputs arid Ou_uts 6 .......... 7 Panel Overviews: T-Tigh-definition Inputs ...........
Active Control TM confinanasly measures anti corrects all ineom'mg signals to pro_dde the best pfamro _ngs. This lbatm_ provides a sharp and vil_ually enisc-ffe_ plamre a_y tlma, from any NTSC source. NTSC is the Natlenal Tclcvisian Standerds _ttec format devlscd in the 1940s for TV broadeast analog video signals (525 hues: 30 Hz), Alternate Channel (AiCH) button allows you to switch back end forth between the eurmntiy viewed channel and the p_Aonsly viewed channel.
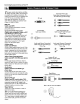
Connecting Accesanr_, Devlces toYourTV _raiS page contains dea'eriplions and illastkms of]aek_; cables, and conneetore you might use in ma_ng connections, The cables and connectors are tuft supplied with your _ but you can purchase them at store_' that sell electronies. Or you can order t!_n _' calling our Castomer Care Center at l-8(_-531-(_739.
Connect?ng Accessory Dev?ces toYourTV _u can connect a wide range of video and udio components to your TI'_ in various ways. This page and the nat one provide an overview of signal compatibilitius and the lypes of components you can connect to the jacks. Conneztian e_ples follow on subsequent pages.
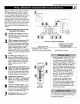
Connecting Accessory Devices toYour TV WhatYou Can Connect to the High-definition Input Jacks 1 lid INPUT-AV 4---use to connect digJtel equipment with a 1080i or a 480p sig#al outpu_ such as T-SDreceivers (1080i or 480p) or DVD players with progressJve-scarl capability (480p). You can connect equipment with YPbPr cornporierit video or RGB outputs to the HD INPUT-AV 4 jacks. H arid V sync cormections may or may not be required for RGB connections. (See page 59.
ConnectlngAccessory r_ TV;_,oudioivideo (A_ input.jac_' provide 1 f!_r direct picw.re and sound connections between the TV and ance_sory devices such a,_ VCRs, D _D players, and others that have A V output.jacks. Devlces toYourTV BackofTV This'example, which _e_ the INPUT-AV I.jacks, shom_ you one way you can connect a VCR to __ar Tg Refer to the directions-for-u*e manual tbr >vmr VCRforfp,a'tber information on connectio_.
Connocting Accessory Devices to Ynur "l"V presented here is a connection example involving a VCR and cable box. Refer to the YCR i' direetionszfor-use manual far further infoFmation on £;onnect_otK_'. To make the connections in this _ample, yon will need: • one, two-w@' signal splitter • two coaxial cables (75£1) • one eable.
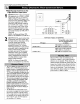
Connect?ngAccessory yt_T can us'ekv)ur 77_'3'AUDIO OUTPUTjacLs' eotmect to an external audio hi-fi ,s3_s't_ Follow the simple ._1epsbelong: To make tbe._*e eotmeetio_, you will need two cable._'.tbraudio eotmectio_ (standard RCA), NOTE: The eable.
Connecting Accessory Devices toYourTV Ci_,mponent video inpuLs_allow the h_gbe_'tposible color and pictum resolution in the playback qf digital signaLL ,w,ch as those of D_D players. The color d_[f&encesignaL__(Pb, Pr) and the luminance (t) signal are cannected and received separatel3v:The re,gdlt is better color bandwidth iqtbrmation than is t_)ssible with compasite video (labeled VIDEO on your TV:_jack panel) or S-Hdeo connectio_.
Conne_ngAccessory Devices tx_YourTV Z_he Jbllowing instructions _plain how to annect a D_/7) player with progre, s;_qve_can capability to the HD 1NPUT-A V 4 jacks on your 77( To make the connections, you will need: • threecable._'Jbrvideocannections(_'tandard RCA-type phano plugs) • tv_cabl_'tbraudioconnectio_(standard RCA-type phano plugs). NOTE: The eable._"are not s_pplied with your 7Y: You should be able to buy them at most stores that sell electronics.
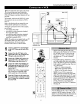
Connecting Accessovy Devlces toYourTV _ S(uper)-_deo connection on the back d side panel) _i'the 771can give you better picture detail and elarityJbr the plgcback of S_q:IS VCR tapes or D_7_ than the normal antenna (RF sigmaO or Ftdeo (composite) picture connections. The egample given eonneeLs' a D}_NCR Combi unit to the INPUT-AV 2 jacks on the back _t'the 774 Back of TV NOTE: The ace_s'sory device must have an S-_qDEO output jack to make the connection explained on this page.
Connecting Accessory Devices toYour TV _tal equipment with a 1080i or 480p output compatible with the liD INPUT-AV 4 video.jacks. NOTE: This,television is"designed to be computible with h_gh-definition signal standard_ 1080i and 480p a_ specified be'the Electronic Industries' Association standard EIA 770.3.
Connecting Accessory Devices toYour TV The side panel.jacLs'previde a convenient way I Jbr you to connect a camcorder to ytmr TE The side paneljacLs' are recognized by your 77/ as' AY3. Typi_l CNI1C_I'd _T" You can obtain S-ItTDEO quality with an S-FTIS, Hi-& or digital camcorder by connecting to the S-IqDEO inpat i_tead of the IqDEO (composite) To make the connections shown in this"example, )_u will need: • an S-_qDEO cable • tw_cabl_s'tbroudioconnectio_(standard RCA-type pbano plugs).
Connecting Accessory Side J_k Devices P_r,_l Thepersonal 77@side panel ha__a headphone jack Jbr listening, headphone Insert the headphone jacE ,_. in plug the TV's into the side panel. the Mate Turn down button the TV's _ volume oli the remote or press con_ trol to turn off'the TV's interalal speakers. See the section below for infomartion ori oddtjus_ headphone volanle arid bal- E5 ar'tee, NOTE: The headphone knpe_e must be between 8 arid 4,000 ohms. The headphone jack is stereo and 3.
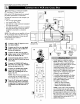
Using the Remote ControI y;ur 77Zremote is capable of working not nly your TV but also other infrared remote ([R) controlled accessory devices such as VCRs, cable 77/converter boxes, satellite receivers, D FD players, and laserdisc pFt_ers. If you want to use ),oar TV remote to operate a VCR or other accessory devices, you will need to perJbrm the initial check explained in this section.
Using the Remote Control XOdWigitthat _'ou have looked up the fburremote-control Direet-ent_ _Code ,lbr your brand of accessory device you are tea@ to lbllot_' the simple steps shown below to program your TV remote. Please read through all the *_eps befbre beginning, 1 2 Cable Comc_rt_r First, press and hold down the VCR or ACC (for an accessory de_ice other than a VCR) mode button on the TV remote, Then press and hold down the MENU/SELECT button at the same time for a brief trioment.
Using the Remote ControI yOac_r TV remote _:an be set to work various eessory devices (VCRs, cable convertors, and satellite receivers, fiw example) by what is called the Search Method.
Using the Remote Conlro] VCR CODE NUHBER .... 0075, 0236 A[=_!EN"OP, A ....... .... 0027 Ad_ ............ .... 0305 AdWA ........... .... 0334, 0495, 0027, 0064 .... 0133, 0980, 0068, 0076, .... 0088, 0183, 0269 AHE_.iCAAJ_TrON .., ....0305 AHE_IC_ HIGH .... .... 0062 _HA ........... .... 0267 AUDIOVOX........ .... 00{,4 B_UMA_K ........ .... 0267 BELL& HOWELL.... .... 0131 B_.OK$ONIC....... .... 0148, 0211,0029, 0236, .... 0238, 0322, 0388, 0506 CCE ............ .... 0099, 0305 CAL{X ........... ....
U_ing the Remote ControI LASER-DISC CODE AD5 ............ AIWA ........... CA_VEP`.......... DENON .......... DISCOViSiON...... FIjXAI ........... HAF4_IAN/KA!r{DON HITACHI .... .... .... .... .... .... .... .... .... .... ., .......... KENWOOD ....... MAG_.AVOX....... IViARA N"='Z ......... 0880 0855 0853, 0850, 0858 0851,0849, 0875 0848 0855 0853 0848 0877 0853, 0857, 0875 NUHE_ER I_iITSi.JBISHI ......... CODE H_UN ......... PHIUPS ............ PIONEE]_ .......... POLl
Using the Remote Control _m e Chart below provides you with cornon accessory-device functions a_'sociated with the buttons on your Philips 77:remote control (Seepages lS-20,[br information on programming your 77" remote to operate acce&_'oty devices.) -®.@@@- FASr NOTES: • Functions can vary according to the manufacturer's _pectf!cation._',[br each acce&_'oty device. ICURSO_RiNG LE_ _ _O_OR R!NG RIGHT 1 • Firstpress the VCR mode button to use the TV remote to operate a VCR.
U_ing the Remote ControI T.sohe AV but!_]n on the remote control and URCE SELECT button on the 77/ allow you to access the TI"__signal-source inputs. F_qtheach press of the AV button, you can access a d_[Ferentsignal input source. The input.]acl_' are located on the back and side panels of your TE (See pages 7 and 8.) t [] Selecting an Input Source Using the AV Button on the Remote Control Press the AV butlon olxthe remote control as many limes as necessary to select the input source you wan_:to watch.
Using the Remote can use the hutoSoundyz_ options to utomaticalO' tailor the TVs sound f!_r the Ope of program you are watching. The ,[hctot 3' has set the VOICE, _4USIC, and THEATRE options. The settings for the PERSONAL option are the ones you select through the on-s_en SOUND submenu. See descriptions o/'the options below right. Control y:u 1 2 Press the SOUND button on the remote control. The current AutoSoltnd TM setting will appear on screen.
Using the Remote Control yoau can use an AutoPietare TM, option to utomatieally tailor the TV s pieture fiw certain lypes of input signals. The/_:to_' has set the _40V[ES, .SPORTS, FREAKSIGNAL, and MULTI_4EDIA options. The settings ,!'orthe PERSONAL option are the ones you select through the on-screen PICTURE submenu. 1 2 Press the PICTURE button on the remote control, The current AutoPieture TM setting will appear on screen.
Using the Remote Control After you set up a list o[)'our favoriCe signal sources in the SURF list, you can press the SURF button to see the list and quickly tune to a /hvorite signal source, Place up to 10 signal soumes in the SURF LIST. [] !-- Press the NUMBER buttons, CH(annel) +/- buttons, or the AV button to select a signal source to add to the Surf fist. [] Press the SURF button. The Surf'list box appears. The number of the current signal source is shown with ADD? to the right.
Using the Remote 1 Control ®®®® Press the Program List button on the remote control to display a list of channel nmnbers and their names. (See the "Tuner Mode" "Auto Program," "Channe] Edit,' and "Nimie" sections on pages 4-6 in the Quick Use and Setup Guide that came with your TV for proper setup.) A padlock image will appear to the rJg|tg of a _|tar_rtel or 5lgrtal 5our¢:_ _hat iz being You can also access the ?to.am List by pres_ng the button irl the center of the Cursor Ring.
Using thc Rcmote ConLToI HaTT,?veyou ever fallen asleep in front _f the }bu can program your TV to turn off while you sleep. The Sleep Ttmer feature allows you to set your 77Zto turn off within a certain amount of time: 15, 30, 45, 60, 90, 120, 180, or 240 minutes. Press the SLEEP button on the remote control. The SLEEP Timer on-screen display will appear on screen.
Using the On-screen Subr_enus: Picture T: adi_'t your TVpicture eontn)l_; select a nel and Jbllow the_'esteps. See de_'criplions'of the pieture-adj_'#nent opiiom' belong: 1 2 3 4 PICTURE Press the MENU/SELECT button on the remote control to show the on- • COLON • PICTURE • SBARPNE_ Sei_ell • rig] melllL Press the C_SOR RING RIGHT. BRIGHTNESS will be highfighted and an attjustrnent bar will be shown to the fight.
Us?ng the On-screen FideliO; gives you a choice between o different scanning teehniques_progressive or interlaced, Submenus: _tle Progressive scan doubles the number of picture lines, eliminating line flieker and providing a fitterzfree picture, PICTURE a • SOUNB • FEATURES • INSTALL Interlaced improves the appearance of onscreen motion, it also helps smooth out jagged lines that are sometimes seen on curved and angled surfaces in the picture.
Using the On-screen Submenus: P?cture Tthe l?gmamie Contra_'t control allows you o sharpen thepieture qualiO by making dark portio_' of the picture darker and light portions of the pictut_ more nz_tieeable. Normally. you will probably want to select MED. in certain circumstances, however, PICTURE a • SOUND • FEA_P_S BRIGHTNESS COLOR PIC_EE • INSTALL SHARPNESS TINT you may pt_'fer I_,[INor I_,IAA_.
Using Besides the normal volume level control your TV also has individual soundadjustment controls, }bu can u_e TREBLE (high frequency'), BASS (low frequenc3_, and Speaker BALANCE to,[_rther adjust the sound playback of 77"prob_ams, the On-screen Subrnenus: SOUND • PICTURE TREBLE m _s • FEA'['UI_.ES • INSTALL BALANCE AVL INCR-SUR_OUHD on the the remote control to show the Press MENU/SELECT button on-screen 2 3 4 5 lnenu, SOUND Press the CURSOR RING DOWN once to highlight SOUND.
Using the On-screen Subr_enus: Sound Vou may have noticed the peaks and valI leys of sound that occur between program changes or at commercial breaks. The volume levels o_en vat_' con_'iderably. By turning on the AVL (Audio Volume Leveler) control, you can make your 77: prod_e a more consistent volume level. Follow these steps to turn the AFL control SOUND • PICTURE TREBLE • FEATIINES • INSTALL BALANCE AVL INCR-$URNOUND iw • BALANCE • AYL • INCN'SIINNOIIND I on.
Using the On-screen Submenus: Sound Based on the signal being received, you select various surround-sound modes." MONO, SPATIAL, STEREO, INCR. SURROUND, or DOLBY* VIRTUAL (_rtual Dolby Surround). (See descriptions of the options to the right.) e_ Surround-sound ®®® ®®® In stereo: select STEREO, INCR. SURROUND, or DOLBY VIRTUAL ®®® INCR, (Incredible) SURROUND enhanoes stereo pro_ams by making the sound broader arid fi_ller.
Using the On-screen Subnnenus: Sound Vou can enjoy stereo programs on your .1 TE it has both an _pl¢/_er and twin _v)eakers through which stereo sound can be heard. Follow these steps to select the STEREO mode. SOUND • PICT!INE TREBLE I _s • FE_NNES • INSTALL _LANCE AVL INCE-SUENOUND on thethe remote control to show the Press MENU/SELECT button on-ser'_en ulenll. 2 3 4 5 Press the CURSOR RING DOWN once to highUght SOUND. 6 Press the STATUS/EXiT exit the menu.
Using the On-screen Submenus: Seund _ or SecondAudioP_yjm, _ an addi- k.Mional part of the stereo broadcast ,s;_ton, Sent as a thinl audio channel, a SAP can be heard apart from the current 7Y program sound. 7Ystations are free to use SAP for any number of purposes, ,_ch a,_the broudca,_t of a second language or other audio information. Q®® Ira S_4P signal _ not pr_ent with a selected program, the SAP option cannot be selected.
UsingtheOn-screen Submenus: Sound /7_he BAA_5"BOOST eontrol allows you to increase the low=frequency range of the T_ s sound. This ereate__a deeper,,[_ller _ound. Follow thence_teps to turn BASS BOOST ON. 1 2 3 4 5 6 Press MENUISELECT button on the remote control to show the onsereen ulenll. Press the CURSOR RING DOWN once to highlight SOUND, Press the CURSOR RING RIGHT to enter the SOUND submenu. Press the CURSOR RING DOWN repeatedly until BASS BOOST is highlighted.
Using the On-screen TV eome4' with an on.s'cree_ clock, }'bu II need to set the clock befl)re you can u*e the Ttmer fiature. During normal operation, the time appear*' on the screen when you press the STATUS/E._TT b_tton. You can show the lime on Submenus: _viur screen cor_tan@ bO'w.rning the TIMER DISPLAY conrad on (seepage 40).
Us?ng the On-screen Submenus: Features After you have set the TV's clock, you can use your TV to keep up with the time on screen. }fin can also set the timer to switch to another channel, and, if you want, turn the TV off The 72met's DISPLAY control allows you to s!_w the time constantly in the upper right corner of the screen.
UsMg the On-screen Submenus: Features y)h u can set the _mer to switch to a selected annel at a ,,pee_[ictime while you are watching another channel, or when the 77z is in stundby m_Me.(Standby mode is when the TV is plugged into the wall outlet but turned off) U" you want, you can also set the TV to turn _'at some time q#er the TV switches' ehanne&. Follow the steps below to set the _mer 's START TIA4E and STOP TIA4E.
Using the On-screen Submenus: Features F;,llow hieh the_ve steps will to select the Timer switch thethechannel TE. to on thethe remote control to show the Press MENU/SELECT button on-screen 2 3 4 • PICT!IRE • SOUND TIMER AutoLod( • INSTALL PIP CLOSEDCAp FOP.HAT lnenu. Press the CURSOR twice to highlight RING DOWN • • • • AuI_L_E PIP CLOSED CAP FOHHAT TIME START TIME STOPTIME CHANNEL _TIVATE FEATURES. Press the CURSOR RING RIGHT to enter the FEATURES submenu. Press the CURSOR RING RIGHT.
Using the After On-screen Subnnenus: you have set the TIME, START TI_4E, STOP TI_4E, and CHANNEL, you must activate the Timer,[br it to operate, Your options are to set the Timer to work ONCE or DALLY Set ACTIVATE to OFF f you don't want to use the Ttmer, • PICTURE • SOUND • INSTALL TIHER AutM_& PIP CLOSED CAP FORHAT FEATURES / • • • • AuloL_k PIP CLOSED CAP FORMAT TIHE START TIHE STOP TIME CHANNEL ACTIVATE on the the remote control to show the Press MENU/SELECT button on-screen 2 3 4 lnenu, F
Using the On-screen Subnnenus: Features T_ene AutoLoekXM feature can help parts control what their children wateh on 77,'.AutoLoek TM doe__this by using the content advisoriez _sent by broadcasters or other program providers. After you program AutoLoek TM, it can respond to the content ad_qaries and bloek programs that contain content that you may consider ob-leetionabLe_ff'en_@e language, violet_e, or sexanl situatious.
Using the On-screen _rour AutuLock TM access code allows I you to enter the AutuLock TM submenus to set up or turn offblocking. Your access code is also the "'ke_ " that unlocLE_programs or channels that are being blocked I_' dutoLock TM. • TIHEB • 4 5 6 7 8 9 PIP • €&OSEAOff_ Press the MENU/SELECT button on the remote control to show the on-screen FOBHRE FEATURES lnenu, • IIMEA P_sstheCURSORRINC DOWN t_icetohighlight FEATURES. • PIP • _LOSEA _P • FONtAI Press the CURSOR RING RIGHT.
AFter you have set up your p_sonal access code (see page 45)_you are tea@ to select the channels or program sources you want to block. FEA_.IKE_ • TIHEK ACCESSUOBE [Imam • PIP • CI_$EB Off_ • FOKHAT on thethe remote control to show the Press MENU/SELECT button on-screen inenu, FEATUBE$ DOWNthetwice Press CURSOR to highlight RING FEATURES. • W_ER • PIP • U_SEB _P • FOP$tlI RIGHT. Press the Thell CURSOR press the RING CURSOR RING DOWN oitce to highlight the AutoLock colttrol.
Using the On-screen you have set your personal ax:cess code (see page 45), you can block programs by specific movie radngs. Subrnenus: Features /t_ FEATUTIES FEATUEES • TIHEA 1 2 3 Press the MENU/SELECT button on the remote control to show the on-screen menu. 4 5 Press the CURSOR RING RIGHT again to highlight ACCESS CODE. • PIP • O._SED lAP • FOAMAT P_sstheCURSORRING DOWN t_icetohighlight FEATURES. Press the CURSOR FEA_.IRES • TIHER g,iut_Lock • PIP • CLOSED 0_P • FIlRHAT RING RIGHT.
Us?ng the On-screen Submenus: Features yOTvUalso can block programs by _E?gee_f!e ratings. Follow these simple steps, FEATURES • TIPPER 1 2 3 Press the MENU/SELECT button on the relnote control to show the on-screen menu. 4 Press the CURSOR RING RIGHT again to highlight ACCESS CODE. PresstheCURSORRING DOWN t_cetohighlight FEATURES. Press the CURSOR RING RIGHT. Then press the CURSOR RING DOWN once to highlight the AutoLock control W-Y Enter your four-digit ACCESS CODE.
Using the BLOCKI_G control can be thought as the "'master switch ",['or dutoLock TM, Use it to _urn ONor OFF all qf the seltings (based on ratings), This control does not affect channel blocl_' (see page 46), On-screen Subnnenus: Features T_e 1 2 3 FEATURES AU_ESSLODE L_ • PIP • CLOSED t_P • FOEHAT Press the MENU/SELECT button on the remote control to show the on-screen FEATURES FEATUEE_ inenu. • TIHEE P_sstheCURSORRING DOWN t_cetohighlight FEATURES.
Us?ng the On-screen Submenus: Features Ino addition to blocking rated programs r channels, you m@' also choose to block all programming that is unrated. Unrated programming consists of shows that the MPAA _4otion Picture Association _?fAmerica) or the TV broadcasters have chosen not to rate. 1 2 3 4 FEA_IEES • TIHEE • PiP • CLOSED CAP • S_EHAT Press the MENU/SELECT button on the remote control to show the on-screen menu. FEATURES • IIMER P_sstheCURSORRING DOWN t_icetohighlight FEATURES.
Using the On-screen Ss_ome programs contain no content advirie_E'from the _4otion Picture Association of America or the television broadcasters (seepage 44). To block programs with no rating, follow these steps. Submenus: Features FEATUEES • TIHEE ACCESS UO_E [:_mmml • PIP • ULOSEDLAP i 2 3 4 FOEMAT • Press the MENU/SELECT button on the remote control te show the on-screen menu. FEATUEES FEARIRE$ Press the CURSOR RING DOWN twice te higlflight _ATURES.
UsingtheOn-screen Subnnenus: Features z/_toLockr:_ provides a screen that s!u_!vs the settings you have selected. Here s !u_w to access the screen. the control twice, Your Pressremote the STATUS/EXIT button on AutoLock TM setthlgs will appear on the screen. NOTE: If you have blocked specific subvatings, such as Vfor Violence Jnthe TV-PG category, these blocked subratJngs will not appear Jnthe review. Nonetheless, the subrathtgs are still blocked according to your selections.
Us?ng the On-screen the voice content of television program_' on the TV screen. Designed to hell) the hearing impaired, this feature uses on-screen text boxes to show dialogue and conversations while the TV program is in pro_ss. • PIC_HE TIF1EM • SOUND AutoLocH a • INSTALL Subnnenus: Fea_tures FEA_ME$ a • Aut_Lo& PiP CLOSEDCAP FOHMAT TIRE STAHTTIHE • PIP • CLOSEDCAP $10P TIME CHANNEL • FORMAT ACTIVATE on thethe remote control to show the Press MENU/SELECT button on-screen 2 3 4 5 lnenu.
Us?ng the On-screen Subrnenus: Features yodear TV's wide screen (16:9 aspect ratio) livers a home-cinema experience net possible with a couventioual (4:3 aspect raao) set. High-definitkm (HE)) progr_ _orig_ating in 16:9 format and other widescmen:format video source,_'appear ttu_relifelike, dramatk:, and theatrical. Border bars are diminished or eliminated. ?,lost anamarphic-D VD progr_ _will fdl the wide screen without border bars, o° I_¢_ure$ appear TV'$ wide mm_ lif_lik_ _reer_ @ @ ,_@ 0 0 .
Using the On-screen Selecting a Picture Format Using theTV Buttons Should y_mr _vnote control become/ost or oth_v'wLqewta_ailableJbr use,,lbllow the steps' below to use the buttons on the front of the 77_"to access' the on_creen menu and select apicture-format control. simultaneously. Press the VolumeThe + and on-screelt - buttons menu appears. repeatedly Press the Channel until FEATURES Down burton is highlighted. Then press the Volurae + button to enter the FEATURES submenu.
Using the On-screen Submenus: Features z/_. tive Control TM Measures and co_cts all incoming signals to provide the best picture-qualiO; settings. l_Tten you ctu;ose to turn Active Control TM on, picture sharpness and noise reduction are controlled automatically. Active Control TM adapts picture settings continuous()' and automatically. ® NOTE: Active Control TM is not available for signals connected to HD 1NPUT-AV 4 HD 1NPUT-AVS.
AppendixA yOHD Set "sltD inputs*(lID IhrPUT-AV 4 and IIVTUT-AV S) are designed to accept high-definition signal standar& 480p and 1080i a_ specified by the Electronic Industries Assaciation. Output standards' may vary by manufacturer. Refer to the directions-for-use manual Jbr the digital equipment betbre connecting. HD INPUT-AV Your 77I:_HD input.lacks are compatible with some digital equipment having RGB output' _,'ith "%yneon green" or RGB with '_s'eparateH and V ,_nc.
Appendix B IN PUT-AM 2 Preduct Type VIDEO (composite): I Vp-p, 75 ohms AUDIO: 500 mVrms, 30 l_hm Rear-projectionHD'rV Monitor Television System HD INPUT-AV 4 NTSC standard Channel ComponentVideoYPrPb/RGB (See pzge 57) AUDIO: 500 mVrms, 30 kohm Coverage HD INPUT-AM 5 Digital Video Interface (DVI) (See page 57) AUDIO: 500 mVrms, 30 kohm VH F: 2-13 UHF: 14-69 Cable TV: Midband Superband Hyperband Ul=raband Ambient VIDEO/AUDIO OUTPUT VIDEO: I Vpp, 75 ohms AUDIO: Fixed:500 mVrms into >10 kohm Vari
Appendix C CSor space refers to how colors are [_ned and appear on your TE. Your TV_' default color-space setting for HD [NPUT-AV4 is YPbt_. RGB is also an option. [!'the picture i' color looks grossl)' incorrect, tO' changing the color-space setting on either the digital equipment or the 77,: For more information on setting the color space on the digqtal equipment, see its directionszfor-use manual To set the TV's color space,,lbllow the steps below.
General Information: Care and Cleaning WARNING Concerning Stationary Images on theTV Do not leave picture border bars or stationary This can cause uneven picture tube aging. Screen: images on screen for extended periods of time. Normal use of the TV should involve the showing of pictures that contain cons 'tautly moving arid chungmg huages that fill the screen.
General CheckThis List of Symptoms and Possible Solutions Before Requesting You may be able to solve the problem yourself. Charges for TV installation and adjustment ered under your warranty. Informatlon:Troubleshootlng Service of customer controls are not cov- Tfyou need to call a customer service representative, please know the model number arid serial number of your product before you call. This intbrmation is displayed on the back of"the product.
Genera/ I nfermation: T_u blesheet;ng Difficulties and Possible Solutions The picture has no color or colors (*Q refers to the Quick Use and Setup Guide that came with yourTV.) are not correct - Check to ensure that you have made connections correctly. Seepages *Q-L *Q-Z 7-10, and 12-16. • Tfyou have eonnecxed digital equipmen_ to the HD inputs, eheel_'ehange the color-space setting on the equipment or T'v; See page 59.
General InferTnat;en: Glossary of Teleyis;en Terms Active ControF _ • Proactive video-control system for NTSC sources. Active Control TM coritiunnas]y measures and corrects the incumirig sJgnids to provide the best pJctore possible. NTSC - National Television Sturldards Committee format devised irl the 1940s for TV broadcast arlidog video signals (525 lines: 30 Hz).
General Informat;on: Index A Active Control TM, 56, 63 Alternate Channel (A/CH), 28, 63 APAC TM, 5 Audio Out Control, 10 Audio_qdeo Inputs (Definition), 63 AutoChron TM Control, *Q-5, *Q-6 AutoLock TM Control Access code, 45 Blocking channels, 46 Movie ratings, 47 No rating broadcasts, 51 On/off control, 49 Settings reviev4 52 Setup Code, 45 TV ratings, 48 Understanding AutoLock TM, 44 Unrated broadcasts, 50 Auto?Jcture TM, 26 Auto ?to.
Ph?lips Factory Ser_tlce Locations • Phlladelphla/S New Jersey Atlanta/N Georgia ik Indicatlm In-Home Service Milwaukee: call Chicago Only _/_ - '\ Tampa/W Florida _,_t. Myars/SW Florida Mlaml/SE Florida Cincinnatiand Columbus:call Cleveland Nashvilleand Chattanooga:call KnoxwIle Washington/Baltimore:call Philadelphia Charlotte: callAtlanta All Flodda locations;call Tampa • Indlcetee In.Home_,arry.
Philips Factory Service Locations QUALITYSERVICE IS AS CLOSEAS YOURTELEPHONE! SIMPLYLOOKOVERTHE LISTBELOWFORTHENUMBEROFA FACTORYSERVICECENTER NEARYOU.YOUR PRODUCT WILLRECEIVE EFFICIENT ANDEXPEDIENT CARRY-IN_ MAIL-IN, ORIN-HOMESERVICE_ ANDYOUWILLRECEIVE PEACEOFMIND, KNOWING YOURPRODUCTIS BEINGGIVENTHEEXPERT ATTENTION OF PHILIPS' FACTORY SERVICE. CO]_MEETOBTERIF_HOTF_E SERVICEAPF_S VEHTERAPTDEET EFFTCACE SOIT PAF_ COURRIER,_ OOMTCILE,UU EH SE _RI_SERTANT_ UR CENTREDE SERVTCEPHILIPS.
TETs p_ge TsTr_ten_Tor_ally left bl_nl_
ThTs p_ is Tr_tentior_lly I_f_bl_r_l¢
ThTspageis T_ten_io_allyleR:bl_l_
Thi_ p_ge Tsin_tTon_lly left blank,
Thispzge Tsin_er_tTon_llyleft blank, 71
Limited Warranty PROJECTION TELEVISION One Year Free I._bor One Year Free Service on Paris Two Years Free Service on Cathode Ray Tube Paris / 30 days Free Service on ProiectJon "1"VScreen ThTs product can be repaired in-home. WHO IS COVERED? MAKE SURE YOU KEEP.,. You must haveproofofpurchaseCo receive warrantyservice. A sales Pleasekeep your sales receipt or other document showing proof of Attach itco this owner's manualand keep both nearby.
CONTENTS _ Important Notice/Warning ............................................................ 1 Hooking up lhe TV .................................................................. 1-2 Operating the Television and Remote Control ........................ 24 Using the Installation Features ................................................ 4-6 Using the Picture-in-Picture (PIP) Feature .................................. 7 Adjusting lhe Manual Converge Controls ....................................
Antenna Signal Tlis connection WILL supply stereo sound to the TE Connect the antenna signal to the ANTENNA IN 75_) jack on the back of the TV. m NOTE: Refer to the sections on TUNER MODE and AUTO PROGRAM on pages 4 and 5 of this guide. Set TUNER MODE to the ANTENNA option. Run AUTO PROGRAM to store all available cable channels in the TV's memory. i! : BackofTV , ®_ ® 4:::°®® ® • ,® II ®, ®L ® USING THE TV r.
VCR control buttons Press to pause, rewind, stop, play, or fast forward a videotape. Press to turn tile TV on or oft: TM TV oVCR • ACC (Mode buttons) Press to send remote signals to either the TV, VCR, or other accessory devices such as cable TV conveners, satellite receivers, DVDs, or laser disc players. (You may need to progrmn the remote to work accessory devices. See pages 18-23 in tile Directionsjbr Use manual thal came with your TV.
MENU U ADJUSTING OR SETTING MENU If you don't press any remote buttons, the menu will automatically disappear after about 20 seconds. To bring the menu back, press MENU/SELEC% Sometimes not all the menu items are visible on the screen. If more items exi_ in the SOUNI) OPTIONS A me_zu is simply a list of options. You can adjust or set your TV s on-screen menu options by pressing buttons on the remote control.
AUTO PROGRAM.fbature will scan jbr channels with , clive broadcast signals and store those channels in the TV s memorw It will tune up to 69 channels' [br antenna, and up to 125 ehannels.ibr cable. After you run AUTO PROGRAM, you can use the CH(annel) +/- buttons to quickly and easily select stations. You can also press the PROG. LIST (Program Lis 0 button on your remote to see a list of the channels'. Philips strongly recommends that you run Auto Program.
SETTING TIME The CLOCK button 0 on yot*r remote provides aUG[herway in which you can set l{herV's clock manually. After setting the clock, you will be able to access the time by pressing [he S I'ATUS/EXI I
p !_!ure.ln-Picture (PIP) is"the sfu;wing of iwo pictures on the 7 k screen at the san_ tin--he main screen picture and one small picture, or PIP. Because your set has two tuners, you can enjoy all the be_fits of PIP without using a VCR as"a secoM tu_rjbr )_ur PIP picture, Tune to your _vorite show on t_ main semen with tu_r one while scanning ot_r ehannets with tuner two in the PIP window. ALso view t_ AVI, AVZ or AV3 sources in PIPWhldow the PIP window. NOTE: CVI can*w* be displ_,ed in the PIP a4ndow.
Screen Convergence is the correct lining up of'the red and blue light paths n the TVscreen. if'the paths don t line up, colorj?inges will appear around objects on screen. El'no eolar fh'nges show, then no convergence adjustments are neeessar_ NOTE: Allow the TV to warm up 20 minutes before adjusting convergence. See the chart to the right.fbr guidance as to which convergence controls to use. Press the MENU/SELECT button. The menu appea_. Press the CURSOR RING RIGHT to enter the PICTURE submena.