Home Theater Master LCD Screen Preprogrammed and Learning Remote Control R MX-500™ Operating Manual
Table of Contents 1. Introduction 3 2. Batteries 4 A. Battery Installation B. Battery Life 3. Summary of Operations 5 A. Description of Devices B. Preprogrammed Codes C. Learning From Other Remote Controls D. Macro Operations E. Favorite Channel Buttons F. Punch Through Operations G. Editing LCD Text H. Cloning The MX-500TM I. All Other Operations J. LCD Screen And Button Layout K. System Settings 4. Programming the MX-500TM to Control Your Components 11 A. Using Preprogrammed Codes 1.
Table of Contents C. Erasing Macro Functions 1. Erase M1, M2, M3, POWER and SYSTEM OFF Buttons 2. Erase Macro Functions In The Ten Device Buttons D. Erasing Punch Through Functions 9. LCD Button Editing 38 A. To Create or Edit Text on Function and Device Buttons B. To Create or Edit Text for Favorite Channel Buttons 10. Recalling the Preprogrammed 40 Three-Digit Number 41 11. Setting Backlight TM 42 12. Cloning MX-500 43 13. Adjustment of LCD contrast 44 14. Caution On Handling LCD Screen 44 15.
1. Introduction Congratulations! You have purchased one of the most sophisticated remote controls on the market. The MX-500TM has been designed to provide a new standard in remote control technology offering a very powerful and flexible preprogrammed and learning product. Setting up your MX-500TM to operate your components is easy. Please follow the instructions in the manual and retain the manual for future reference.
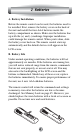
2. Batteries A. Battery Installation Before the remote control can be used, the batteries need to be installed. First, remove the battery cover on the back of the unit and install the four AAA batteries inside the battery compartment as shown. Make sure the batteries line up with the (+) and (-) markings. Improper installation could damage the remote control. When you're done, slide the battery cover back on. The remote control starts up automatically and the default devices will appear on the LCD screen.
3. Summary of Operations A. Description of Devices The MX-500TM is designed to operate up to ten components including Audio Receivers, Cable and Satellite Boxes, TV1, TV2, DVD (LD), VCR, CD, Tape and AUX. However, each of the device buttons and corresponding functions can be changed to meet your individual requirements. Almost any device that uses infrared commands can be controlled by the MX-500TM, including Home Automation, Personal computers and more.
3. Summary of Operations C. Learning From Other Remote Controls The MX-500TM can learn codes from your original remote controls. There are 26 LCD screens in the MX-500TM. Each screen (page) has ten function buttons, including the ten device buttons on the main menu screen that can be taught. In addition, there are 31 buttons and a joystick (thumbpad) that can be taught for each of the ten devices. You can teach up to 530 new functions into the remote control.
3. Summary of Operations SYSTEM OFF buttons can be made “system-wide” if they are programmed with macros. (Note: Programming the POWER or SYSTEM OFF buttons with a macro overrides the preprogrammed or learned code on the button.) See page 25 of this manual for further information. Each of these five buttons is designed to be able to send out a series of up to 20 commands you program into the buttons.
3. Summary of Operations volume control buttons (VOLUME UP and DOWN and MUTE) while all the other buttons control other equipment. You can also set up the remote to operate channel control and transport functions (PLAY, STOP, REWIND, FAST FORWARD, SKIP-, SKIP+, PAUSE and RECORD buttons) from VCR, DVD, LD, CD or any other mode while all other buttons in the remote control are controlling other components. Please refer to page 31 in the manual for details. G.
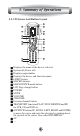
3. Summary of Operations J. LCD Screen And Button Layout 1 SYSTEM 2 9 4 4 5 3 8 + 11 PREV CH - 10 7 + 12 - 13 MENU EXIT 14 GUIDE 15 EXIT 17 -- INFO 16 AV 6 HOME THEATER MASTER LEARNING REMOTE CONTROL Displays the name of the device selected. System off (Power off) Displays page number. Displays the device and function names. LIGHT button. MACRO buttons. MAIN DEVICE menu button. LCD Page change button. POWER MUTE VOLUME CHANNEL Previous channel button.
3. Summary of Operations K. System Settings All programming is done by first entering the SETUP mode in the remote control. Press both the MAIN and AV buttons simultaneously for three seconds to enter the SETUP mode. SETUP will be shown at the top of the LCD screen. + PREV CH + - - -- AV You exit the SETUP mode by simply pressing the MAIN button.
4. Programming the MX-500TMto Control Your Components WHERE DO I START? First of all, get all of your original remote controls together. Find out what brands of components you have. You may have one or more components that do not have original remote controls, but can still be controlled by the MX-500TM. You must use the preprogrammed method for those devices.
4. Programming the MX-500TMto Control Your Components sound, you may want to start by setting up the DVD Device using the preprogrammed method described below, and then add functions from the other devices you will be using while watching your DVD video to the DVD device. For example, while playing a DVD, you will want to adjust the volume of your receiver. So, you would use the “Punch Through” method described on page 31 to put the Receiver's Volume control into your DVD Device.
4. Programming the MX-500TMto Control Your Components 1. Manually turn on the device you wish to operate. 2. Go to the SETUP mode by pressing both the MAIN and AV buttons simultaneously for three seconds until SETUP appears at the top of the LCD screen. 3. Press the P-PRO button next to the LCD screen. 4. The remote will be flashing “SELECT BUTTON”. Press the button for the device you wish to program. (For example, to program TV, press the TV button.) 5. The remote will be flashing “FROM TABLE”.
4. Programming the MX-500TMto Control Your Components There is no way of knowing which code is the one that will have the functions that more closely match your device than the others, so it is wise to try them all. See step #9 below. (Please enter the code number within 20 seconds of beginning programming, otherwise the remote will revert to the SETUP menu, and then after a period of time, it will go back to the MAIN device page.
4. Programming the MX-500TMto Control Your Components 12. When you are finished programming your remote, exit from the preprogramming mode by pressing the MAIN button and then exit from the SETUP mode by pressing the MAIN button once again. Tip: You can change the preprogrammed code for each device at any time by following the steps above. The new code will override the old code. For example, this would be done if you replaced your old TV with a new one.
4. Programming the MX-500TMto Control Your Components 4. The remote will be flashing “SELECT BUTTON”. Press the device you wish to program. (For example, to program TV, press the TV button.) 5. The remote will be flashing “FROM TABLE”. Select the device from which the scanned code will be selected. (Important: If you have already relabeled your device keys, your LCD screen will not look like the illustration above.
4. Programming the MX-500TMto Control Your Components the device back on, and reverse your UP or DOWN one press at a time, until the unit turns off. There is no way of knowing which code is the one that will have the functions that more closely match your device than the others, so it is wise to try them all. See #9 below.
4. Programming the MX-500TMto Control Your Components B. Learning Method You can program the MX-500TM to operate a device by “teaching” the correct commands to device buttons on the main screen menu, the two sub-pages within each device button, 31 buttons and the joystick located in the middle of the remote control. The MX-500TM learns these commands by receiving infrared signals directly from your existing remote controls.
4. Programming the MX-500TMto Control Your Components remote’s button until “Good” flashes twice on the LCD screen. ● Try varying the distance between the remotes until you find an optimal distance where the codes are learned on the first or second try. 1. Programming The Function Buttons 1. Go to the SETUP mode by pressing both the MAIN and AV buttons simultaneously for three seconds. 2. Press the LEARN button next to the LCD screen. 3.
4. Programming the MX-500TMto Control Your Components 6. Press the button on the MX-500TM you wish to program. Only the three MAIN, PAGE and FAV buttons cannot be programmed. 7. Press the button on your original remote control that you wish to program onto the MX-500TM. Once the MX-500TM has received the signal, the MX-500TM will flash “Good” on the LCD screen, indicating it learned the code correctly.
4. Programming the MX-500TMto Control Your Components 2. Programming The Ten Device Buttons This will program ONE learned code onto the Device button, so that when you select that Device, it will send out the learned signal as it changes to that Device's function pages. 1. Go to the SETUP mode by pressing both the MAIN and AV buttons simultaneously for three seconds. 2. Press the LEARN button next to the LCD screen. 3. Important: Press the PAGE button. 4.
4. Programming the MX-500TMto Control Your Components the Learning mode, press the MAIN button. Exit from the SETUP mode by pressing the MAIN button once again. Tip: Only follow these instructions if you actually want a code sent when changing devices. Some users do not want a Device to send out a code when changing to that device. For example: You program the AMP's TV input code on the TV device, and are in the DVD device pages because you are controlling the DVD player. The AMP's input is set to DVD.
5. Programming Favorite Channels You can create and program up to 50 Favorite Channel buttons. Each favorite channel button can send out up to 10 commands with one button press. 1. Go to the SETUP mode by pressing both the MAIN and AV buttons simultaneously for three seconds. 2. Press the FAV button next to the LCD screen. 3. Press the device button that corresponds to the component that your FAV channel will control.
5. Programming Favorite Channels Tip: If you press a wrong channel number, move the cursor by using the left or right button of the joystick and then reassign the correct channel number. 6. Return to Step #3 until you have programmed all of the FAV channel buttons that you require. 7. Once you have completed the programming and wish to exit from the Favorite Channel mode, press the MAIN button. Exit from the SETUP mode by pressing the MAIN button once again.
6. Programming Macro Buttons A “macro” is a series of commands that you choose to be sent out with the push of one button. There are two types of macro functions you can program with the MX-500TM: The M1, M2, M3, POWER and SYSTEM OFF buttons are designed to send out up to twenty commands from each of the five hard buttons. The ten device buttons can each send a macro of up to 20 commands when the device button is pressed for more than 1 second while on the MAIN page of the remote control.
6. Programming Macro Buttons 3. Press one of the macro buttons, M1-M3, Power or System Off you wish to store your macro on. 4. Press the functional buttons you wish to store in the device macro button you selected, in the order you want them stored. You can store up to 20 commands. Important: Do not press the MAIN button at the beginning of your macro, or it will not work. You can use the MAIN button at any other step in your macro. 5.
6. Programming Macro Buttons B. Programming Macro Functions To The Ten Device Buttons 1. Go to the SETUP mode by pressing the MAIN and AV buttons simultaneously for three seconds. 2. Press the MACRO button next to the LCD screen. 3. Important: Press the PAGE button. 4. Press one of the ten device buttons you wish to store your macro on. 5. Press the functional buttons you wish to store in the device macro button you selected in the order you want them stored. You can store up to 20 commands.
6. Programming Macro Buttons Tip: Remember that a single push of a Device Button that has a macro connected to it will take you to that device's function pages. You will need to hold the Device Button down for 1 second in order to send out the macro that you have created for that Device Button. Tip: Pressing the PAUSE button (the key to the bottom right of the cursor pad) during the macro programming will add a time delay of 0.2 seconds between the commands.
6. Programming Macro Buttons In this case we are going to use the M1 button to turn on the TV, the receiver, the Cable box, choose the appropriate inputs, and tune in the channel where we normally watch the morning news. 1. Press MAIN and AV simultaneously for three seconds. 2. Press MACRO. 3. Press M1. 4. Press AUDIO. (Takes you to the Audio device page.) 5. Press POWER. (The button on the top right of the remote.) 6. Press TV. (This takes you to the TV device page.) 7. Press POWER. 8. Press MAIN. 9.
6. Programming Macro Buttons 16. Press CABLE. (Back to the this device to enter the appropriate channel.) 17. Press 1, then 3, then 5. (Then press the ENT(AV) button if your cable device requires it.) 18. Press CH UP to save the macro. 19. Press MAIN twice. Press M1 to test your macro. It should turn on your Audio device (receiver for example), then your TV, then your Cable box, then change the input to Cable on your receiver, then change the Channel on your Cable box to 135.
7. Programming Punch Through Functions You can use the audio receiver volume control in a different mode (for example, Audio receiver Volume Up and Volume Down and Mute in Satellite mode) using the volume punch through feature. You can also have channel punch through (Channel Up, Channel Down) as well as eight VCR (or DVD) transport buttons (Play, Stop, Fast Forward and Rewind, Skip-, Skip+, Pause, Record) operate in another mode such as in Satellite, Cable and Audio modes. 1.
7. Programming Punch Through Functions For example, for VOL you are punching through the controls of the Audio receiver's VOL to the TV or Cable box, enabling you to control the Audio receiver's VOL when in the TV or Cable box screen. 6. Punch Through is saved when the second device is pressed. 7. Repeat from Step #2 to program Punch Through for other devices. 8. Once you complete the programming and wish to exit from this mode, press the MAIN button.
8. Erasing Existing Programming A. Erasing Learned Buttons 1. Go to the SETUP mode by pressing both the MAIN and AV buttons simultaneously for three seconds. 2. Press the ERASE button next to the LCD screen. 3. Press the LEARN button. 4. If you wish to erase all the learned functions in the MX-500TM, press the ALL button and then press the SURE? button at the next LCD screen. 5. If you wish to erase all the buttons in a single device or an individual button in the device, press the DEVICE button. 6.
8. Erasing Existing Programming 8. Press a single button if you wish to erase individual buttons one at a time. This will show all the functions in the device. Press the button you wish to erase. 9. Repeat from Step #5 to erase any other devices or learned buttons you require. 10. Press the MAIN button to exit to main Erase mode. Press the MAIN button once again to exit the SETUP mode. B. Erasing Favorite Channel Buttons 1.
8. Erasing Existing Programming 7. Press the MAIN button to exit to main Erase mode. 8. Press the MAIN button once again to exit the SETUP mode. C. Erasing Macro Functions 1. Erase M1, M2, M3, POWER and SYSTEM OFF Buttons 1. Go to the SETUP mode by pressing both the MAIN and AV buttons simultaneously for three seconds. 2. Press the ERASE button next to the LCD screen. 3. Press the MACRO button. 4.
8. Erasing Existing Programming 2. Erase Macro Functions In The Ten Device Buttons 1. Go to the SETUP mode by pressing the MAIN and AV buttons simultaneously for three seconds. 2. Press the ERASE button next to the LCD screen. 3. Press the MACRO button. 4. Press the KEY button. 5. Press one of the ten DEVICE buttons from which you wish to erase the macro function and then press the SURE? button at the next LCD screen. 6.
8. Erasing Existing Programming 3. Press the VOL button on the LCD for Volume Punch Through, the PLAY for Transport Punch Through or the CH for Channel Punch Through depending upon which Punch Through you want to erase. 4. Press the DEVICE button from which you wish to erase punch through. 5. Press the same DEVICE button once again. 6. Punch through is erased when the same device button is pressed the second time. 7. Repeat from Step 2 to erase the Punch Through for other devices. 8.
9. LCD Button Editing A. To Create or Edit Text on Function and Device Buttons 1. Enter the SETUP mode by pressing the MAIN and AV buttons simultaneously for three seconds. 2. Press the EDIT button next to the LCD screen. 3. Press the DEVICE button to display the function buttons for that device. 4. Press the function button on which you wish to write or edit text. You can also go to the second page of the device by pressing the PAGE button. 5.
9. LCD Button Editing 1. A B C 5. M N O 9. Y Z Blank 2. D E F 3. G H I 6. P Q R 7. S T U 0. + - < > etc 4. J K L 8. V W X 7. Save the text you completed by pressing the button you were writing on (the same function button you selected in step 3 or device button in step 4.) 8. Exit from Edit mode by pressing the MAIN button and then exit from the SETUP mode by pressing the MAIN button once again. B. To Create Or Edit Text for Favorite Channel Buttons 1.
9. LCD Button Editing 1. A 4. J 7. S 0. + B K T - C 2. D E F L 5. M N O U 8. V W X < > etc 3. G H I 6. P Q R 9. Y Z Blank 5. Save the text you completed by pressing the same function button you selected in step 4. 6. Exit from Edit mode by pressing the MAIN button and then exit from the SETUP mode by pressing the MAIN button once again. 10. Recalling the Preprogrammed Three-Digit Number 1. Go to the SETUP mode by pressing the MAIN and AV buttons simultaneously for three seconds. 2.
11. Setting Backlight The Backlight can be toggled On and Off just by pushing the LIGHT button on the top right side of the remote. It can also be set to go off at a predetermined time, as shown below. 1. Go to the SETUP mode by pressing the MAIN and AV buttons simultaneously for three seconds. 2. Press the LIGHT button next to the LCD screen. 3. Using the number pad buttons, enter the desired backlight time (in seconds). It can go up to 99 seconds.
12. Cloning MX-500™ 1. Go to the SETUP mode by pressing the MAIN and AV buttons simultaneously for three seconds. 2. Press the CLONE button next to the LCD screen. 3. Press either the SEND or RECV button depending upon the role of the remote control. If the MX-500TM is to be copied from, press the SEND button. If it is to be copied to, press the RECV button. 4. If you wish to clone the entire device, press the ALL button. If you wish to clone only one device at a time, press the DEVIC button. 5.
12. Cloning MX-500™ 7. Press the START button on both units to begin cloning. It will take about 40 seconds to complete the cloning and it will flash “ GOOD” upon completion of the cloning. 8. Exit from the Cloning mode by pressing the MAIN button and then exit from the SETUP mode by pressing the MAIN button once again. 13.
14. Caution On Handling LCD Screen Please note the LCD screen is breakable glass. Please exercise the following precautions when using the MX-500TM: Do not tap the LCD screen to active devices. Use the rubber buttons beside the labels on the screen. ● Keep the LCD screen dry. Wipe off any spill immediately. The MX-500TM is not waterproof. Never immerse it in water. ● Don't expose the MX-500TM to extreme temperatures. Keep it away from any heat sources. ● ● Avoid dropping the remote control.
16. Memory Lock The MX-500TM has an internal memory lock system that retains all of the programs and learned functions for an extended period in the event of battery loss. 17. Glossary Backlight: A feature that illuminates the LCD screen or keypad for use in low light or dark conditions. Battery type: The MX-500TM uses 4 standard disposable alkaline AAA batteries, or the new rechargeable alkaline batteries.
17. Glossary Discrete codes: Versions of toggle codes that only perform one function. Some examples would be "POWER ON" and "POWER OFF" or "VCR," "TUNER" and "DVD" receiver inputs. These types of signals are most often used to ensure your home theater components stay completely in sync for powering on and off and changing device inputs. Some of the preprogrammed codes in the MX-500TM contain discrete codes. If your original remote contains discrete codes, these can be taught to the MX-500TM as well.
17. Glossary frequencies higher than the industry standard. Some examples would be Bang & Olufsen, Kenwood (455KHz) and older Pioneer Elite (1.125MHz). Such devices are never preprogrammed into off-the-shelf remote controls and can generally only be used with very specific learning remote controls. Infrared: "IR" A portion of the light spectrum below our visible range, used by many modern remote controls to transmit signals. The MX-500TM uses IR signals.
17. Glossary control: up, down, left, right and enter. The Joystick on the MX-500TM can be programmed with other commands as well. The Joystick on the MX-500TM is sometimes referred to as a Thumbpad. Keypad: Generally refers to all hard buttons on a remote control, or more specifically the numeric keypad (0 through 9). LCD screen: The display device built into the MX-500TM. The MX-500TM LCD screen displays mode and programming information, along with macro commands and soft buttons.
17. Glossary Memory backup: The MX-500TM can retain its programming information for an indefinite amount of time without batteries installed. Remotes that do not feature this may have their programming erased when changing batteries. Operating distance: The distance from which a remote control can still reliably operate devices. The average infrared range is thirty feet, although the MX-500TM is capable of greater distances.
17. Glossary VCR, while the volume keys may be "punched through" to operate the audio receiver. Signals: See “ codes” or “ infrared.” Thumbpad: A feature on certain remote controls, the thumbpad is a single disc-shaped pointer which replicates five functions for menu control: up, down, left, right and enter. Also referred to as a “ joystick.” Transport control: A common term for the group of VCR/LD/DVD media operation controls, such as fastforward, rewind, play, stop, pause, etc.
18. Warranty The MX-500TM is covered against any manufacturer's defects or workmanship for a period of one year from the date of purchase. The warranty does not cover the following items: Batteries or damage to the remote from faulty batteries. ● Damage from misuse, neglect, or acts of nature. ● Products that have been modified or incorporated into other products. ● Products purchased more than 12 months from the current date.
20. APPENDIX A.
20.
20.
20.
20. APPENDIX AUX Button Name System-OFF POWER VOL UP VOL DN CH UP CH DN MUTE PRE-CH UP DN LEFT RIGHT SELECT PLAY/ MENU STOP/ INFO REW/ EXIT FF/ GUIDE SKIP-/ RED SKIP+/ GREEN REC/ YELLOW PAUSE/ BLUE 1 2 3 4 5 6 7 8 9 0 -AV Functions OFF ON/OFF VOL UP VOL DN CH UP CH DN MUTE PREV UP DN LEFT RIGHT SELECT ● Note : Because of the variety of function names for different components in this mode, we list them in A, B, C, D......on the LCD. Please write the appropriate names that apply to your components.
Set-up Code Table B.
Set-up Code Table AUDIO Manufacturer/Brand NAKAMICHI NEC ONKYO OPTIMUS PANASONIC PARASOUND PHAST PHILIPS PIONEER PROCEED RCA REALISTIC REVOX ROTEL SAMSUNG SANSUI SANYO SCOTT SEARS SHARP SHERWOOD SONY SOUNDESIGN SOUNDSTREAM SSI SUMO TAEKWANG TEAC TECHNICS THETA DIGITAL TOSHIBA WARDS YAMAHA ZENITH Set-Up Code Number 111 244 245 172 183 176 017 046 064 107 108 187 079 080 090 179 209 270 275 026 041 138 032 195 219 177 129 130 132 261 196 249 250 251 063 014 033 039 044 045 050 069 159 168 116 035 078 198 144
Set-up Code Table SAT Manufacturer/Brand ABSAT AEGIR AKAI ALBA ALDES ALLSAT ALPHA ALTECH AMITRONICA AMPERE AMSTRAD ANGLO ANKARO ANTTRON ARCON ARMSTRONG ASA ASAT ASLF ASTRA ASTRO AUDIOTON AUSTAR AXIS BEST BLAUPUNKT BLUE SKY BOCA BROCO BSYSB BUBU SAT BUSH CAMBRIDGE CANAL SATELLITE CARAT.
Set-up Code Table SAT Manufacturer/Brand ELTA EMANON EMME ESSE ENGEL EURIEULT EUROPA EUROSKY EXATOR EXTRA SAT FAGOR FERGUSON FIDELITY FINLANDIA FINLUX FLAIR MATE FOXTEL FRACARRO FREECOM FTE FUBA GALAXIS GARDINER GOLDBOX GOLDSTAR GRANADA GRANDIN GRUNDIG G-SAT HANSEATIC HANTOR HANURI HARTING UND HELLING HEIRU HELIOCOM HINARI HIRSCHMANN HITACHI HNE HUMAX HUTH HYPSON IMEX INTERNATIONAL INTERVISION ITT ITT NOKIA JOHANSSON KAMM KATHREIN KENNEX KITON KOSCOM KR KREISELMEYER K-SAT KYOSTAR LASAT LATEST LEMON LENCO LE
Set-up Code Table SAT Manufacturer/Brand LEXUS LG LIFESAT LORENZEN LORRAINE LUXOR M ELECTRONIC M&B1 MAESTRO MANATA MANHATTAN MARANTZ MASCOM MASPRO MATSUI MB MEDIABOX MEDIASAT MEDION MEDISON MEGA MELECTRONIC METRONIC METZ MICRO MICRO ELECTRONIC MICRO TECHNOLOGY MICROTEC MITSUBISHI MITSUMI MORGAN'S MOSER MULTICHOICE MURATTO MWC MYSAT NECKERMANN NETWORK NEUHAUS NEUSAT NEVELING NIKKO NLKIA NOKIA NOMEX NORCO NORDMENDE NTC OCEANIC OCTAGON OKANO ONDIGITAL OPTEX OPTIMA OPTUS ORBIT ORBITECH ORIGO OSAT OTTO-VERSAND P
Set-up Code Table SAT Manufacturer/Brand PALLADIUM PALSAT PANASAT PANDA PHILIPS PHOENIX PHONOTREND PIONEER PREISNER PREMIER PREMIERE PRO VISAT PROSAT PROSONIC PROVISION PYXIS QUADRAL QUELLE QUSDRAL RADIOLA RADIX RAINBOW REDPOINT RFT RITAR ROADSTAR ROVER SABA SAGEM SAKURA SALORA SAMSUNG SANYO SAT SAT PARTNER SAT TEAM SATCOM SATEC SCHACKE SCHNEIDER SCHWAIGER SCS SEDEA ELECTRONIQUE SEEMANN SEG SEI-SINDUDYNE SELECO SERVI SAT SIEMENS SILVA SINGER SKANTIN SKARDIN SKINSAT SKR SKYMASTER SKYMAX SKYSAT SKYTWIN SKYVIS
Set-up Code Table SAT Manufacturer/Brand SONOLOR SONY SR STARLAND STRONG STVL SUNSAT SUNSTAR TAGRA TANTEC TECHNILAND TECHNISAT TECO TELASAT TELECIEL TELECOM TELEDIREKT TELEFUNKEN TELEKA TELEMASTER TELESAT TELESTAR TELETECH TELEVES TELEWIRE TENSAI THOMSON THORN TOKAI TONNA TOSHIBA TPS TRENDLINE TRENDPLAIN TRIAD TRIASAT TRIAX TRISTAR UEC UNIDEN UNISAT UNITOR UNIVERSUM VECTOR VENTANA VESTEL VIPER VISIONIC VISIOSAT VORTEC VTECH WELA WETEKOM WINTERGARTEN WISI WITTENBERG WOORISAT XCOM XRYPTON XSAT ZEHNDER ZETA TE
Set-up Code Table TV Manufacturer/Brand ADMIRAL ADYSON AKAI AKURA ALBA ALLSTAR AMSTRAD AMWAY ANITECH ANTECNO ARC EN CIEL ASA ASBERG ASORA ATLANTIC AUDIOSONIC AUTOVOX BANK BEKO BESTAR BLAUPUNKT BONDSTEC BOSCH BRANDT ELECTRONIQUE BRIONVEGA BSR BUSH CENTURY CGE CIE CLATRONIC CLARIVOX CONDOR CONIC CONTEC CONTINENTAL EDISON COSMOS CROSLEY CROWN CS-ELECTRONICS DAEWOO DANSAI DE GRAAF DECCA DECCAVIDEO DUAL DUMONT ELBE ELBIT ELECTROVENDA ELEKTRONIKA ELIN ELITE ELMAN ELTA EMERSON ESC ETRON EUROPHON EXPERT FENNER FERG
Set-up Code Table TV Manufacturer/Brand FINLANDIA FINLUX FIRST-LINE FISHER FORMENTI FRABA FRONTECH FUBA FUJITSU GENERAL FUNAI GALAXIS GALERIA GBC GEC GELOSO GENERAL GENERAL TECHNIC GOLDHAND GOLDSTAR GOODMANS GORENJE GPM GRANADA GRUNDIG HCM HIFIVOX HINARI HIT HITACHI HYPER ICE IMPERIAL INGERSOLL INNO HIT INTERBUY INTERCORD INTERFUNK INTERVISION IRRADIO ITC ITS ITT JVC KAIDO KAPSCH KARCHER KATHREIN KAWA KENDO KENNEDY KNEISSEL KONKA KORTING KUBA KUBA ELECTRONIC KURA LENCO LG LIESENKOTTER LIFETEC Set-Up Code N
Set-up Code Table TV Manufacturer/Brand LOEWE LOGIK LUMA LUXOR M ELECTRONIC MAGNADYNE MAGNAFON MAGNASONIC MARANTZ MARSHAL MATSUI MERRIT METZ MITSUBISHI MIVAR MNARTT MTC MULTITECH MURPHY NAONIS NECKERMANN NEI NIKKAI NIKKO NOBLIKO NOGAMATIC NOKIA NORDMENDE NORMN NOVA OCEANIC OKANO ONWA ORAVA ORBITER ORION OSAKE OTTO-VERSAND PAEL PANASONIC PATHE CINEMA PATHE MARCONI PHILCO PHILIPS PIONEER PRANDONI-PRINCE PRIMA PRO VISION PROFEX PROFITRONIC QUELLE RADIOLA RADIOTONE REDIFUSSION REVOX REX Set-Up Code Number 109
Set-up Code Table TV Manufacturer/Brand RFT RITAR ROADSTAR ROSITA SABA SAISHO SAKIO SALORA SAMBERS SAMSUNG SANY SANYO SCHNEIDER SEG SEI-SINUDYNE SELECO SENTRA SHARP SHINTOM SHINTOSHI SHIVAKI SIAREM SIEMENS SIESTA SILVER SINGER SINUDYNE SMARAGO SOLAVOX SONOLOR SONTEC SONY SPECTRA STARLITE STARLUX STERN SUNSTAR SUPERTECH TADISTAR TASHIKO TASHIKO TEC TECHLINE TECHNISAT TECNISON TEKON TELEAVIA TELEFUNKEN TELEOPTA TELERNT TELETECH TELETEXT TELETON TELETON TENSAI TENSON TESLA THOMSON THORN THORN-FERGUSON Set-Up
Set-up Code Table TV Manufacturer/Brand TOSHIBA TOWADA TRISTAR TRIUMPH UHER ULTRAVOX UNIVERSUM UNIVOX VESTEL VIDEOSAT VIDEOTON VIDEOWAY VISION VOXSON WALTHAM WATSON WEGA WHITE WESTINGHOUSE YOKO ZANUSSI ZENITH Set-Up Code Number 012 016 026 036 037 222 232 144 185 010 064 025 219 236 089 108 109 149 185 197 233 108 164 185 204 275 204 108 165 178 193 230 108 149 137 204 178 064 108 149 171 208 222 108 110 149 010 064 108 136 144 159 164 170 171 137 197 231 68
Set-up Code Table VCR Manufacturer/Brand ADYSON AKAI ALBA ALLSTAR AMWAY ANITECH ASA AUDIOSONIC AUDIOTON BAIRD BANG & OLUFSEN BESTAR BLACK PANTHER BLAUPUNKT BONDSTEC BRANDT ELECTRONIQUE CIE CLATRONIC CONDOR CONTINENTAL EDISON CROWN DAEWOO DAYTRON DE GRAAF DECCA DECCAVIDEO DUAL ECONOMIC EDISON ELBE ELTA ESC FERGUSON FIDELITY FINLUX FISHER FUNAI GBC GEC GELOSO GOLDHAND GOLDSTAR GOODMANS GRANADA GRUNDIG HCM HINARI HITACHI IMPERIAL INNO HIT INTERBUY INTERFUNK INTERVIDEO INTERVISION ITT ITV JVC KAPSCH KENDO KENWO
Set-up Code Table VCR Manufacturer/Brand LIESENKOTTER LOEWE LOGIK LUXOR M ELECTRONIC MAGNAFON MARANTZ MARQUANT MATSUI METZ MITSUBISHI MULTITECH NATIONAL NEC NECKERMANN NESCO NIKKAI NOBLIKO NOKIA NORDMENDE OCEANIC OKANO OLYMPIC ONNO HIT ORION OTTO-VERSAND PANASONIC PATHE MARCONI PHILIPS PROFEX QUELLE QUESTAR RADIOLA REX RFT ROADSTAR ROYAL SABA SAISHO SALORA SAMSUNG SANSUI SANYO SCHNEIDER SEG SEI-SINUDYNE SELECO SENTRA SETRON SHARP SHINTOM SIEMENS SINGER SOLAVOX SONITRON SONOLOR SONY TASHIKO Set-Up Code Numb
Set-up Code Table VCR Manufacturer/Brand TEC TECHLINE TELEAVIA TELEFUNKEN TELERENT TELETECH TENSAI THOMSON THORN THORN-FERGUSON TOSHIBA TOWADA TVA UHER ULTRAVOX VIDEOMASTER WHITE WESTINGHOUSE YOKO Set-Up Code Number 029 017 037 039 001 037 039 069 074 006 039 017 017 030 001 037 039 069 014 015 036 038 039 040 047 048 050 053 059 070 074 079 084 037 039 070 074 014 039 017 030 029 010 029 038 039 064 029 053 010 017 029 030 Tip: When programming VCR2, use this code table.
Set-up Code Table CABLE Manufacturer/Brand ABC ANTRONIX ARCHER CENTURY CITIZEN COMBANO COMSAT COMTRONICS D-BOX EAGLE EASTERN ECHOSTAR ELECTRICORD GEMINI GENERAL INSTRUMENT GOLDEN CHANNEL HAMLIN HITACHI JERROLD MAGNAVOX MEMOREX M-NET MOVIE TIME NOKIA NSC OAK PANASONIC PARAGON PHILIPS PIONEER PTS PULSAR RCA REGAL REGENCY SAGEM SAMSUNG SCIENTIFIC ATLANTA SIGNAL SIGNATURE SL MARX SONY SPRUCER STARCOM STARGATE TADIRAN TIME WARNER TOCOM TOSHIBA UNIKA UNITED CABLE UNIVERSAL VIEWSTAR ZENITH Set-Up Code Number 103
Set-up Code Table DVD Manufacturer/Brand APEX DIGITAL DENON GE HARMAN KARDON JVC LG MAGNAVOX MARANTZ MITSUBISHI NAD ONKYO PANASONIC PHILIPS PIONEER PROCEED PROSCAN RCA SAMSUNG SHARP SONY THETA DIGITAL THOMPSON TOSHIBA YAMAHA ZENITH Set-Up Code Number 087 007 080 026 027 084 012 091 057 074 066 083 017 088 076 035 021 042 066 023 092 086 026 027 026 027 056 070 094 033 032 026 027 035 034 042 089 057 074 091 73
Set-up Code Table CD Manufacturer/Brand ADCOM AIWA AKAI AMC AMEND ARCAM AUDIO ACCESS AUDIO EASE AUDIO TECHNICA BSR CALIFORNIA AUDIO CAPETRONIC CARRERA CARVER CASIO CLARINETTE CREEK CROWN DENON EMERSON FISHER FRABA GENEXXA GOLDSTAR HAITAI HARMAN KARDON HITACHI INKEL JC PENNY JENSEN JVC KENWOOD KOSS KRELL KYOCERA LOTTE LUXMAN LXI MAGNAVOX MARANTZ MCINTOSH MCS MEMOREX MISSION MITSUBISHI MITSUMI MODULAIRE MONDIAL MYRYAD NAD NAKAMICHI NEC NIKKO NSM ONKYO OPTIMUS PANASONIC PARASOUND PHILIPS PIONEER PROCEED PROTON
Set-up Code Table CD Manufacturer/Brand QUASAR RADIO SHACK RCA REALISTIC ROTEL SAE SANSUI SANYO SCOTT SHARP SHERWOOD SIGNATURE SONY SOUNDESIGN SUMO SYLVANIA SYMPHONIC TAEKWANG TANDY TEAC TECHNICS TECHWOOD THETA DIGITAL TOSHIBA VECTOR RESEARCH VICTOR WARDS YAMAHA YORX Set-Up Code Number 103 008 182 017 042 150 042 050 051 102 181 182 187 044 107 161 178 250 044 107 044 069 107 128 171 190 125 050 069 102 026 031 051 066 003 019 051 096 112 115 119 166 033 048 081 097 126 133 177 225 226 164 251 155 044 107
Set-up Code Table LD Manufacturer/Brand DENON FUNAI KENWOOD MAGNAVOX MARANTZ MITSUBISHI NAD OPTIMUS PANASONIC PHILIPS PIONEER RADIO SHACK RCA REALISTIC RUNCO SANYO SHARP SONY TECHNICS THETA DIGITAL TOSHIBA YAMAHA Set-Up Code Number 206 207 120 152 013 032 121 211 121 121 049 013 113 032 106 117 121 120 002 049 127 075 152 013 053 110 113 032 152 106 043 129 • Note : These codes are stored in DVD.
Set-up Code Table TAPE Manufacturer/Brand AIWA CARVER DENON FISHER GOLDSTAR HARMAN KARDON JVC KENWOOD LINN LUXMAN MAGNAVOX MARANTZ MCINTOSH MITSUBISHI NAD NAKAMICHI ONKYO OPTIMUS PANASONIC PHILIPS PIONEER QUASAR SANSUI SHARP SHERWOOD SONY TEAC TECHNICS TOSHIBA VICTOR YAMAHA Set-Up Code Number 015 071 100 114 006 008 027 024 036 105 227 229 064 011 233 106 116 239 240 005 013 023 026 064 145 146 181 190 124 035 137 139 027 014 027 056 065 087 238 242 243 029 048 244 245 025 002 012 016 017 018 019 115 026 0
Set-up Code Table •AUX - Light, Switch, Tivo, etc.
OCE-0016C Rev 02