® Operation / Installation Manual RV6100 Wall Mount Rugged Style AM/FM/ Bluetooth/DVD Multimedia Receiver For Technical Assistance, please call (310) 735-2000, or for more accessories or replacement parts visit www.magnadynestore.com.
Introduction Please take the time to read all of the information in this manual. Familiarity with operation and installation procedures will help you obtain the best possible performance from your new AM/FM Stereo Multi-Media Receiver. WARNING! To prevent fire or electrical shock hazard, do not expose this product to moisture. No user-serviceable parts inside. Refer servicing to qualified personnel. Index Getting Started ...............................................3-4 USB Operation ....................
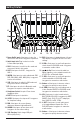
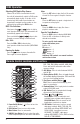
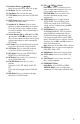
Getting Started 1 4 3 2 5 7 6 8 9 31 10 30 11 29 12 28 27 26 25 24 23 21 22 20 19 18 17 15 14 13 16 14. DISP: Short press to toggle between info and 1. Power On/Off, mute: Short press to turn the clock display. Long press to enter into clock unit on or to mute on/off. Long press to power off. settings. 2. Audio Input Jack: Plug in a device via the 3.5mm audio input plug. 3. DISC: Short press to switch to disc mode and song search while in disc mode. 4.
Getting Started (continued) 23. 2 / INT: Short press to recall radio preset or to turn Intro ON/OFF in DISC/USB mode. Long press to memorize a radio station. 26. EQ: Short press to toggle between EQ presets: FLAT-POP-ROCK-CLAS or EQ OFF. Long press to turn LOUD ON/OFF. 27. USB Music: Music media USB port. Seek Down: Press to tune the radio to a lower frequency or to navigate to previous track 28 Reset: Press to reset unit to default settings. in USB, Disc or Bluetooth mode.25. 2 / INT: 29.
RV6100 General Operations (continued) Cancelling the Sleep Timer: 1. Press the SLEEP button and SLEEP OFF will appear in the display. 2. Wait 5 seconds and the display will return to normal operation. Headphone Operations: Insert headphones into 3.5mm headphone jack located on the front panel of the radio. The speakers of the unit will automatically be muted. BEEP ON/OFF: To turn the unit's audible beep on or off, short press the SEL button until BEEP ON or BEEP OFF appears in the display.
Radio Operations Radio Settings: Press and hold SEL button to access radio settings, then short press the SEL to select between the below listed setting options. Press the + and - buttons to make your selections (ON / OFF, up or down levels): P-VOL- Radio's default volume level. AREA- USA, EUR. DX/LOC- Distant / Local. Effects seek and scan sensitivity and ability to lock into either distant weak signal stations or local strong signal stations.
AUX 1 / AUX 2 Operation Selecting the Audio Source: Note: The RV6100 does not control AUX connected devices, it just allows the audio to be played through the system. Front Audio Input: Insert the 3.5mm jack from the audio device into the AUX input socket on the front of the unit. Press the AUX button until “AUX 1” appears in the display. Refer to the audio device’s owner’s manual for proper operation.
DISC Operation Intro: Selecting DISC Audio Play Source: When a CD or DVD is inserted into the unit, the unit will automatically switch to DISC mode automatically begin to play. If the disc is left inserted any other audio source button can be pushed to navigate to other modes or also returned to by pushing the DISC button. DISC File Selection: Short press the / button to skip to next / previous audio track. File information will automatically appear in the display.
12. Navigation Buttons ( , , , ): Moves feature selection up, down, left or right. 13. OK Button: Executes a selected item. 14. Stop Button: Press to stop disc play. 15. TITLE Button: Back to title menu in DVD DISC mode . 16. GOTO Button: Select exact time, track or chapter in DVD DISC mode. 17. Speakers A, B, C Buttons: Press to select speakers to adjust independently or in groups. Press and hold any of the 3 buttons to mute the selected speakers. Press and hold again to resume the sound. 18.
BT APP Operation APP Installation: 1. Your smart phone can be used as an alternative way to control the RV6100. You will need to install the “LINEAR SERIES” app into your smart phone. The APP can be downloaded from Google Play (Android phone) or App Store (iPhone). Search for “LINEAR SERIES” and proceed to download. Install per the app instructions. Note 1. Your smart phone must be Bluetooth version 4.0 or above. Note 2. Before turning on the APP, make sure the unit didn’t pair with another device.
BT APP Operation (continued) Radio Mode AUX in 1 / AUX in 2 Mode Preset Stations Band Selection Seek Down Manual Station Selection Seek SubUp Menu Aux in 1 Aux in 2 Mode Mode USB/BT Mode Back to Previous Folder Previous Pause / Play File Next File 11
Installation • Read the instruction manual carefully before installing the unit • Make sure to connect other wires before powering on the unit. • To avoid short circuit, make sure all the exposed wires are insulated. • Secure all wires after installation. • Connect the player according to the wiring connection instruction on page 13 of this manual. Wrong connection may cause damage to the unit. • This player only fit for 12V DC device. MOUNTING THE RV6100. Take off the units front trim ring. 2.
Wiring NO. WIRE COLOR DESCRIPTION NO. 01 11 02 12 03 13 04 WIRE COLOR DESCRIPTION RED B+ 14 BLUE +12V REMOTE OUT 16 BLACK GND 07 GRAY/BLACK SPEAKER A RIGHT - 17 WHITE/BLACK SPEAKER A LEFT- 08 GRAY SPEAKER A RIGHT+ 18 WHITE SPEAKER A LEFT+ 09 PURPLE/BLACK SPEAKER B RIGHT- 19 GREEN/BLACK SPEAKER B LEFT- 10 PURPLE SPEAKER B RIGHT+ 20 GREEN SPEAKER B LEFT+ 05 06 15 1. This player operates on 12V DC. 2.
Trouble Shooting Symptom Cause Solution The car ignition switch is not on. If the power supply is connected to the car accessory circuits, but the engine is not moving, switch the ignition key to “ACC”. The fuse is blown. Replace the fuse. Volume is in minimum. Adjust volume to a desired level. Wiring is not properly connected. Check wiring connection. The operation keys do not work. The built-in microcomputer is not operating properly due to noise. Press the reset button.
Warranty ONE (1) YEAR LIMITED WARRANTY Magnadyne Corporation or its authorized agents will within one year from the date of sale to you, repair, replace or refund the retail sales price of said product or any part thereof, at the option of the Magnadyne Corporation or its authorized agents, if said product or part is found defective in materials or workmanship, when properly connected and operating on the correct power requirements designated for the specific product.