
User manual


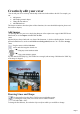
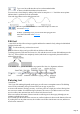
Table Of Contents
- Support
- More from MAGIX
- Welcome to MAGIX Xtreme Print Studio
- Short description
- Document handling
- Object Handling
- The Pen Tool
- Creating rectangles and squares
- Creating circles and ellipses
- Creating regular polygons (the Quickshape Tool)
- Color Handling
- Text Handling
- Printing
- Customizing
- Menus and Keyboard Shortcuts
- Introduction
- File menu
- Edit menu
- Undo (Standard control bar or Ctrl+Z)
- Redo (Standard control bar or Ctrl+Y)
- Cut (Edit control bar or Ctrl+X)
- Copy (Edit control bar or Ctrl+C)
- Paste (Edit control bar or Ctrl+V)
- Paste in place (Ctrl+Shift+V)
- Paste Attributes (Ctrl+Shift+A)
- Delete (Edit & Standard control bars or Delete)
- Select All (Ctrl+A)
- Clear Selection (Esc)
- Duplicate (Edit control bar or Ctrl+D)
- Clone (Ctrl+K)
- Arrange menu
- Utilities menu
- Window menu
- Help menu
- The help system

Creatively edit your cover
You can edit your cover creatively with the help of the tools in the toolbar to the left. For example, you
can:
Add pictures
Add simple geometric shapes
Change the font and text
Add additional text
This chapter contains a short description of these functions; for a more detailed description, please read
the reference chapters,
Add images
To add image files for your cover, simply drag them out of the explorer onto a page in MAGIX Xtreme
Print Studio, or use the Import command from the File
menu.
Imported objects always land at the very front of the document, i.e. before available playlists. In order to
put them behind the text, use the command Move to background (shortcut: Ctrl + B) in the Arrange
menu.
Drag the corners with the Selection
tool to make the image the desired size.
Tip: You can also fill a shape (e.g. the CD label or a rectangle) with an image. Hold down the "Shift" key
as the image is dropped.
Drawing Lines and Shape
Use the pencil tool to draw lines. Click for a new straight line section;
if you drag the corner points, curved lines will be created. Finish the
line with "Shift + click".
To change the line thickness, first select the object or objects which you would like to change:
Page 9