
User manual
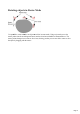
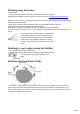


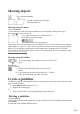

Table Of Contents
- Support
- More from MAGIX
- Welcome to MAGIX Xtreme Print Studio
- Short description
- Document handling
- Object Handling
- The Pen Tool
- Creating rectangles and squares
- Creating circles and ellipses
- Creating regular polygons (the Quickshape Tool)
- Color Handling
- Text Handling
- Printing
- Customizing
- Menus and Keyboard Shortcuts
- Introduction
- File menu
- Edit menu
- Undo (Standard control bar or Ctrl+Z)
- Redo (Standard control bar or Ctrl+Y)
- Cut (Edit control bar or Ctrl+X)
- Copy (Edit control bar or Ctrl+C)
- Paste (Edit control bar or Ctrl+V)
- Paste in place (Ctrl+Shift+V)
- Paste Attributes (Ctrl+Shift+A)
- Delete (Edit & Standard control bars or Delete)
- Select All (Ctrl+A)
- Clear Selection (Esc)
- Duplicate (Edit control bar or Ctrl+D)
- Clone (Ctrl+K)
- Arrange menu
- Utilities menu
- Window menu
- Help menu
- The help system

Skewing objects
This is part of the Selector
Tool.
Left is the original object, to the right
with a horizontal skew
Skewing using the mouse
Switch the Selector
Tool to rotate/skew mode. (The selection handles are arrow shaped) by clicking on the object.
Drag a side arrow to skew the object.
As you drag, the object skews in the direction of
movement (vertical or horizontal).
The InfoBar shows the current skew angle.
"Shift+ drag" to skew the object around its center. Hold down "Ctrl" to restrict the skew to the constrain
angles. Right click, or press "+" on the numeric keypad as you drag to create a copy, leaving the original
where it was. Or right-drag with the mouse to create instant copies, additional copies by left clicks.
You can also skew an object in the Selector Tool's resize mode using the skew areas. Read more under
Rotating objects in resize mode
.
Skewing using the InfoBar
To skew horizontally type an angle into the skew text box and
press "
¿".
To skew vertically:
1.
Click the center-right button on the 3x3 matrix on the
InfoBar.
2.
Type an angle into the skew text box and press "¿". Positive
values skew downwards, and negative upwards.
Create a guideline
Guidelines are vertical or horizontal lines and are a quick and easy way to align a series of objects on the
page. To create guidelines:
Select Display ruler (shortcut: Ctrl + L)
Drag the ruler onto the page.
or:
Double click the ruler to create a guideline aligned to the click point.
Deleting a guideline
Using the Selector
Tool drag the guideline onto the appropriate ruler (the vertical ruler for vertical guidelines, horizontal ruler
for horizontal).
Or, right click on the guideline and then "Delete".
Page 77