
User manual

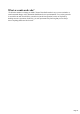

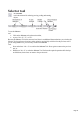

Table Of Contents
- Support
- More from MAGIX
- Welcome to MAGIX Xtreme Print Studio
- Short description
- Document handling
- Object Handling
- The Pen Tool
- Creating rectangles and squares
- Creating circles and ellipses
- Creating regular polygons (the Quickshape Tool)
- Color Handling
- Text Handling
- Printing
- Customizing
- Menus and Keyboard Shortcuts
- Introduction
- File menu
- Edit menu
- Undo (Standard control bar or Ctrl+Z)
- Redo (Standard control bar or Ctrl+Y)
- Cut (Edit control bar or Ctrl+X)
- Copy (Edit control bar or Ctrl+C)
- Paste (Edit control bar or Ctrl+V)
- Paste in place (Ctrl+Shift+V)
- Paste Attributes (Ctrl+Shift+A)
- Delete (Edit & Standard control bars or Delete)
- Select All (Ctrl+A)
- Clear Selection (Esc)
- Duplicate (Edit control bar or Ctrl+D)
- Clone (Ctrl+K)
- Arrange menu
- Utilities menu
- Window menu
- Help menu
- The help system

The constrain key
The "Ctrl" key has a special function in Xtreme Print Studio. It constrains the action of the current
operation in some way. For example, normally you can rotate an object to any angle. But in Xtreme Print
Studio, if you hold down "Ctrl" while you rotate an object, and the rotation is constrained to preset
angles.
The black line on the left can be
rotated to any angle within the circle.
On the right is the same line, but with
"Ctrl" held down it can only be rotated
to the positions indicated.
Similarly, constraining a rectangle creates a perfect square and constraining an ellipse creates a perfect
circle. Release "Ctrl", and they will not be constrained.
The constrain angle feature is defined in Options -> General -> Angle constraint
.
Page 33