
User manual
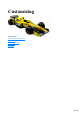
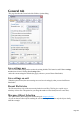
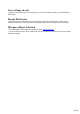
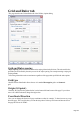
Table Of Contents
- Support
- More from MAGIX
- Welcome to MAGIX Xtreme Print Studio
- Short description
- Document handling
- Object Handling
- The Pen Tool
- Creating rectangles and squares
- Creating circles and ellipses
- Creating regular polygons (the Quickshape Tool)
- Color Handling
- Text Handling
- Printing
- Customizing
- Menus and Keyboard Shortcuts
- Introduction
- File menu
- Edit menu
- Undo (Standard control bar or Ctrl+Z)
- Redo (Standard control bar or Ctrl+Y)
- Cut (Edit control bar or Ctrl+X)
- Copy (Edit control bar or Ctrl+C)
- Paste (Edit control bar or Ctrl+V)
- Paste in place (Ctrl+Shift+V)
- Paste Attributes (Ctrl+Shift+A)
- Delete (Edit & Standard control bars or Delete)
- Select All (Ctrl+A)
- Clear Selection (Esc)
- Duplicate (Edit control bar or Ctrl+D)
- Clone (Ctrl+K)
- Arrange menu
- Utilities menu
- Window menu
- Help menu
- The help system

Custom fit
Allows you to have control over your print out, including orientation, size and margins.
The Orientation buttons can be used to choose the orientation of the printout. The scale can be altered
using the Scale
field. The top and left margin fields can be changed (these set where the top left-hand corner of the page
appears on the printer's paper).
The Width and Height
fields give you an alternative way of setting the print scale (when you change one of these settings, the
other changes to ensure the page is always printed with a 100% aspect ratio).
Multiple fit
To print multiple copies on one page, choose Multiple Fit
, enter a value for the number of copies needed across the page (rows), the number down the page
(columns), and the distance between each (gutter).
Page 221