
User manual
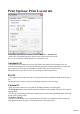
Table Of Contents
- Support
- More from MAGIX
- Welcome to MAGIX Xtreme Print Studio
- Short description
- Document handling
- Object Handling
- The Pen Tool
- Creating rectangles and squares
- Creating circles and ellipses
- Creating regular polygons (the Quickshape Tool)
- Color Handling
- Text Handling
- Printing
- Customizing
- Menus and Keyboard Shortcuts
- Introduction
- File menu
- Edit menu
- Undo (Standard control bar or Ctrl+Z)
- Redo (Standard control bar or Ctrl+Y)
- Cut (Edit control bar or Ctrl+X)
- Copy (Edit control bar or Ctrl+C)
- Paste (Edit control bar or Ctrl+V)
- Paste in place (Ctrl+Shift+V)
- Paste Attributes (Ctrl+Shift+A)
- Delete (Edit & Standard control bars or Delete)
- Select All (Ctrl+A)
- Clear Selection (Esc)
- Duplicate (Edit control bar or Ctrl+D)
- Clone (Ctrl+K)
- Arrange menu
- Utilities menu
- Window menu
- Help menu
- The help system

Print As
Normal
is suitable for most types of document.
However some printers do not reproduce consistent colors when printing bitmaps or vector objects that
are the same color (this is a fault with the printer driver). This is noticeable if objects overlap onto
bitmaps or onto objects with transparency applied to them. In this case, select Bitmap or Anti-Aliased
Bitmap
and retry.
The choice between Bitmap and Anti-Aliased Bitmap
depends on the printer and personal preference. Some printers give best results with anti-aliasing turned
off especially when printing thin lines. As a rule, using anti-aliasing allows lower resolution printing. For
example, 150 DPI bitmap printing is usually good enough for all uses-even typesetting. Without
anti-aliasing, higher resolutions may be needed which gives much slower printing.
Transparency resolution
When printing, MAGIX Xtreme Print Studio's transparency effects are created using bitmaps.
This option controls the resolution of those bitmaps when sent to the printer. Automatic is suitable for
most drawings, and means MAGIX Xtreme Print Studio automatically selects a resolution suitable for the
current printer. This might be unsuitable if printing to a very high resolution printer such as image setting
devices. In this case you may wish to control the print resolution manually by entering the desired value.
Note that modern printers often claim to be able to print at over 1000 dots-per-inch, but this is not the
same thing as "pixels-per-inch", which is what you see on screen. Generally, it's never necessary to print
at more than 600 pixels-per-inch, and typically 300 pixels per inch produces perfectly adequate print
results, especially if anti-aliased.
Fill quality
Using this option, you can choose how many steps make up the graduated fills in your document when it
is printed. The Normal
setting is suitable for most purposes. This option is dimmed for PostScript printers.
Text options
If your printer has problems reproducing fonts, select the Print All Text as Shapes
option. All text is then converted to vector shapes before the document is sent to the printer. This may
be slower, but will reproduce exactly what you see on screen.
Page 213