
User manual

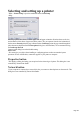
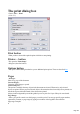
Table Of Contents
- Support
- More from MAGIX
- Welcome to MAGIX Xtreme Print Studio
- Short description
- Document handling
- Object Handling
- The Pen Tool
- Creating rectangles and squares
- Creating circles and ellipses
- Creating regular polygons (the Quickshape Tool)
- Color Handling
- Text Handling
- Printing
- Customizing
- Menus and Keyboard Shortcuts
- Introduction
- File menu
- Edit menu
- Undo (Standard control bar or Ctrl+Z)
- Redo (Standard control bar or Ctrl+Y)
- Cut (Edit control bar or Ctrl+X)
- Copy (Edit control bar or Ctrl+C)
- Paste (Edit control bar or Ctrl+V)
- Paste in place (Ctrl+Shift+V)
- Paste Attributes (Ctrl+Shift+A)
- Delete (Edit & Standard control bars or Delete)
- Select All (Ctrl+A)
- Clear Selection (Esc)
- Duplicate (Edit control bar or Ctrl+D)
- Clone (Ctrl+K)
- Arrange menu
- Utilities menu
- Window menu
- Help menu
- The help system

Printer… button
This opens the "Print Setup"
dialog box (described earlier).
Options button
This opens a tabbed dialog box that lets you set additional print options. These are described later
.
Pages
All Pages:
Prints every page of the document.
Current Page(s):
Prints the selected page or spread.
Selected Objects:
This option is available when any objects in the document are selected. When active, only selected
objects are printed. When you print selected objects, this means that the selected objects are printed, not
that all the objects within the bounds of the selection are printed.
Objects in the background layers and the guides layer never print. See Layer Gallery for more details.
Page Range:
Allows you specific control over which pages you wish to print. You can type specific pages numbers,
separated by commas, or page ranges by typing two numbers with a hyphen in between them.
Page range examples:
2
will print just page 2.
1,3,5-7
will print pages 1, 3, 5, 6 and 7.
2,3,6-8,11-12
will print pages 2,3,6,7, 8,11 and 12.
The Options
section of the dialog will indicate if your page range is OK or invalid.
Double page spreads
If the document comprises a double-page spread, you can print both sides or just the left or just the right
page.
This option is dimmed when the spread comprizes a single page (see Document Handling for how to
select single or double-page spreads). Or the "Print/export individual pages
" is active in the Page Options, so that the two pages of a double-page spread are treated as individual
single pages.
Print to File
You can select the Print to File
option to create a document that you can give to a printing company (if they are able to accept this type
of file).
After checking this option, when you click Print Xtreme Print Studio displays the standard Windows
Save
dialog box so you can specify a file name and drive for the file.
Print files have a default extension of .prn.
If you want to create a PDF file we recommend selecting the "File -> Export…" option and selecting
Page 200