
User manual

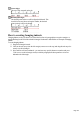
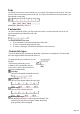

Table Of Contents
- Support
- More from MAGIX
- Welcome to MAGIX Xtreme Print Studio
- Short description
- Document handling
- Object Handling
- The Pen Tool
- Creating rectangles and squares
- Creating circles and ellipses
- Creating regular polygons (the Quickshape Tool)
- Color Handling
- Text Handling
- Printing
- Customizing
- Menus and Keyboard Shortcuts
- Introduction
- File menu
- Edit menu
- Undo (Standard control bar or Ctrl+Z)
- Redo (Standard control bar or Ctrl+Y)
- Cut (Edit control bar or Ctrl+X)
- Copy (Edit control bar or Ctrl+C)
- Paste (Edit control bar or Ctrl+V)
- Paste in place (Ctrl+Shift+V)
- Paste Attributes (Ctrl+Shift+A)
- Delete (Edit & Standard control bars or Delete)
- Select All (Ctrl+A)
- Clear Selection (Esc)
- Duplicate (Edit control bar or Ctrl+D)
- Clone (Ctrl+K)
- Arrange menu
- Utilities menu
- Window menu
- Help menu
- The help system

How to creating hanging indents
Hanging Indents, as they are known, are where the first line of a paragraph has a negative margin or a
margin that hangs to the left of the normal left margin. Numbered or bulleted lists are examples of hanging
indents.
To create hanging indents:
1.
Drag the left margin inwards.
2.
Click on the ruler away from the left margin (creates a new tab stop) and drag this tab stop to be
exactly over the left margin.
3.
Now each line will start outdented—you can insert any special character or number and press
"Tab" to move to the left margin. And (as with this paragraph) all subsequent lines of text are
indented to the left margin.
Page 157